For some reason, the internet has done a surprisingly bad job at explaining what Clipping Masks are, why they’re useful, and how to use them. Beginner artists and aspiring designers often learn to get by without them, and it’s a shame because knowing how to use clipping masks can do wonders for your workflow and save you from costly mistakes. Down below we’ll show you how to use Clipping Masks in Photoshop and why they’re super useful to artists, illustrators, designers and anyone else looking to optimize their workflow and safeguard their images.
What Are Clipping Masks?
Clipping Masks are, in simple terms, almost literal masks that can be draped over other layers. The mask limits the pixels that can be painted over on the mask to only the pixels placed on the layer below — get it? You only paint on the parts of the canvas already painted over on the layer below.
For example, if you’ve sketched out the profile of a crow, you can create a new layer with local value — something like dark blue-black for the beak and feathers without any rendering. Placing a clipping mask on top of the local value layer makes it so your brush strokes only register on the parts of the canvas where you put local value down — allowing you to render carefully on a separate layer, adding light onto the beak and feathers without having to worry about damaging the silhouette of the crow.
Sure, you can use the magic wand on the local value layer, create a second layer, and start rendering from there — but if you’ve paid attention closely, you’ll notice some disadvantages to edge control left behind by the magic wand tool. More on that next.
Why Use Clipping Masks?
Clipping Masks are Non-Destructive
Clipping Masks are an essential part of any non-destructive painting/design process. They allow you to follow form and shape without actually changing the content of specific layers — be it cropping a photo or rendering a form — and preserving the base layer in its totality. This is, quite possibly, the single greatest advantage that digital has over traditional beside the undo button — the ability to make significant changes and iterate through ideas without altering the foundation of your piece. Even oil painting, which over the course of its extensive drying period allows artists much greater freedom over experimentation and alteration, pales in comparison to the unbridled possibilities that non-destructive digital workflows provide, of which learning how to use clipping masks is an integral part.
Clipping Masks Give You Better Edges
Both shape design and edge control are essential elements to any painting — digital or traditional — and digital has a wide array of tools to help artists and designers effectively cultivate both in their paintings. The Lasso and Magic Wand tools are common for many artists and designers to preserve hard edges where they need them and for many, it’s a tried and true method of delineating space and form. However, these same designers may notice that the Magic Wand leaves jagged, stuttered edges around a form, tracing each pixel to a definitive point rather than — even with “hard” brushes — showing the natural fall-off that occurs with even a hard brush.
Because Clipping Masks follow the opacity of the base layer, the natural edge to any sort of brushstroke, hard or soft, is preserved in the mask itself. This way artists can use clipping masks in much the same way they might the Magic Wand, demarcating the boundaries of a higher layer to render or apply other effects on a definitive form, but without leaving the unattractive, toothy edge.
How to Use Clipping Masks Photoshop: Step-by-Step
Create a Base Layer
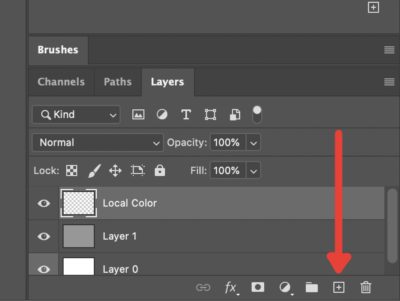
The first thing you’ll need to do is create the base layer that you will clip the mask to; this is essentially the “mannequin” that will “wear” the mask. Just hop on down into the Layers menu and press the plus sign to create a new normal layer.
Create Layer Content
The next step is to lay down the local value which will determine the shape of the mask. What you’re essentially doing here is creating the form that will “wear” the mask. Keep in mind that the mask will share the opacity of the base layer.
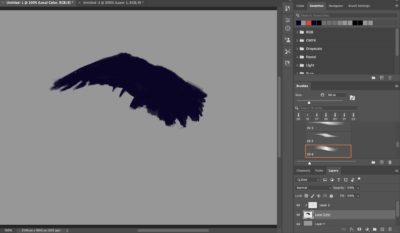
For example, in this case, we’re laying down some color to do a quick and dirty sketch of a crow.
Create Clipping Mask
Up next, we create the clipping mask. The long, textbook way is to go and create a new layer, making sure it’s placed above the base layer, right-clicking and selecting ‘Create Clipping Mask’.
The faster way is to hold the Alt Key and hover over the line between the base layer and the top layer we will use for the mask. You should see a square and an indented arrow. Clicking this will automatically turn the above layer into a clipping mask.
Paint Inside the Mask
Now that you have the clipping mask laid over the base layer, you can begin adding to the mask. As we’ve said before, whatever you paint into the mask will only be visible within the pixels on top of the base layer. Do you see why mask is the perfect word here?
In this case, we can use the mask to lay in some rendering over the local color we laid down for the crow. Note that you can set the mask to numerous blend modes like you would any other layer. In this case, we used Pine Light to add some quick lighting to define the form of the crow.
Clipping Mask Tips
The Clipping Mask & Base Layer Can be Moved Together
Say you wanted to tweak certain aspects of the composition by rearranging objects in their entirety, for example, our crow. If you just grab the Mask, this happens:

Because the local value determines which pixels are active, creating a “window” of sorts, moving the mask or layer independently will separate the image. For designers looking to create emphasis on, say, a portrait or logo, this can be a useful cropping tool. If, say, you’re an illustrator or concept artist looking to render a form or iterate lighting scenarios, this is a problem.
Luckily you can solve this in two ways. First, by selecting both the base layer and the clipping mask by holding the shift key and clicking on both layers or by linking the layers by selecting both and then pressing the Link button at the bottom of the Layers menu.
You Can Create Multiple Masks on One Base Layer
Another great aspect of masks, especially for digital artists, is the ability to stack multiple masks on top of the base layer. If you’re looking to add multiple light sources like an ambient light to complement your direct source, you can add it by simply pressing the New Layer button while the Base Layer is selected.
Photoshop will assume you want to add a new clipping mask and automatically add it to the stack. If you want to create a new normal layer, selecting any of your other layers and clicking New Layer or pressing Shift+Ctrl+N (Shift+Cmd+N on Mac) will generate an unclipped layer.
And that’s your basic handle on Clipping Masks. As with everything Photoshop, there’s a lot more to be learned about how to use clipping masks in different situations and employ them for maximum efficiency, but this should cover your most general use-cases for design and illustration.
RELATED


One response to “How to Use Clipping Masks Photoshop: A Complete Guide for Artists, Illustrators and Designers”
Thank you so much for sharing awesome tutorials.