Microsoft Teams has a habit of running in the background or launching on its own when you boot up your desktop. While this helps bring you important messages from your colleagues and clients instantly and seamlessly, the same might, at the same time, be pretty annoying to see it popping up from time to time. Needless to say, you might also end up draining your device’s battery if Teams keeps running in the background.
That’s why in this post we’ll help you turn off Microsoft Teams, prevent it from auto-starting, and then uninstalling the program off of your system entirely.
How to Force-Close Microsoft Teams app
If you’re fed up with being greeted with messages on Teams when you’re not required to see them, your best option is to force-close the app on your machine to stop it from running in the background.
This procedure involves two steps; the first is to prevent Microsoft Teams from running in the background and the next is to four-close the app to stop it from running.
Step 1: Prevent background running
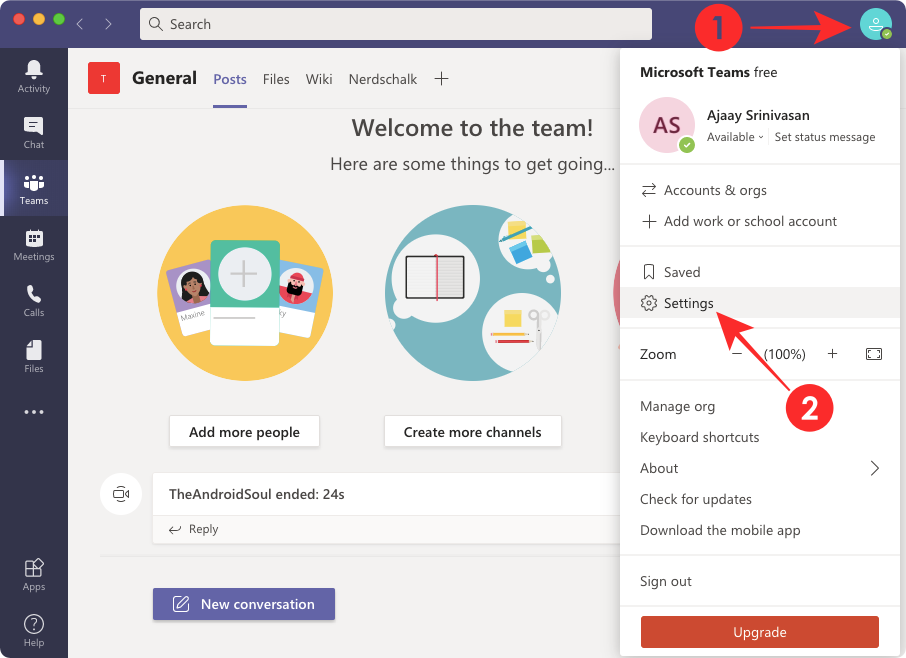
If you prefer closing Microsoft Teams with the ‘Close’ button and don’t want Teams to run all the time on your desktop, you can prevent it from running in the background. To do so, open the Microsoft Teams app on your desktop, click on your profile picture at the top corner, and then select the ‘Settings’ option.

When the Settings popup window appears, select the ‘General’ tab from the left sidebar, and uncheck the box adjacent to the ‘On close, keep the application running’ message.

This should help you terminate the Microsoft Teams app on your Mac or Windows PC instead of minimizing the app onto the taskbar.
Step 2: Close Microsoft Teams
Once you have disabled the background running of Teams, you can now proceed to close the program on your Windows or macOS computer.
On Windows
You can close the Microsoft Teams program on Windows by simply clicking the ‘X’ button at the top right corner of the Teams window. If that doesn’t work, you can use the “Alt + F4” keyboard shortcut with the Teams window active to force-close the app on Windows. 
The “Alt + F4” keyboard shortcut won’t work if the Teams screen isn’t active on Windows. In such scenarios, you can force-close the app by summoning the Task Manager on Windows. To do this, press the “Ctrl + Shift + Esc” shortcut on your keyboard.

Now, select the Microsoft Teams program from the list of active apps, and click on the ‘End Task’ button at the bottom right corner of the Task Manager window.
The Teams app will now be shut down and will only open the next time you intentionally open it on Windows.
On Mac
You can close the Microsoft Teams app on a Mac by clicking the Close button at the top left corner of the app window. In case you can’t quit the app normally or if Teams stops responding, you can force-close the app using the “Command (⌘) + Q” shortcut on your keyboard.
You can also do it by going to the app’s menu in the Menu bar and clicking the ‘Quit Microsoft Teams’ option.

If none of the aforementioned steps work, press the Option, Command, and Esc keys together on your keyboard to bring up the Force Quit window.

In this window, select Microsoft Teams from the list of active apps, and then click on the ‘Force Quit’ button at the bottom. You will now be asked to confirm the process in a new dialog. Here, click on the ‘Force Quit’ button to complete the exit process.

How to Turn off Autostart on Microsoft Teams
Microsoft Teams isn’t just known to run in the background but can also start automatically when your system boots up. You can however prevent the app from auto-starting by following any of the methods listed below.
Method 1: Using Teams Settings
To switch off Autostart on Teams, open the Microsoft Teams program on your desktop.
When the Teams window launches on your screen, click on your profile picture at the top right corner, and select the ‘Settings’ option in the menu that pops up.

In the Teams Settings pop-up window, select the ‘General’ tab from the left sidebar, and uncheck the ‘Auto-start application’ box under the ‘Application’ section.

This should stop Teams from reopening every time you load up your computer.
Method 2: Using Windows Settings
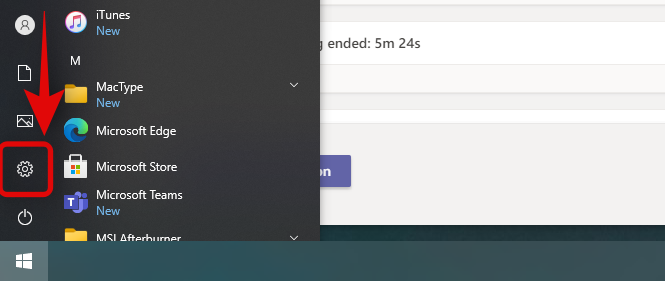
If Teams keeps restarting even after Autostart is disabled inside the app, you can try disabling it directly from Windows Settings. To get this done, open Windows Settings on your Windows desktop by clicking on the Start button and then selecting the cogwheel icon from the Start menu.

When the Windows Settings window appears, select the Apps tile.

Inside the Apps screen, click on the Startup tab from the left sidebar and toggle the switch adjacent to Microsoft Teams on the list of apps on the right-side pane.

This should stop Microsoft Teams from starting automatically when the next time you boot up Windows.
Method 3: Using Windows Task Manager
You can also disable Autostart for Microsoft Teams on Windows using the Windows Task Manager. For this, open Task Manager on Windows using the “Ctrl + Shift + Esc” keyboard shortcut.

Inside the Task Manager window, click on the ‘Startup’ tab at the top.

Inside the Startup screen, select Microsoft Teams from the list of apps running on your desktop and click on the ‘Disable’ button at the bottom right corner of the Task Manager window.
Teams should no longer start on your Windows desktop automatically.
How to Uninstall Microsoft Teams
If you want to completely turn off Microsoft Teams and aren’t planning to use it again, you can uninstall it from your desktop.
On Windows
To remove Microsoft Teams from your PC, you need to uninstall two programs – Microsoft Teams and Teams Machine-Wide Installer. Before you proceed to uninstall Microsoft Teams, make sure your close it using any of the steps we mentioned in this post.
After you have closed the Teams application, click on the Start button and go to Settings > Apps.

In the Apps screen, select the Apps & features tab from the left sidebar.

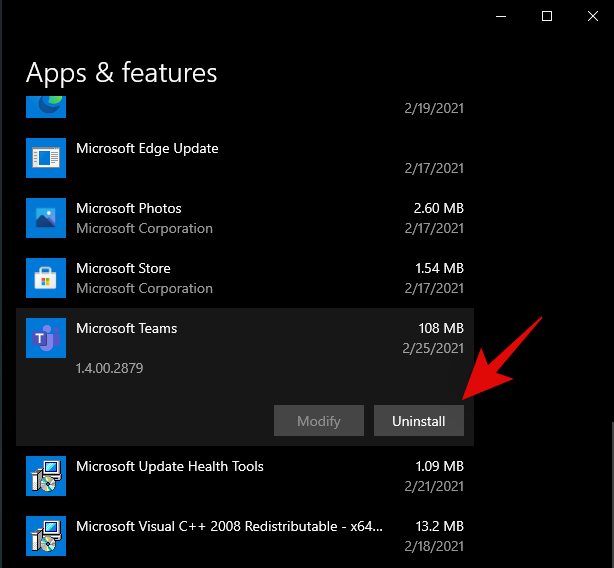
Locate the Microsoft Teams app from the list of apps and select it. When the app is highlighted, click on the ‘Uninstall’ below it.

You will be asked to confirm the uninstall process.

Repeat the above process to uninstall the Teams Machine-Wide Installer app from Windows. You should be able to see it listed inside the Apps & features screen and from there, you can uninstall it by clicking on the ‘Uninstall’ button and confirming on the prompt that appears.
Note: Microsoft Teams will also be removed from your PC if you uninstalled Microsoft Office on Windows.
On Mac
Unlike on Windows, removing Microsoft teams from a Mac is a relatively easy process. Before you uninstall the application, you just have to make sure that you have first quit it using any of the methods mentioned in the Mac section above.
To uninstall Teams from macOS, open the Finder app from the dock.
In the Finder window, select the ‘Applications’ tab from the left sidebar, right-click or Control-click on the Microsoft Teams app, and click on the ‘Move to Trash’ option.

You can now complete the uninstallation process by Control-clicking or right-clicking on the trash icon on the dock and selecting the ‘Empty Trash’ option.

Now, click on the ‘Empty Trash’ button again from the dialog that asks you to confirm the process.

Microsoft Teams should now be removed from macOS.
RELATED


Discussion