Snap Camera is a great way to add filters to your live streams and video calls. Snap Camera brings all the popular Snapchat filters that are in the market today right to your desktop. The software is compatible with both Windows and Mac and comes with easy installation programs.
Snap Camera works by capturing the virtual feed from your webcam and overlaying it with filters. This allows the filters to work with every streaming and video calling service, be it Hangouts, Microsoft Teams, Twitch, Skype or Zoom.
If you are having trouble getting Snap Camera working on your system then we have the perfect guide for you. Let’s get started.

Note:
This article is about the Snap camera software for PC, not the Snapchat camera app. If you are experience issues with the Snapchat app’s camera (black screen issue?) on your Android phone or iPhone, then visit the link below.
► How to fix Snapchat camera black screen problem
- Understand how Snap Camera works
- Restart your video call software after installing Snap Camera
- Clear Snap Camera’s Cache and App Use
- Force Restart Snap Camera
- Make sure your system meets the requirements
- Ensure that Snap Camera has access/permission to use your webcam
- Make sure webcam is turned on and working
- Make sure you have selected snap camera as your camera in software
- Choose the right webcam as your default source
- Make sure Video is enabled
- Change camera resolution and frame rate
- Check if Snap Camera works when Camera preview is flipped
- Enable Keyboard Hotkeys to trigger Lens On/Off
- Try different Lenses to see if anyone of them work
- Ensure that VPN is disabled on your computer
- Need to reinstall?
- Remove official signature from your video calling software on Mac
- Find and install an older version of Snap Camera
- Close and open your video calling app again
- Reinstall webcam driver
- Accept that some apps won’t work with virtual cameras like Snap Camera
Understand how Snap Camera works
To use Snap Camera, it’s important for you to understand how it works. It doesn’t have the hardware of its own but uses your PC’s webcam to create a virtual webcam with augmented effects. The software acts as a bridge between your physical webcam and the video calling software.
If you have multiple webcams connected to your computer, you can select the webcam you want Snap Camera to use by choosing your option from the ‘Choose Your Camera’ dropdown.
In order to use Snap Camera as the input, you will have to select it as an option from your list of webcams to make use of augmented video inside the desired video calling application.
Restart your video call software after installing Snap Camera
If the video calling software that you’re using isn’t able to detect Snap Camera as the input, you should restart it and try again. To make sure Snap Camera works, you should not only close the video call application but also exit it as many video calling software tend to stay open in the background.
On Windows, you can exit the video calling software by locating the app in the Task Manager, right-clicking it, and selecting End task. On Mac, open the software and hit ‘Command + Q‘ on the keyboard.
In case you’re using the web browser to login to your video calling service, force close the browser on your Windows or Mac device.
Clear Snap Camera’s Cache and App Use
Like on smartphones, apps and services also take up some amount of storage through the cache. If an app is taking up too much of your cache memory, it might not function properly and thus, it’s important that you adjust the cache size Snap Camera uses and also clear history.
You can do so by clicking the Settings icon in the top right corner of Snap Camera and heading over to Cache & App Use > View. Here you can configure the cache size that Snap Camera can take up on your storage and also clear history to clear Lens History, Favorite Lenses, Third-party Integrations, and Cache.
Force Restart Snap Camera
You can exit the Snap Camera app manually first and then start it again to fix the problem you are facing. Here’s how to do this on Windows and Mac.
For Windows users

Snap Camera should now show up as a webcam input option in your application.
For Mac users

Note: You can also click on the application to make it the active window on your screen and then hit ‘Command + Q’ simultaneously.
Snap Camera should now start showing up as a webcam input option in the concerned application.
Make sure your system meets the requirements
Just downloading the Snap Camera onto your PC isn’t enough to start using it. There’s a possibility that your PC might not support it. Snapchat has mentioned that in order for Snap Camera to work properly, the PC needs to run Windows 10 (64 bit) or MacOS 10.11 or later.
In terms of hardware, Snap Camera needs to meet the following criteria as system requirements:
- Intel Core i3 2.5Ghz or AMD Phenom II 2.6Ghz
- 4 GB RAM
- Intel HD Graphics 4000 / Nvidia GeForce 710 / AMD Radeon HD 6450
- 1280×768 or higher screen resolution
To check your system requirements on Windows, open Settings and head over to System > About > Device specifications. On Mac, click the Apple icon at the top left and head over to ‘About This Mac’.
Ensure that Snap Camera has access/permission to use your webcam
Modern operating systems like their mobile counterparts have also gained privacy and security controls. Similar to granting them on iOS and Android, both Windows and Mac computers also come with permission controls to access your webcam. For Snap Camera to work on your computer, you will have to enable access to your camera so that it can modify the input of your camera and change it according to your needs.
You can enable camera access on your PC by following these steps:
- On Mac: Click the ‘System Preferences’ icon on your Mac, head over to Security & privacy > Privacy > Camera, and check the box adjacent to Snap Camera.
- On Windows: Press the ‘Windows Key + I’ shortcut, head over to Privacy > Camera, switch ON the toggles adjacent to ‘Allow apps to access your Camera’ and ‘Snap Camera’.

Make sure webcam is turned on and working

If Snap Camera isn’t working on your PC, make sure your webcam is connected (if you’re using a desktop) and that is it turned ON. You can check whether the webcam is working by opening your default webcam application or trying it out on another video calling software that’s installed on your PC like Zoom, Skype, Microsoft Teams, etc.
If the secondary video calling software is able to detect your webcam and output video from it, try switching its default camera from the physical webcam to Snap Camera. This will get you with either of two results – Snap Camera is working, meaning your primary video calling software isn’t functioning properly; OR your webcam is working well but there’s something wrong with the Snap Camera software.
Make sure you have selected snap camera as your camera in software
Since Snap Camera creates a virtual webcam on your computer, it needs to be selected as a new input source in your video calling software. When configuring your video calling application, select Snap Camera from the camera input section instead of your default webcam.
Only after you select Snap Camera as your default webcam, you will be able to utilize the augmented video and Lenses features on your video call service.
Choose the right webcam as your default source
You might have chosen Snap Camera as your default camera source inside your video calling applications, but you won’t be able to see the magic created by it if you haven’t chosen the right webcam inside the Snap Camera app. If you have multiple cameras or webcams connected to your computer, then you will have to select the right webcam as your default video source inside Snap Camera.
You can select or change webcam sources inside Snap Camera by going into the app’s Settings screen which you can do by clicking on the cogwheel icon in the top right corner of Snap Camera. Inside the Settings screen, click on the drop-down menu under ‘Choose Your Camera’ and select the right webcam that you want to use for Snap Camera. Make sure this webcam is functioning properly. 
Make sure Video is enabled
For your video calling software to use Snap Camera’s augmented video and Lenses, you must ensure that video is enabled when conducting a meeting with your colleagues or when calling your loved ones. Sometimes, your call might get connected through audio but to enable video, you will have to dial a video call or enable your webcam during an ongoing call.
Change camera resolution and frame rate
Sometimes, the video feed from a webcam won’t work with a video calling software simply because the latter doesn’t support the camera’s video output resolution. Even if your webcam only supports 720p, you might still get other resolution options inside Snap Camera since that’s what acts as your default camera during video calls.
You can thus try changing the video resolution inside Snap Camera by first going on to the Settings screen which you can do by clicking on the cogwheel icon in the top right corner of Snap Camera. Inside the Settings screen, click on the drop-down menu under ‘Choose Camera resolution’ and select the video resolution and frame rate that you want to set for Snap Camera.

Note: The ability to change camera resolution is only available on Windows for the time being.
Check if Snap Camera works when Camera preview is flipped
Snap Camera offers users the option to flip the preview of the video feed sideways like a mirror. By default, this option is enabled so that you will see your video exactly how others will see the output.
You can flip the video preview by clicking on the cogwheel icon in the top right corner of Snap Camera to get to the Settings screen. Click on the ‘Flip Video Preview’ toggle to switch it off and check if Snap Camera is working. 
Enable Keyboard Hotkeys to trigger Lens On/Off
Like any application on your computer, Snap Camera works with keyboard shortcuts and you can even modify and set which keys trigger the different operations inside the app. Once enabled, you can switch ON and OFF the Snap Camera Lens at any time, even in the middle of a meeting.
To enable Trigger Hotkeys for Turn Lens On / Off, you will need to click on the cogwheel icon in the top right corner of Snap Camera and then navigate to the ‘Turn Lens On / Off’ section under ‘Hotkeys’ inside the Settings screen. Under this section, click on the ‘Add Hotkey’ button on the right-hand side, enter the hotkey shortcut you want to set and select ‘Save’. 
You can now easily switch on the Snap Camera Lens at any time and turn it off by pressing keys on your keyboard. Try enabling and disabling the trigger to check if Snap Camera is working.
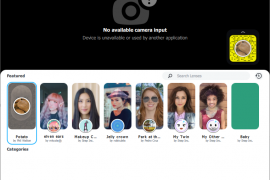
Try different Lenses to see if anyone of them work
Snap Camera offers a ton of Lenses at hand that you can switch and apply from and all these lenses are unique on their own and offer different effects on your face and background. If one of the Lenses you applied doesn’t work for you, you should try and apply different Lenses from various other categories to see if they work on your computer.
You can choose from any of the lenses available on the Snap Camera home screen and apply them by just clicking on them.

Ensure that VPN is disabled on your computer
Some of you might be using VPN services on your computers to browse the internet securely. But in case you don’t know, Snap Camera, like Snapchat, doesn’t work well when VPN is enabled. That’s because to load a Lens on Snap Camera, the software needs to connect to the internet to download the Lens from Snapchat’s servers, and like any major service, it won’t connect to the servers with VPN turned ON.
So if Snap Camera isn’t working properly, make sure that you have switched OFF the VPN service that you use on your computer.
Need to reinstall?

If the above method fails to work then it is likely that the Snap Camera app itself is glitching out on your system. You can use the above-stated steps to try and restart the Snap Camera application itself. This should fix the issue in most cases.
In case you are still unable to use Snap Camera in your desired video streaming/calling service, then you might want to start with a fresh installation of the Snapchat camera. Follow our step-by-step guide to uninstall Snap Camera from your PC or Mac.
Once the application is uninstalled, reboot your PC, and then download and install Snap Camera again on your system. This should solve any persistent applications that were preventing Snap Camera from functioning properly on your PC or Mac.
Remove official signature from your video calling software on Mac
Recent updates to video calling software including Zoom have enabled a feature called ‘Library validation’ that restricts plugins that aren’t signed by Apple or the video software. If Snap Camera only stopped working after the latest update, then you should consider unsigning the latest version of Zoom or the video calling app that you use and then enable Snap Camera on it. You can do so by following the steps below:
Step 1: Update your Zoom app or the video calling app that you use to the latest version on Mac by opening the app, heading over to the Menu bar > App name > Check for updates, and then updating the app to the latest version. After installing the update, force-close the zoom app. 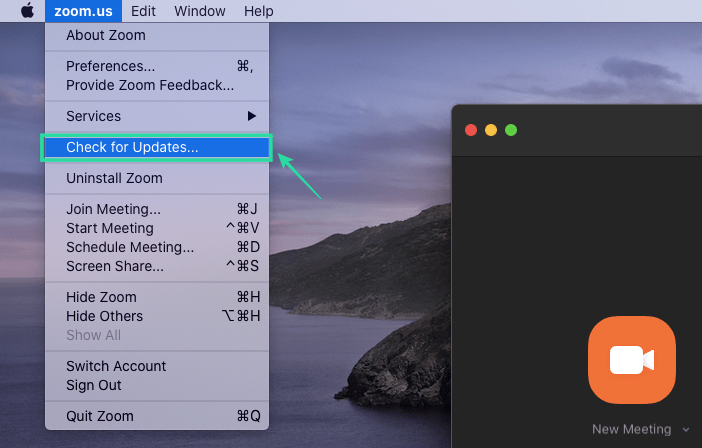
Step 2: Install the Xcode tool on your Mac by opening Terminal and entering the following command and hitting the Enter key: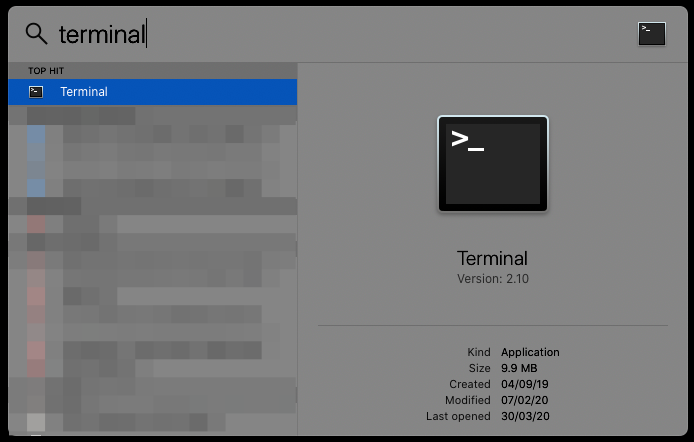
Xcode-select --install
Wait for Xcode to install on your system and then move on to the next step.
Step 3: You can now proceed to unsign the video calling software by typing the following command and then hitting the Enter key:
sudo codesign --remove-signature /Applications/<app name>

For example,
If you're using Zoom, then you should use the command - sudo codesign --remove-signature /Applications/zoom.us.app/

OR

Enter the command "sudo codesign --remove-signature"
Then drag the video calling app from the Applications folder to the Terminal window
Step 4: You can now open the video calling app and enable Snap Camera as your default camera option.
That’s it! Snap Camera should now start working on your video calling app.
Find and install an older version of Snap Camera
If reinstalling Snap Camera doesn’t solve the problem, then you can try installing an older version of the app on your PC from the Snap Camera download page. Sometimes, new updates to software could break some of its functionality and compatibility with other apps and services. While installing a previous version of Snap Camera isn’t advisable due to security concerns, it might be your best chance to get it working on your computer.
Close and open your video calling app again
Once Snap Camera is reinstalled on your system, you will need to exit the concerned application (Zoom, Microsoft Teams, Skype, etc.) where you want to use Snap Camera filters, and then start it again.
You will also need to restart any browser where you might want the Snap Camera filters to show up.
You will also need to download the filters again.
Reinstall webcam driver
In order for your webcam to work, your PC needs to understand how your webcam works. That’s where the webcam driver steps in, allowing communication between your webcam and PC. If Snap Camera isn’t working, as a last-ditch resort, you can try reinstalling your webcam driver to get it up and running again.
You can get details about your webcam driver by opening the Control Panel on your PC and heading over to Hardware > Sound > Device Manager > Imaging Devices > Webcam. Copy the name of your webcam, search the web for drivers, download and install the latest driver for your webcam.
Accept that some apps won’t work with virtual cameras like Snap Camera
Certain apps on your PC are not designed to work with third-party add-ons, including your virtual camera software. If you planned to use Snap Camera with Safari and FaceTime on a Mac, then you’re out of luck as it won’t work those apps on your computer.
We hope this guide helped you easily troubleshoot Snap Camera not working on your system. What did you think about it? Let us know in the comments section below.


10 responses to “Snap Camera not working? Here are 21 ways to fix that”
The camera is working but it keeps telling me I am not connected to the internet and I cannot see any filters or backgrounds.
(2) It’s already 2021 yet I had the same problem. Is there any solution?
Same problem for me “(Looks like you have no internet connection”) but it works on a different account on the same computer.
For those who installed/updated to 4.6.9 version of the Zoom app, there is an issue that would not allow you to select your virtual camera (i.e. snap camera, OBS etc). Zoom has not responded on the issues yet. But the solution to this is simply downgrading your version of the Zoom app.
Versions that work:
Mac OS – Version: 4.6.8 (March 23, 2020)
Link: https://zoom.us/client/4.6.19178.0323/ZoomInstaller.pkg
Windows – Windows Version: 4.6.8
Link: https://zoom.us/client/4.6.19178.0323/ZoomInstaller.exe
Snap Camera never appears on the list of apps that asked for camera access on my Mac (MacOS Catalina), so I cannot enable it. Anyone else seeing this problem? Help?
Is there a way to use snap camera (or some other backround changing app) with my iPad, to use in google meet app?
The app loads and camera works but it never populates filters. The circle at the bottom of the filters just spins.
Have you come to a solution please ? I am having the same issue
Snap camera (whatever version) only work with Cisco Jabber version 11.0, anything higher on cisco jabber will not work. Any one knows why? i tried v12, v14, but don’t show video “Snap Camera”, but regular camera works.
OMG thank you very much! i’ve tried to quit all the apps and restart it and then it works!