Privacy and security have always been of growing concern since the internet started reaching new bounds and territories. With its current growth and investment taken into account, its no doubt that every second software company now focuses on user privacy.
Apple is no different as they have introduced nifty features in iOS 15 to help enhance and maintain your privacy. Nobody likes giving away their IP addresses when browsing the internet or having trackers plot their every move.
Hence, here’s a complete guide to help you set up private browsing using various tools and apps in iOS 15. Let’s get started.
Private browsing on iOS 15
Private browsing as a concept involves various things. Maintaining anonymity, hiding your IP address, encrypting your data, and much more. There’s a couple of things that you can do in iOS 15 to maximize your privacy.
Let’s start with setting up Safari first. We will then enable a private relay or VPN depending on your subscriptions and then install additional Safari extensions.
You can then use incognito browsing on your device for complete privacy. Follow the guides below to get you started.
Related: How To Fix Safari Issues on iOS 15
Step 1: Setup Safari
Safari has dedicated options to stop trackers and increase your privacy when browsing the internet. Follow the guide below to enable or disable the necessary options depending on your preferences.
Open the Settings app on your device, scroll down and tap on Safari.

Tap and select your Search Engine at the top. We recommend you use DuckDuckGo for enhanced privacy.

We recommend you turn off the following toggles at your discretion to avoid sharing your browsing data with Apple and your default search engine provider.

- Search Engine Suggestions
- Safari Suggestions
- Quick Website Search
- Preload Top Hit
Now scroll down and enable the following toggles. Additionally, select ‘From Trackers’ when you tap on ‘Hide IP Address’.

- Prevent Cross-Site Tracking
- Hide IP Address
- Block All Cookies (Optional)
- Fraudulent Website Warning
- Privacy-Preserving Ad Measurement
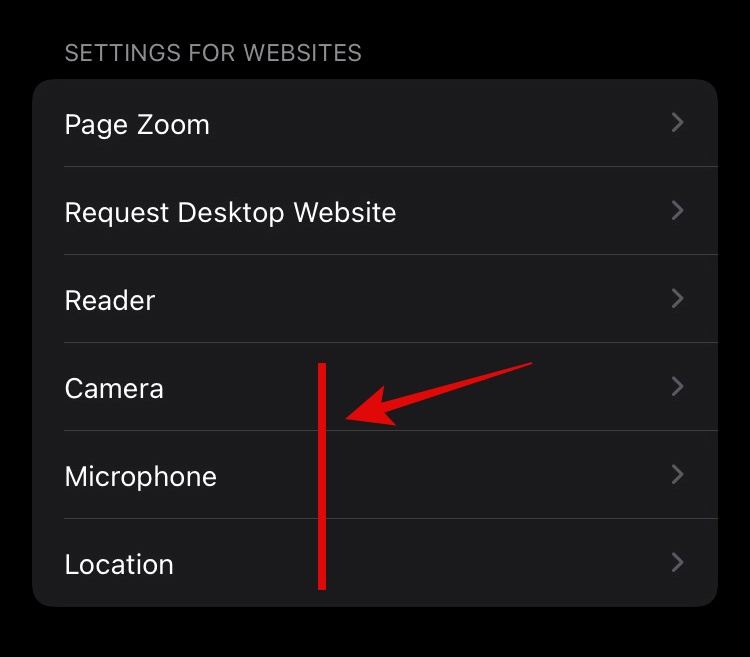
Additionally, disable the toggle for ‘Check for Apple Pay’. Scroll down now and tap on the following components. We recommend you select ‘Deny’ but you can set certain components to ‘Ask’ if you use them regularly within Safari.

Safari is now set up for maximum privacy. We can now hide your IP address entirely using the guide below.
Related: How to Disable Focus on iOS 15 [6 Methods]
Step 2: Enable Private Relay/VPN
While a private relay differs from VPN, both can hide your IP address which is essential for maintaining your privacy online. The upside of using either of these is that you will hide your IP address system-wide.
This means that apps too won’t be able to view your actual IP address. If you have a VPN subscription then we recommend you enable your VPN at the earliest.
You will end up encrypting your browsing data, hiding your IP address, and most importantly, changing your location. We recommend you opt for a paid and trusted VPN rather than using a free one.
Most free VPNs have some sort of compromising privacy policy that might put your data at risk in the future.
However in this case you can also check out Apple’s Private Relay feature. While this will only hide your IP address without the additional perks of a VPN, you will end up getting a subscription to iCloud + which means additional cloud storage and backup features.
If you’re interested in Private Relay, then here’s how you can subscribe and use it on your device.
Open the Settings app and tap on your Apple ID at the top.

Now tap on ‘iCloud’.

Scroll down and ensure that iCloud is enabled on your device. Tap on ‘Private Relay (beta)’ now.

You will now be shown the basic plan for iCloud+ for your region. The prices could vary. If you wish to select a higher plan, tap on ‘See other plans’.

Tap and select your plan at the top.

Tap on ‘Upgrade to iCloud+’.

Tap on ‘Subscribe’ now and approve your payment.

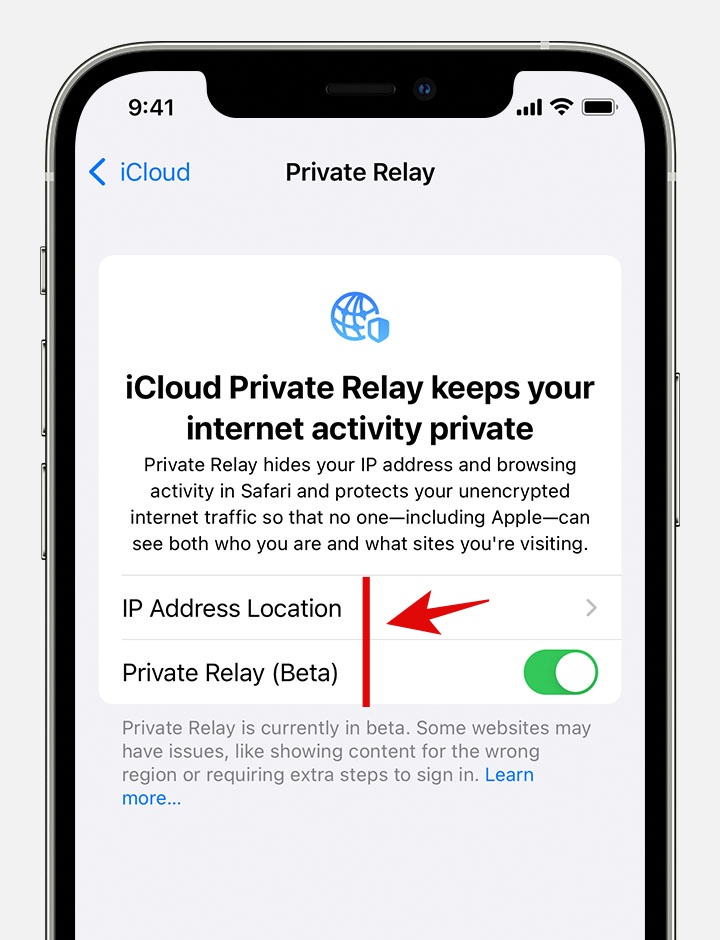
Tap on ‘Private Relay’ again once you are subscribed and enable the toggle for the same. Tap on ‘IP Address Location’ and you should now have the following options. Select either one depending on your current privacy needs.

- Maintain General Location: Using this option will allow trackers to determine your general location. Your precise location and exact whereabouts will be hidden.
- Use Country and Time Zone: This option will use a broader area to represent your location however, your IP address will still be shown within your country and time zone only.
You can now close the Settings app. Private Relay is now enabled for your device.
Related: Want to Disable App Library on iOS 15? Here are the Workarounds
Step 3: Install necessary extensions
Safari for mobile now has the option to install extensions. There are many privacy-focused extensions out there that can help you hide from trackers, block ads, and whitelist services that you like and support.
Use the guide below to find and install the desired necessary extensions on Safari. You will find our recommended extensions at the end.
Open Settings and tap on ‘Safari’.

Tap on ‘Extensions’.

Tap on ‘More Extensions’.

You will now be redirected to the app store section for extensions. Find and install the desired extensions on your device. You can then use this guide to set them up and start using them within Safari.
If you’re looking for some privacy-focused extensions for Safari, then you can check out our top 6 picks below.
- Hush | Download Link
- 1Blocker | Download Link
- KaBlock | Download Link
- BlockBear | Download Link
- Kidslox Parental Control App | Download Link
Related: What is Live Listen? | What is Voice Isolation? [iOS 15]
Step 4: Access incognito tabs
Lastly, we recommend using Incognito tabs whenever possible within Safari. Unless you’re using a service or logging into Safari, you don’t need permanent cookies on your device.
Incognito tabs will help you maintain this by deleting them all once you close your browsing session. If Safari’s new UI seems daunting, then here’s how you can access Incognito tabs.
Open Safari and tap on the tabs icon in the bottom right corner.

Tap on ‘Start Page’ at the bottom.

Select ‘Private’.

Tap on ‘+’ to add your first tab and start browsing.

You can also move your tab bar to the top of Safari. Refer to this guide by us to get you started.
How is a Private Relay different from a VPN?
The two services are vastly different but in regards to privacy, a private relay helps hide your IP address from everyone on the internet. VPN on the other hand encrypts your data packets when they are being transmitted.
This helps hide your activity from everyone except your VPN provider. Your IP address is hidden as well when using a VPN but it will be available to your provider which often puts you at the mercy of their privacy policies.
A private relay on the other hand when activated will hide your IP address from your VPN provider as well. So you might want to use either one or a combination of both depending on your privacy needs.
Should you pay for a Private Relay?
This completely depends on your budget and if you can shell out monthly charges for this service and iCloud +. We wouldn’t recommend a private relay subscription in case you are already subscribed to a VPN unless privacy is of utmost importance to you and has potential consequences to your workflow or finances.
It is, however, recommended for users not subscribed to anything, looking to enhance their privacy. However, if you feel that data encryption is more important to you, then you can opt for a paid VPN as well.
There are tons of industry-tested and trusted services out there with transparent privacy policies that should help you get the job done.
We hope you were able to easily set up private browsing on iOS 15 using the guide above. Feel free to drop your suggestions in the comments below.
Related:
- iOS 15 ‘Shared With You’ Photos: What is it and How to Find it
- List of iOS 15 Focus Mode Issues [Know Your OS]
- iOS 15 Shortcuts Not Working: Issues and Possible Fixes Explained
- iOS 15 Focus ‘Share Across Devices’ Not Working? How to Fix
- Outlook Notifications Not Working on iPhone on iOS 15: How to fix


