
Every operating system faces an issue or two from time to time. If you are an Android user, you may have come across a few bugs while using your smartphone or tablet. There is usually a way to fix a bug and that’s what we will try to do here. Now the bug in question here is related to SMS Messages on Android.
Sometimes you might see an error that states ‘Message not sent’ in the Notification panel. This might be shown to you when a message isn’t sent. The issue can get very annoying because tapping on the ‘Message not sent’ notification doesn’t do anything useful neither does swiping on the notification, as the alert keeps coming back every time the Messages app is launched.
In this post, we will help you find a possible solution to the ‘Message not sent’ problem on Android.
Choose the correct SIM
The most common reason for a failed text message could be the fact that you use multiple SIM cards. Some Android phones have Dual SIM functionality that allows you to make phone calls and send texts depending on which SIM you choose to do it with.
When there are two SIMs installed on your phone but only one is active (being billed for calls, data, and texts), that fact that you’re seeing the ‘Message not sent’ error displayed on the screen is most likely because your inactive SIM has been set as your default SIM for sending texts.
If that’s the case, you can solve the ‘Message not sent’ error by setting your currently active SIM as the default SIM for messaging. You can do so by opening the Settings app and going to Network and internet (labeled ‘Wireless and networks’ on some phones) > SIM cards (labeled ‘SIM manager’ on some phones). 
On this screen, you can choose which SIM card can execute a certain action and you can customize it the way you choose. If the SIM you have currently selected doesn’t support text messaging or you don’t have enough credits to use text messaging on it, you can set the other SIM for the same purpose.
To do that, tap on the ‘Text messages’ option (‘Default SIM for SMS’, on some phones) and select your SIM card that you regularly send texts from. 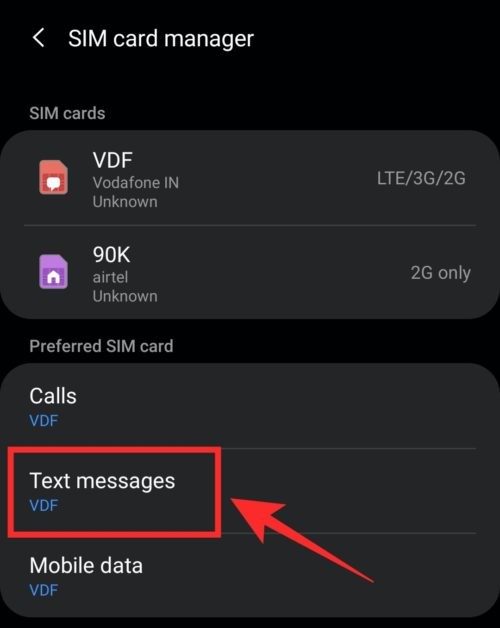
Once that’s done, you will now able to successfully send messages from your phone.
How to fix error code 17
You might also be unable to send text messages on your phone and instead get showed the Error Code 17. The issue is reportedly appearing when a user is sending a message and appears a minute or so after the message is shown as ‘Sending’. When the message doesn’t get sent, users are greeted with an error message that reads “Can’t send. Network problem. (Error code 17)”.
It’s unclear what’s the cause behind the error code 17 but some users in this Google’s support thread have claimed that there’s a temporary workaround to solve the issue. The intended message seems to get sent when you’re disconnected from a WiFi network with its mileage varying from one network to another.
To solve the error code 17, you need to unlock your phone and disconnect the WiFi connection by turning OFF WiFi on your phone. You can do so by disabling the WiFi toggle from Quick Settings.
Alternatively, you can open the Settings app, go to Network and internet, and then disable the toggle adjacent to ‘Wi-Fi’.


As for a permanent fix, your device manufacturer should provide you with a permanent fix via an update if the issue is widely reported. Once the update with a fix is rolled out, you can easily update to the latest software version of your device to get it resolved with ease.
15 Fixes You Should Try
If the above solution doesn’t work, you can try the following fixes that should work to solve your ‘Message not sent’ problem on your phone.
- Check the delivery report of the message: You can see if your message has been sent from your phone or if it has reached the receiver’s phone by enabling Delivery reports for SMS. To do that, open the Messages app, go to 3-dots icon > Settings > Advanced, and enable ‘Get SMS delivery reports’.
- Copy and resend the message again: If a message is not being sent, the next easiest solution is to try and see if you can send it again.
- Verify that the receiver’s phone number is correct: While it sounds silly, you should verify if the receiver’s phone number is correct or if there’s a number or two missing. You should also check if their country code is different and if you’re both in different countries, try to add the actual country code.
- Delete the contact and add it again: You can delete the contact by opening the Contacts app, selecting the contact, going to More > Delete, and then confirming the deletion process by tapping Delete again. You can add the contact again by dialing the number on the Phone app and adding it as a new contact.
- Check if you have blocked the receiver: Open the Messages app, go to Spam and blocked > More > Blocked contacts, and then remove the blocked contact from the list.
- Update your Messages app to the latest version: Update the Messages app from Google Play.
- Clear cache of the Messages app: Tap and hold the Messages app and click on the ‘I’ icon. Go to Store & cache and tap on ‘Clear cache’ to delete the cache.
- If you are using a third-party app, set Messages as your default SMS app and try again: Open the Messages app and tap on ‘Set as default chat app’.
- Ensure that your carrier supports SMS/RCS messaging: Some carriers no longer offer support for text messaging. Check your carrier website to see if they support it.
- Check if you have enough credit balance to send messages: Even if your carrier supports it, you might not have enough credits to use your carrier’s text messaging service. Check your current plan to see if text messaging is active on your SIM.
- Make sure you’re connected to a cellular network with good signal: Check your signal strength by going to Settings > About phone > SIM status.
- Turn Airplane mode ON and then OFF: Swipe down on your home screen, tap on the Airplane (Flight mode) icon from Quick Settings and turn it OFF after a few seconds.
- Reboot your phone: Press the hold the power button and then tap on ‘Restart’.
- Force-close the Messages app and open again: Tap and hold the Messages app, tap on the ‘I’ icon, and then tap on ‘Force close’.
- Factory Reset your Android phone: Sometimes resetting your phone to factory setting should help solve your problem but that might delete all the data from your phone; so proceed with caution. Factory reset your phone by going to Settings > System > Advanced > Reset options and then tapping ‘Erase all data’.
That’s about it. Now the ‘Message not sent’ error should not appear on your device.


4 responses to “How to fix ‘Message not sent’ error on Android”
Sms not send
Very accurate and helpful
I’m using itel A36 so how do i fix “not send” problem on it
I get error like message not send for MMS no for Text. However other app like signal can send mms.