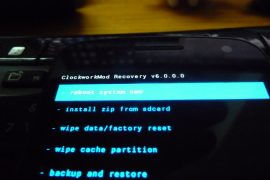
ClockworkMod (CWM) recovery – one of the most useful and famous Android tools that almost every device uses to flash custom ROMs and modifications – has gotten a major version upgrade. CWM recovery v6.0.0.0 is now available for the Galaxy Nexus as an alpha test build, which brings some very important improvements over v5.x.x.x which has been in use till now.
According to Koushik Dutta, developer of ClockworkMod, ROM backups take much less time now and are 4-5x times faster than before. Also, incremental backups of the same ROM are of much less size, only around 15-20 MB which saves quite a lot of space. These are quite impressive improvements and we hope v6.0.0.0 of CWM recovery gets ported to more and more devices soon.
Important! This is an alpha and early build of CWM v6.0.0.0, there may be a few bugs and issues. The main functions such as making backups/restores and flashing ROMs work properly, but some other miscellaneous features may have issues.
Let’s take a look at how you can flash ClockworkMod recovery on your Galaxy Nexus.
Compatibility
This hack and the guide below are compatible only and only with the international GSM variant of the Galaxy Nexus. It’s not compatible with the Sprint or Verizon Galaxy Nexus or any other device. Check your device model in Settings » About phone.
Warning!
The methods and procedures discussed here are considered risky and you should not attempt anything if you don’t know completely what it is. If any damage occurs to your device, we won’t be held liable.
How to Install ClockworkMod Recovery v6.0.0.0 on Galaxy Nexus
- Unlock the bootloader on your Galaxy Nexus by following the guide → here. This will erase all your data, including the data on the SD card, so back everything up first. This Android backup guide would help you.
- Install the phone’s drivers on the computer. Download them → here.
Skip this step if you already installed drivers while unlocking the bootloader - Download the ClockworkMod recovery image.
Download Link | Filename: maguro-touch-test-recovery.img - Download fastboot, which will be used to flash the CWM image downloaded in step 3.
Download Link | Filename: Fastboot.zip - Extract the Fastboot.zip file to the C: drive on your computer to get a folder named Fastboot with four files inside it.
- Copy the maguro-touch-test-recovery.img file downloaded in step 3 to the Fastboot folder on C drive. You should have 5 files in the Fastboot folder now.
- Enter fastboot mode. To do this, turn off the phone, then press and hold the following keys together: Power + Volume Up + Volume Down. You will enter Fastboot mode where you will see Start written in big green letters. Here, connect your phone to the computer.
- Open Command Prompt on your computer from Start » All Programs » Accessories (or by typing cmd in Run).
- Now, type the following commands in command prompt, pressing Enter after each command (check screenshot after step 9.2 for reference).
- cd c:Fastboot
- fastboot devices (this is to ensure the phone gets detected. A string of numbers and letters should appear if the phone is properly detected, as shown in screenshot below. Else, make sure the phone drivers are properly installed)

- Now, in the same command prompt window, type the following command and press Enter to flash CWM recovery:
fastboot flash recovery maguro-touch-test-recovery.img - CWM recovery will be flashed. After it finishes, type fastboot reboot in the command prompt window to reboot your phone.
- Now, in order to try out ClockworkMod recovery 6.0.0.0, turn off your phone. Then, boot into fastboot mode as explained in step 7. Then, in fastboot mode, use the volume keys to navigate to the Recovery mode option, then select it using the power button to boot into ClockworkMod recovery.

ClockworkMod recovery v6.0.0.0 is now installed on your Galaxy Nexus. Boot into it, try it out, then let us know how it works for you, in the comments below.


4 responses to “ClockworkMod Recovery 6.0 (CWM) for Galaxy Nexus”
Doesn’t work…I get the triangle error
Doesn’t work…I get the triangle error
Every step worked perfectly as advertised. Thx!
Every step worked perfectly as advertised. Thx!