Picsart photo studio is one of the best image editing apps for Android devices on the Play Store. With this next level editor comes many tools which allow you to bring your images to life by editing them creativity.
On an image, you can start by applying filters from the tools menu, make a collage with different pictures, click images with its in-built camera apply stickers and much more.
Here are some of the best tips to become a pro editor in Picsart.
Best tips for PicsArt Android Pie
Here are some tips for the PicsArt that will help you get the best out of the beautiful and feature-rich imae editor app.
In case we missed a feature think deserves to be here, do give us a shout.
Add text to your photos
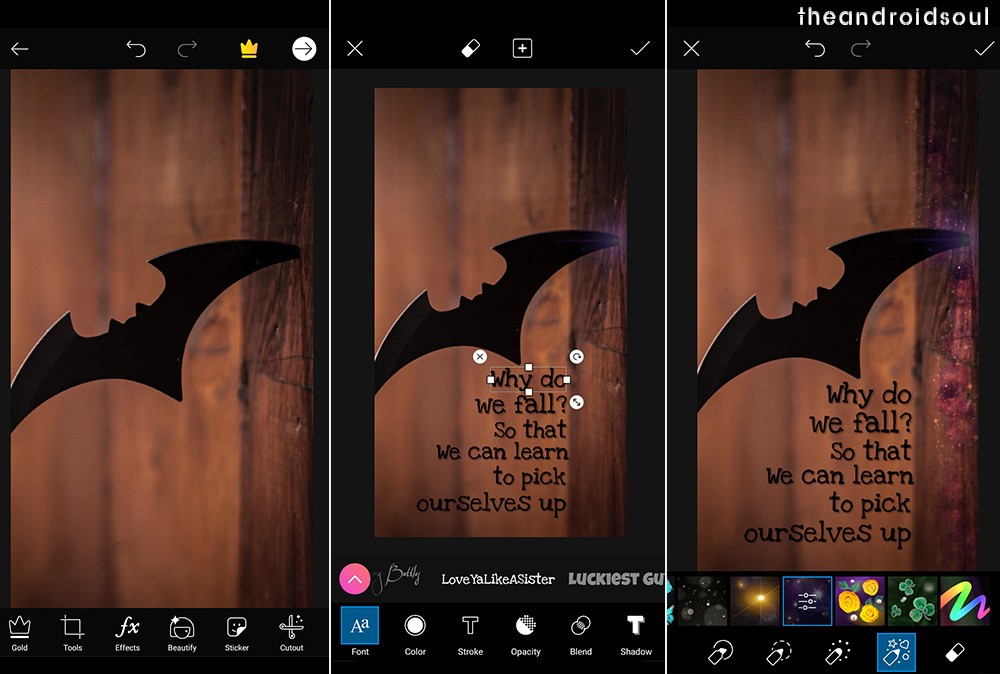
Text on an image can be very appealing and also provides a suitable feel to the image. PicsArt allows you to add text to your images very easily, It has a variety of Fonts to choose from and therefore applying effects to the text which gives it a 3D feel.
With different fonts, there is are also numerous colors provided and you can choose any color for your text as it suits the image that you are editing.
Here’s how to add text to an image:
- On the bottom icon bar look for Text menu.
- Clicking on the Text brings in a blank page.
- Add the required text here and then click the tick button on top right.
- Now you can choose from a variety of Fonts, Colours, Blends, and Shadows as per your preference.
Do a dispersion

On the tools menu, there is an option of called Dispersion, which can be used to provide a scattering effect to any particular part of the image. This effect if used in a correct way can truly enhance your image’s creativity.
Here’s how to use the Dispersion tool:
- On the bottom icon bar look for Tools menu.
- Tapping on Tools will bring up a number of options.
- Select the option called Dispersion.
- Now you’ll have to draw on the particular part of the image you want to be scattered.
- You can vary the brush size from below and when you are done click the arrow on the top right.
- Now you’ll see the part dispersed and also there are many options below to edit that part.
Play with effective photo effects

Effects panel brings up many different types of filters and some of these are really very impressive. It consists of options like FX, MAGIC, ARTISTIC, POP ART and many more.
Using these effects can make a difference as these provide a creative feel to the image, These options then bring up many different filters inside them to choose from.
Here’s how to add an Effect to an image:
- On the bottom icon bar look for Effects menu.
- Clicking on the Effects will bring up a number of options.
- Choose from a variety of effects and their filters in order to edit your image.
- Once you have applied your effect click on the tick at the top right corner.
Fun with stickers

Stickers are the effect elements that can be added into the image to make it more appealing. PicsArt provides a ton of free stickers to choose from and you can even make your custom one.
Here’s how to add Stickers into an image:
- On the bottom icon bar look for Sticker button.
- Clicking on the Sticker button will bring up many different sticker options.
- You can choose any of the stickers that you want to insert into the image.
- After inserting there are a bunch of options like Opacity, Adjust and Effects that you can apply.
- Once you have applied the stickers click on the tick at the top right corner.
Change background

This happens so many times when you click an image, as in your picture comes out to be great but it gets spoiled due to a bad background. But now you can easily change that with the help of the Cutout tool in PicsArt.
The Cutout tool helps in order to cut out only your image from an image and leaving the background behind so that you can apply the image on to a new background.
Here’s how to change the Background of an Image:
- On the bottom icon bar look for Cutout menu.
- Clicking on the Cutout menu will bring up two options below.
- Click on the user like icon on the left in order to cut out the image.
- You can even edit the cutting with the help of Eraser or Brush tools.
- Once you are done click on save at the top right.
- Now go on to Add Photo menu and choose the background photo you want to apply.
- Stretch out the inserted photo and try different blending modes as per your requirement.
Shape creativity with Shape Masks

Shape masking lets you go crazy with your ideas. There are many different types of shapes provided to choose from. By selecting the shape that suits you, you can resize according to your image’s dimensions.
Here’s how to play around with the Shape masking:
- On the bottom icon bar look for the Shape Mask menu.
- Clicking on it will bring up many different shapes.
- Select the desired shape and resize it accordingly.
- Now there are a bunch of Blend modes you can choose like Multiply, Lighten, Dark, Screen, etc.
- Background color and Background pattern options are also provided.
- With the help of the Eraser tool, you can erase any part of the shape so as give it a creative feel.
Use the blur effect on the background

Blur Effect allows you to give your photo a portrait mode like feel. With the help of this tool, you can easily blur out the background of your photo so as to focus on your image or to avoid the unwanted background.
Here’s how to apply Blur effect on your photo:
- On the bottom icon bar look for Effects menu.
- From the Effects menu then click on BLUR.
- Select from different types of blur options like Lens Blur, Motion Blur, Focal zoom, etc.
- This will apply the blur to the whole image.
- Now with the help if Eraser tool at the top, erase the effect from the object you wanted to focus on.
Ah, double exposure!

Double exposure effect can be really amazing if used in the correct way. As with the help of this, you can easily blend in two or more images and make an appealing result.
In order to achieve the best effect, you do need to play around with different blend modes which are provided.
Here’s how you can get a good double exposure effect:
- On the bottom icon bar look for Cutout menu.
- Click on the user like icon on the left to cut out the image.
- Now go to the Add image option and choose a suitable image to blend in with the cutout image.
- After adding the image try different blending modes such as Screen, Multiply, Darken, Overlay, etc.
See more on Double exposure here.
RECOMMENDED