
Pick Heavy or Medic for the strongest early-game Hawks build. Choose Scout when your squad needs more Advantage, or Gunslinger when you want Hawks focused on damage.
Pick Heavy or Medic for Hawks at the start of Star Wars Zero Company. Heavy gives you a durable frontline anchor, while Medic strengthens and sustains the entire squad. Hawks is your custom protagonist, and his Specialization — the game’s term for a class — determines his role from the opening mission. There are twelve Specializations in total, but the decision is reversible: return Hawks to the Den whenever you want to swap his Specialization.
- Scout Specialization picks for Hawks and the squad
- How Specializations fit together in Zero Company
- Every standard Specialization compared
- Assault: mobility and displacement up front
- Gunslinger: spread-fire pistol damage
- Heavy: the taunt-and-retaliate anchor
- Medic: Combat Stim over healing
- Scoundrel: assist and crit setup
- Scout: the Advantage engine
- Sharpshooter: long-range reliability
- Soldier: raw damage and grenades
- Unique and exotic Specializations
- What to make Hawks
- Building a squad around your pick
- Frequently Asked Questions
Scout Specialization picks for Hawks and the squad
| Pick | Best use |
|---|---|
| Heavy | Soaks damage and taunts enemies onto one durable operator |
| Medic | Combat Stim buffs and steady healing for the whole squad |
| Scout | Generates Advantage that any squadmate can spend |
| Gunslinger | High-volume pistol offense across multiple targets |
Put Hawks on Heavy or Medic for the smoothest early-game route. Heavy turns him into a wall that absorbs fire and punishes attackers, while Medic supplies the entire team with Combat Stim and reliable healing. Pick Scout when your squad needs more Advantage, or Gunslinger when you want Hawks dealing direct damage. You can respec him at the Den at any point.
How Specializations fit together in Zero Company
Specializations are divided into two groups. The eight standard Specializations are available to most recruits, including Hawks and every custom operator you create. The exotic Specializations belong to specific story characters and cannot be freely assigned. There are four exotic classes in total, with three detailed below.
Each operator’s kit has four layers: a Talent consisting of one or two signature abilities for story characters or one of ten choices for a custom operator, a Weapon Class selected from Longarm, Repeater, Rifle, or Pistol, a primary Specialization chosen during creation, and a secondary Specialization unlocked partway through the campaign for dual-class builds. Card values can change before launch, but each Specialization’s role is established.
Every standard Specialization compared
| Specialization | Role | Standout tool |
|---|---|---|
| Assault | Close-to-medium frontline mover | Bull Rush |
| Gunslinger | Multi-target ranged damage | Open Fire |
| Heavy | Tank and damage funnel | Bulwark |
| Medic | Healing and squad buffs | Combat Stim |
| Scoundrel | Assist and crit setup | Identify Weakness |
| Scout | Advantage generation | Combat Recon |
| Sharpshooter | Long-range marksman | Precision Shot |
| Soldier | Close-to-medium raw damage | Rocket Strike |
Key Use the role column to see where each Specialization fights, then check the standout tool for the ability that defines its turns. The breakdowns below cover each class in detail.
Assault: mobility and displacement up front
Assault is a mobile frontline fighter that closes on enemies hiding in cover and kills them at medium-to-close range. Its ultimate, Sweeping Salvo, damages and disorients every target in a wide cone. True area-of-effect attacks are rare, so Sweeping Salvo gives Assault an especially useful battlefield-clearing tool.
Bull Rush charges an enemy, deals melee damage, and shoves the target backward. Aim the charge toward a ledge for an instant environmental kill, or knock an enemy out of cover to expose it to the rest of the squad. The passives support that exact attack pattern: Fleet of Foot boosts the operator’s first movement so you can reach Bull Rush range, while Strike the Flanks adds crit chance against exposed enemies. Pick Assault when you want to reposition targets and reshape the battlefield every turn.
Gunslinger: spread-fire pistol damage
Gunslinger delivers fast attacks across several targets. Its ultimate, Open Fire, fires twice at any combination of enemies, while Quick Draw provides a lightning-fast sidearm shot. Keen Eye increases the crit chance of every ranged attack, and Onslaught adds +1 blaster damage for each attack made during the turn. Onslaught applies only to the operator’s primary blaster.
Equip a pistol to get the most from this kit. More shots per turn produce more Onslaught stacks and increase the damage of every follow-up attack. Gunslinger operates at close-to-medium range but still relies on cover, so establish a firing position near the fight and unload instead of roaming like Assault.
Heavy: the taunt-and-retaliate anchor
Heavy is one of the strongest early-game picks. These armored operators stand in the open, absorb attacks, and protect the rest of the squad. The ultimate, Bulwark, taunts every enemy in the target area and forces them to attack the Heavy while granting +2 Defense for the rest of the turn.
Pair Bulwark with Unstoppable, which grants two stacks of Retaliation. Each stack triggers a free counterattack against an incoming hit. Activate Unstoppable, taunt enemies onto the Heavy, and punish the next two attackers for taking the bait. Intimidating Posture also makes the Heavy’s primary blaster attacks taunt on hit, giving you a second way to redirect enemy aggression.
Add Conditioning for +4 Max Health and Heavy Armor Training for +2 Defense. Together, these abilities funnel most enemy damage into one operator built to absorb it while generating free counterattacks. Heavy fits almost every party and is a top Specialization for Hawks.
Medic: Combat Stim over healing
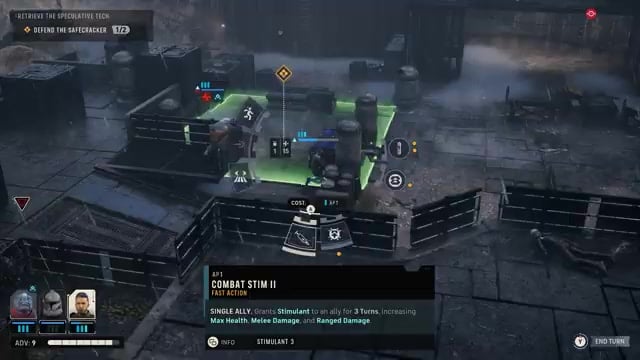
Medic keeps teammates alive while increasing their combat output. Combat Stim is the class’s defining action: it stims an ally for several turns and raises that operator’s max health, melee damage, and ranged damage. It costs one action point, allowing the Medic to apply multiple stims during the same turn. Use it on your Heavy, Assault, or any operator moving into attack range for an immediate durability and damage boost.
The passives complete the support kit. Lifesaving Measures increases the health restored by this operator’s med packs, while First Responder supplies a permanent med pack that does not consume a utility slot and fully heals any ally rescued with a rally. The ultimate, Morale Boost, grants morale stacks to the Medic and nearby allies, but it is the weakest part of the kit and rarely deserves priority over the Medic’s other actions. Combat Stim, stronger med packs, and full-heal rallies more than compensate.
Use Combat Stim on your Heavy before sending them forward. It costs one action point, so the Medic can provide the max-health, melee, and ranged-damage boost and still attack during the same turn.
Scoundrel: assist and crit setup
Scoundrel exploits openings with assist damage and guaranteed crit setups. Its ultimate, Easy Mark, tags an enemy and causes the operator to assist the next ally who attacks that target. The free request backup mechanic already allows one ally to follow up each turn at no cost, reducing the ultimate’s impact. Identify Weakness makes an enemy vulnerable so the next attack crits, while Never Play Fair increases assist damage and Scoundrel’s Instinct allows attacks to ignore up to 4 points of defense.
This kit extracts extra damage from assists and guaranteed crits, but it delivers less immediate value than the stronger early-game classes. Its crit and assist bonuses scale better toward the endgame, so save Scoundrel for a developed squad instead of making it your starting pick.
Scout: the Advantage engine
Scout is stronger than its modest-looking kit suggests because it generates Advantage, the shared resource displayed in the bottom-left that powers ultimates and special actions across the entire squad. Combat Recon assesses an area and grants Advantage for every enemy caught inside, letting you refill the team’s pool on demand.
The ultimate, Ambush, launches a surprise attack whose damage scales with the Advantage spent. Most ultimates cost a flat 10 Advantage, but Ambush lets you spend the entire pool for a heavy strike or use a small amount to finish a weakened enemy. The passives keep generating resources and utility: Tactical Timing provides a 20% chance to gain Advantage after a kill, while The Spotter marks every enemy this operator damages with a blaster.
Advantage fuels the entire squad, so Scout improves every teammate who relies on Advantage-powered abilities. That shared value makes Scout useful in almost every party and an excellent tactical Specialization for Hawks.
Sharpshooter targets enemies from long range and removes them with highly reliable shots. Its ultimate, Precision Shot, fires a calculated blaster attack that always hits. Zero In establishes a firing position and grants stacks worth +15% chance to hit and +9% crit chance. Sharpshooter Training adds a flat +10% hit to every blaster attack, while Pick Them Off strengthens overwatch with +5% overwatch hit chance and bonus overwatch damage.
Pair Sharpshooter with a sniper-style Longarm. Luco is a strong example: his signature Combat Gas talent grants five stacks of Sharpened Senses, increasing his hit chance and ranged damage while consuming one stack per ranged attack. Combine those stacks with Zero In to reach near-perfect accuracy while adding crit chance and damage.
Soldier: raw damage and grenades

Soldier is a direct offensive unit that fights at close-to-medium range with melee attacks, grenades, a heavy blaster, and a rocket launcher. Its ultimate, Rocket Strike, fires an explosive that damages every target within the blast and consumes all available Advantage. Brutal Strike rushes an enemy, deals melee damage, and dazes the target. It fills a similar role to Bull Rush but replaces knockback with a status effect. Strength increases melee damage and grenade-throwing range, while Armsmaster adds +2 blaster and grenade damage.
Soldier and Assault cover similar frontline roles but emphasize different strengths. Soldier prioritizes raw damage and grenades; Assault prioritizes mobility, displacement, and pushing enemies out of cover or off the map. Avoid running both in the same squad. Pick your preferred frontline style and use the remaining slot for a class that supplies a different role.
Unique and exotic Specializations
| Specialization | Locked operator | Main strength |
|---|---|---|
| Jedi Padawan | Tel-Rea Vokos | Force pushes and lightsaber deflection through Harmony |
| Mandalorian Warrior | Cly Kullervo | Jetpack repositioning and armor-ignoring Electroweb Surge |
| Astromech | The squad’s astromech droid | Hands out action points and strips enemy defense |
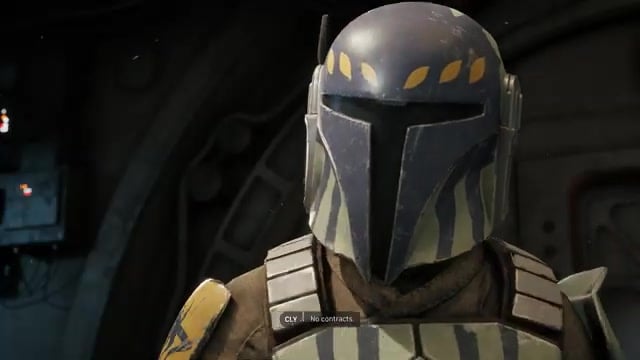
Exotic Specializations belong to specific story operators and cannot be assigned to anyone else. Jedi Padawan belongs to Tel-Rea Vokos, who fights with dual lightsabers. Her Strong with the Force passive starts every battle with stacks of Harmony, increasing her deflect chance and lightsaber damage. She can Push enemies out of cover or off ledges and unleash a Shockwave that knocks back every enemy around her, making her devastating in the center of a crowd.
Mandalorian Warrior belongs to Cly Kullervo. Her jetpack lets her cross the map and shove nearby enemies without triggering overwatch or retaliation. Ruthless increases her crit damage, while Electroweb Dart marks targets for Electroweb Surge, an electrical blast that ignores defense and damages everyone marked. The Astromech fills a support role: Built-in Comlink and Coordinated Support grant extra action points, capped at three per operator; Enhanced Scanners removes enemy defense to make targets easier to hit; and Extended Storage adds another use to limited utility items. Astromech is the most specialized of the three, so broader squad compositions get more all-round value from other operators.
What to make Hawks
| Hawks pick | Trade-off |
|---|---|
| Heavy | Tanky and consistent, but low personal burst and redundant if a story Heavy is already along |
| Medic | Great buffs and a safety net, but the Morale Boost ultimate underwhelmed in previews |
| Scout | Huge squad value from Advantage, but less direct personal damage |
| Gunslinger | Strong offense, but wants pistol range and gives up support utility |
Hawks has the Fearless Leader talent, which increases every ally’s assist damage while he is on the field and gains overwatch damage and additional perks through upgrades. Because Hawks already strengthens the whole party, choose the Specialization that fills your squad’s missing role. Gunslinger, Heavy, Medic, and Scout are the strongest candidates, especially when the story operators in your current lineup do not already cover them.
Choose Heavy or Medic for the strongest all-purpose Hawks build. Heavy redirects and punishes enemy fire, while Medic uses Combat Stim to strengthen your damage dealers and keep the squad healthy. Choose Scout when your party needs more Advantage, or Gunslinger when Hawks needs to supply direct damage. Start with the class that fills your current lineup, test it alongside your operators, and respec at the Den whenever the squad composition changes.
Building a squad around your pick
Team composition has more impact than any individual class ranking. Avoid stacking operators that perform the same job. Running Assault and Soldier together, for example, gives you two similar frontliners when one of those slots could provide healing, Advantage, tanking, or long-range damage.
Build around complementary pairs and distinct roles. A Heavy backed by a Medic forms a powerful core: Heavy pulls enemy fire while Medic keeps the tank standing with Combat Stim and healing. Scout generates the Advantage that the rest of the squad spends on ultimates and special actions. Fill the damage slot according to your preferred weapon and engagement range: Sharpshooter for long-range Longarm attacks, Gunslinger for close-range pistol volume, or Soldier for grenades and heavy direct hits. Cover every battlefield role instead of doubling down on the same strength.
Related Star Wars Zero Company guides
Frequently Asked Questions
Can you change Hawks’ Specialization later?
Yes. Return to the Den to swap Hawks’ Specialization freely at any point in the campaign. Tel-Rea Vokos is the only operator who cannot be respecced because she remains locked to Jedi Padawan. Every other operator, including Hawks, can be reassigned to any standard Specialization.
Are unique Specializations available for custom operators?
No. Jedi Padawan, Mandalorian Warrior, and Astromech belong exclusively to their respective story characters. Custom recruits use the eight standard Specializations, ten selectable talents, and a weapon class. Story characters with exotic classes keep those classes exclusively, and no other operator can respec into them.
Which Specialization should you pick for a frontline damage dealer?
Pick Soldier for raw damage, grenades, and the Rocket Strike ultimate. Soldier gives you a direct close-to-medium-range frontliner, leaving the remaining squad slots available for healing, tanking, Advantage generation, and long-range support.
Video help






Leave a Reply