PDF files are the most preferred document format, not just because they’re accessible across multiple platforms and devices but also because they retain data at the highest quality even after compression. When it comes to editing them, however, many people find it cumbersome because there aren’t a lot of free apps and services that allow making changes to PDF documents.
If you’re looking to add your signature to PDF files, the following post should help you do that across multiple devices, without spending a dime.
How to add your signature to PDF files [5 methods]
The following methods can be used to add signatures to PDF files across multiple devices.
Method 1: Using Adobe Fill & Sign web tool [on PC]
You can add your signature or initials to a PDF file directly on Acrobat Web using the “Fill and sign” utility. This utility doesn’t need you to download additional software on your desktop or an app on your phone and can be accessed from any web browser you use on your devices.
- To sign a PDF file, go to the Fill and sign page on Acrobat Web and click on Select a file.

- In the popup window that appears, select the PDF file you wish to add a signature to and then click on Select a file.

- Your PDF file will now be uploaded onto the Adobe Document Cloud.

- Acrobat Web will now prompt you to sign in or sign up to be able to proceed to add a signature to the uploaded PDF and also download the signed PDF file. Select your preferred sign-in process by clicking on it and following the on-screen instructions.

- You will now be taken to the editing screen where you’ll be able to add a signature or initials to your uploaded PDF file.
- To add a signature to the PDF, click on the signature icon from the toolbar at the top and select either Add Signature or Add Initials depending on what you want to add to the document.

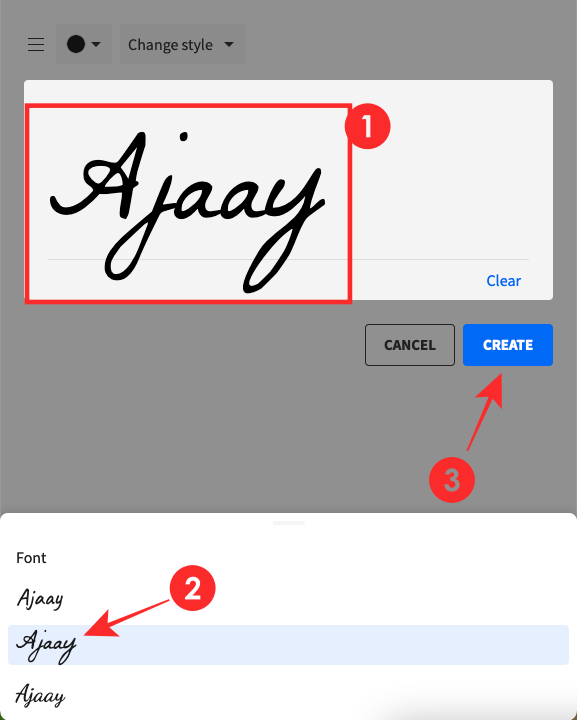
You will have three ways to add a signature. - By default, Acrobat will create a signature with your complete name stylishly. You can change the text here however you wish to add it to the document. Choose this option if you don’t have a pre-saved image of your signature.

- You can also manually sign on the provided field using your mouse or touch screen after clicking on the Pen icon at the top.

- Perhaps the most useful and preferred option will be the ability to add your signature that you saved as an image earlier. To do your signature from an image, click on the image icon from the top left corner, and click on Select image.

- In the popup window that appears, locate and select your signature image file and click on Open.

- After your signature has been uploaded, it will appear on the screen. To add it to the PDF document, click on Apply.

- The signature will be added to the PDF. Drag and move it anywhere you want it to position it properly.

- You can also enlarge the signature by clicking on the circle icon beside it and dragging it to your preferred size.

- Once you have made the final touches to your PDF, click on Share at the top and select Download a copy.

The newly created signed PDF file will now be downloaded into your default downloads folder.
Method 2: Using smallPDF.com [PC]
Similar to Acrobat Web’s offering, you can also sign documents using SmallPDF’s eSign tool on any of your devices on the web.
- To sign a PDF file, go to the eSign PDF page on SmallPDF and click on Choose file.

- A menu will pop up on your screen, asking you when you want to upload the PDF file. Select From device to choose the file from your local storage.

- In the popup window that appears, select the PDF file you wish to add a signature to and then click on Select a file.

- Your PDF file will now loaded onto the SmallPDF screen. To add your signature to the document, click on Your Signature at the bottom.

- Select either Create signature or Create initials depending on how you want to sign the PDF.

- If you wish to add your signature by drawing it on SmallPDF or by typing it, you can click on Draw or Type tabs from the sidebar and create a proper signature.
- If you have an already existing signature saved as an image, you can add that by selecting the Upload tab from the sidebar.

- To do your signature from an image, click on Select image.

- In the popup window that appears, locate and select your signature image file and click on Open.

- After your signature has been uploaded, it will appear on the screen. To add it to the PDF document, click on Create.

- The signature will be added to the PDF. Drag and move it anywhere you want it to position it properly. You can also enlarge the signature by clicking and dragging on the corners beside it and dragging it to your preferred size.

- Once you have made the final touches to your PDF, click on Finish & Sign at the top right corner.

- To download the signed PDF file, click on Save.

- You can save it on your phone or PC by clicking on Save to device.

The newly created signed PDF file will now be downloaded into your default downloads folder.
Method 3: Using the Markup tool [iPhone]
The Markup tool is built-in across all iOS devices including iPhones and iPads and can be used to draw over or mark any image or document that can be edited.
- To add a signature using Markup, open your file from the Files app or Mail app.

- When the PDF file is opened, tap on the Markup icon from the top-right corner.

- You can tap on the + icon at the bottom right corner and select Signature to create your signature.

- In the next screen, create a signature by drawing on the screen, and when done tap on Done.

- When you do that, your signature will be added to the document. You can tap and drag on the signature to move to the preferred position of the PDF file. You can enlarge it by tapping and dragging on any of its corners.

- Your PDF file with the signature is now ready. You can save the document by tapping on the Share icon at the bottom left.

- Next, tap on Save to Files to save the PDF on your local storage.

Method 4: Using the Adobe Fill & Sign app [iPhone]
If the iOS Markup tool doesn’t fit your requirements, you can download and install the Adobe Fill & Sign app by either searching for it from the App Store or using this link.
- Open the Adobe Fill & Sign app on your iPhone.
- Inside Adobe Fill & Sign, select the PDF file you want to sign by tapping on Select a form to fill out.

- Inside the PDF file, tap on the Fountain pen icon from the bottom toolbar.

- Select Create Signature from the popup menu.

- If you wish to draw the signature on your own, you can tap on the Draw tab from the top, draw, and then tap on Done.

- If you want to add a signature from an already signed document, tap on the Camera tab from the top, capture a picture of a signature, and then tap on Done.

- If you already have a signature saved on your phone, you can add that to the document by tapping on the Image tab from the top.

- You will now be asked to select an image with your signature. Tap on the signature image from your library.

- On the next screen, you will be able to see your signature. Make sure your whole signature has been selected and then tap on Done at the top right corner.

- Tap on Done again on the next screen.

- Your selected signature will be added to the PDF file. You can drag it to any preferred location inside the document and enlarge it by tapping and dragging the two-headed arrow icon to the left and right until you get a preferred size.

- To download the newly signed document, tap on the Share icon at the bottom right corner.

- Now, select Save to Files from the popup menu to save it on your library.

Method 5: Using the Adobe Fill & Sign app [Android]
If you own an Android device, you can add a signature to documents using the Adobe Fill & Sign app. You can install Adobe Fill & Sign from Google Play from the highlighted link.
- Open the Adobe Fill & Sign app on your Android device,
- Inside Adobe Fill & Sign, select the PDF file you want to sign by tapping on Select a form to fill out.

- Select From PDF file.

- In the next screen, select the PDF file from your file library.

- Inside the PDF file, tap on the Fountain pen icon from the toolbar at the top.

- Select Create Signature from the popup menu.

- Unlike the Adobe Fill & Sign app on iOS, you cannot type or add a signature from another image. On the Android version of the app, you’ll have to draw the signature on the screen and then tap on Done at the top right corner.

- To add the signature you just created, tap on the Fountain pen icon from the toolbar at the top.
- Now, select the signature that you just created from the options on the screen.

- The selected signature will now be added to your document.

- Drag it to any preferred location inside the document and enlarge it by tapping and dragging the two-headed arrow icon to the left and right until you get a preferred size.

- After all the modifications to the signed document have been made, it will be saved automatically on your device. You can share this PDF file by tapping on the Share icon at the top.

That’s how you add a signature to PDF files.
RELATED