You can store files on your iPhone and access them using the Files app that comes pre-installed with your iPhone. This app is where you will see all your documents, files, images, or any other content you downloaded from the web.
If you’re wondering how you can access the files saved on your iPhone, the following post should explain how to find files, access different storage locations, sync files with iCloud, and access them from other devices.
Related: [Easy] How to Remove Background Using Files App on iPhone or iPad
How to find your files on an iPhone
Checking the files saved on your iPhone is pretty easy. All you need is Apple’s Files app that comes pre-installed on all iPhones and can be accessed from the App Library or by searching for it on Spotlight. If you’re unable to access it on your iPhone, you may have accidentally deleted it from your device but you can always download and install it back from the App Store.
- Open the Files app on your iPhone.

- When you open the Files app, you will see three different tabs at the bottom: Recents, Shared, and Browse.
Recents: It’s where you see all the files that you opened sometimes in the last few weeks. Files here will be sorted by the order of the date you last accessed them but you can change the sorting order by tapping on the grid icon at the top right corner and selecting any of these options – Name, Kind, Date, Size, and Tags. You can also group them as you would on a folder and perform other actions on them.

Shared: If you’ve shared or received files from someone else via iCloud, you will see the Shared tab at the bottom of the Files app. In this tab, you will see all the files and folders shared by you or shared with you over iCloud and you can sort through them by date last modified, kind, and size. You can also group files and folders by who shared it with you which makes locating shared files easier.

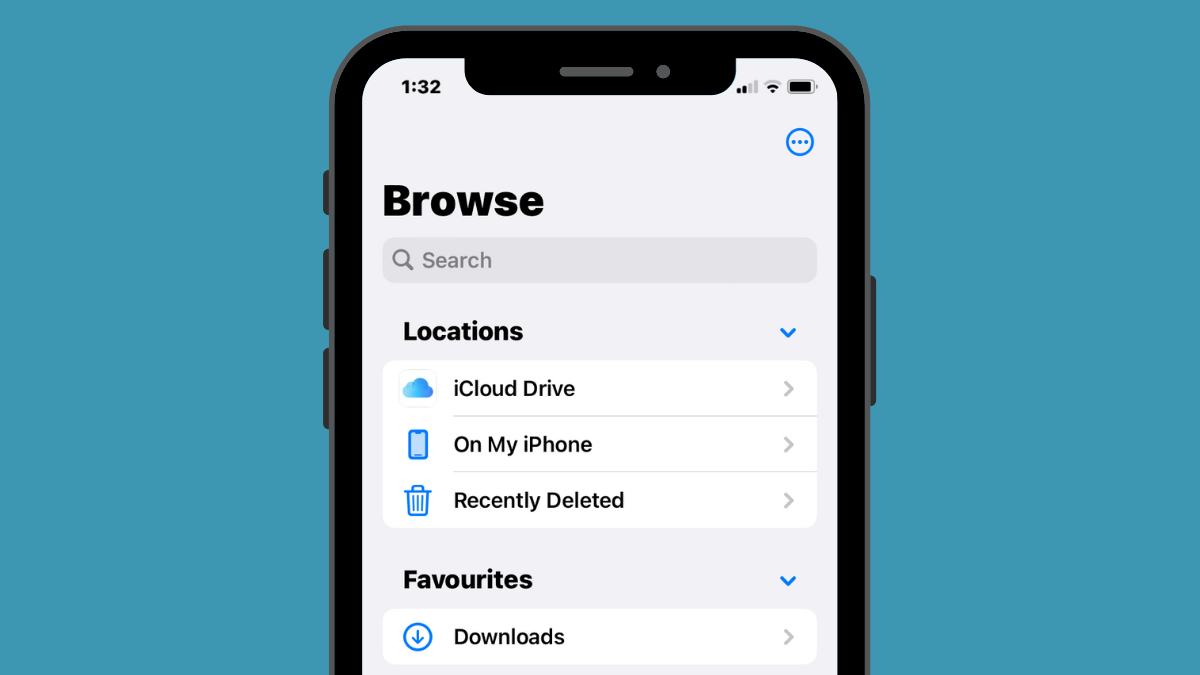
Browse: This is the most important tab inside the File app and perhaps the only section you’d access the most when browsing through the content inside the app. Your files will be accessible under different storages, most notably iCloud Drive and On My iPhone. On this screen, you will also see folders you’ve marked as favorites and you can search files and folders directly if you’ve previously added color tags to them.

- To access the files that are stored locally on your iPhone, select the Browse tab and tap on On My iPhone.

- On the next screen, you’ll be able to see all the files and folders that are saved on your device.

- To change how these files and folders are listed on the screen, tap on the 3-dots icon at the top right corner.

- From the menu that shows up, you can toggle between Icons and List views, and sort or group files and folders by name, kind, date, size, and tags.

- You can open a file in Quick Look by tapping on it. If the file the supported, it will open on the next screen within the Files app.

- When the file opens, you will get additional options to share, search markup, or add captions from the bottom toolbar.

- You can perform various other actions on a file by long-pressing on it. This will open an overflow menu that will allow you to do certain actions like rename, compress, duplicate, add tags, copy, move, share, and delete.

- You can similarly interact with folders by long-pressing on them and selecting an action of your choice.

- To check a file’s size, long-press on it and select Get Info. You can do the same for folders present inside your iPhone.

- In the Info screen that appears, you should see the file size, date created, last opened, or modified, and more information that’s available.

How to manage storage locations on the Files app
By default, the Files app on iOS will show your two storage locations – iCloud Drive and On My iPhone. If you use third-party storage apps like Google Drive, Dropbox, OneDrive, Box, or Adobe Creative Cloud on your iPhone, you can browse any file you have stored on these storage services directly from the Files app.
Any file you’ve uploaded via your computer or other devices will get synced with the Files app on your iPhone. In addition to accessing all of your files across these apps from the Files app, you can also copy content across these storage locations at any time.
- Before you proceed to add third-party storage accounts to the Files app, you must first install the concerned app (in this instance, it’s Google Drive) and sign in to your account inside the app.
- With the storage app (Google Drive) ready, open the Files app and select the Browse tab at the bottom right corner.

- Inside the Browse screen, tap on the 3-dots icon at the top right corner.

- In the overflow menu that appears, select Edit.

- You will now see all available storage options that are available on your iPhone. In this instance, we have the Google Drive app that we’ve set up and signed in to. To add Google Drive as one of the storage locations inside Files, turn on the Drive toggle under “Locations”. Similarly, you can turn on the toggles for your respective storage app to add them to the Files app.

- While editing the Browse section, you can disable the iCloud Drive and On My iPhone sections to prevent them from showing up on your iPhone. Doing so will hide the selected storage and won’t delete any data on them.

- You can re-arrange these locations by long-pressing the 3-lines icon adjacent to the selected storage and dragging it upwards or downwards as per your preference.

- On the same screen, you can also remove folders that you have previously marked as Favorites by tapping on the red minus (-) icon on the left-hand side of the folder you want to remove.

- To confirm your choice, tap on Remove on the right-hand side.

- You can also remove certain tags from the “Tags” section in the same manner.

- When you’re done editing your storage locations and the Browse section, tap on Done at the top right corner to save changes.

Once you add an external storage location to the Files app, you will be able to browse through it like you would browse files on your iPhone. You can move files around as long as you do it within the selected storage location but you can use the Copy action to copy files between multiple locations.
Related: How to Edit a PDF Document on iPhone
How to save something to the Files app
Anything that can be saved as a file can be stored inside the File app at a location of your choice. You can do this across any app that’s installed on your iPhone and this action should work seamlessly on the native iOS apps as well as on third-party apps.
- To save something from an app, open the app you want to save from and go to the location of the content that you want to save. Now, depending on the app you’re currently on, open the app’s share sheet by tapping on the Share icon generally (but not limited to) present at the bottom left corner of the screen.

- On some apps, the share option will be accessible when you tap on the 3-dots icon generally present at the top right corner. When additional options appear, select Share from the list.

- Once you’ve accessed the iOS Share Sheet, tap on Save to Files.

- When you do that, the Files app should load up on a popup screen. From there, select a location and choose a file name for the content you’re saving on your iPhone. After choosing your desired location, tap on Save at the top right corner to store the file on your iPhone, iCloud, or a storage location you’ve linked inside the Files app.

- At any time, you can access this file by opening the Files app on your iPhone and going to the location where you saved the file from the app.

Related: How to Change File Extensions on iPhone
How to sync your files from iPhone on iCloud Drive
Any Apple ID is associated with an iCloud account which isn’t just an email address but also a storage option in itself. You can use your account’s 5GB of free cloud storage to not just back up your iPhone and the photos you’ve captured but you can also store files from your iPhone and other Apple devices as well.
If you wish to upload your files natively from your iPhone and sync them at any time, you will need to enable iCloud Drive on your iPhone.
- Open the Settings app on your iPhone.

- Inside Settings, tap on your Apple ID card at the top.

- In the Apple ID screen, tap on iCloud.

- When the iCloud screen appears, select iCloud Drive.

- On the next screen, turn on the Sync this iPhone toggle.

- You will now be able to upload files from your iPhone to the iCloud Drive by going to Files > Browse > iCloud Drive.

Any file you create, move, or save here will be sent to your iCloud account and they’ll be accessible from other Apple devices you own or on the web.
Related: How to Merge PDFs on an iPhone Using Files App or a Shortcut
How to find recently deleted files on iPhone
When you delete a file from any of the storage locations inside the Files app, the selected file is immediately sent to the Recently Deleted section of the app from where it can be deleted permanently or can be recovered back to your iPhone. Files in the Recently Deleted section will continue to appear for up to 30 days from when you deleted it and this is the case no matter whether you deleted it from the iCloud Drive, from On My iPhone, or from any other storage location linked inside the Files app.
- To access your recently deleted files, open the Files app and select the Browse tab at the bottom right corner.
- Inside Browse, you should see the Recently Deleted section under “Locations”. To find the files you recently deleted, tap on Recently Deleted.

- On the next screen, you’ll see a list of files you have deleted sometime in the last month. If you find a file that you want to recover or delete from this list, tap and hold on the file until you see an overflow menu.

- In the overflow menu that appears, select Recover to bring the file back to your iPhone’s storage. If you wish to remove the file permanently, tap on Delete Now.

- In the prompt that shows up, you’ll be asked to confirm your action. To proceed, tap on Delete.

- If there are multiple files that you want to recover or delete, tap on the 3-dots icon at the top right corner.

- In the menu that appears, tap on Select.

- Now, you can select the files you want to delete or recover to highlight them with a blue tick icon.

- When you’ve made your selection, tap on Recover at the bottom left corner to put the files back into your iPhone or iCloud storage. If you wish to delete the selected files permanently to clear your iPhone storage, tap on Delete at the bottom right corner.

- If you’re deleting files, you will see an additional prompt asking you to confirm your action. To proceed, tap on Delete.

- You can also delete or recover all of the files from this screen without needing to select them one by one. To do that, tap on Recover All or Delete All from the bottom depending on your preference.

Related: How to Edit a PDF on iPhone Using the Files App
How to access iPhone files on a computer
Now that we’ve established all the ways you can access files on your iPhone, what do you do when want to view the same files on your computer? Fortunately, you can browse through your iPhone storage to access all the files saved on it from your Windows or Mac computer. If there are a lot of files saved on your iPhone and you’re having a hard time finding or opening certain files, we suggest you try connecting your iPhone to a Mac or Windows computer to transfer the files that you want to access.
To get this done, you need to meet the following requirements:
- You have a Mac or a Windows computer.
- You’re updated to the latest version of macOS on the Mac or an updated version of iTunes for Windows on a Windows PC.
- You’re signed into the same Apple ID on the Mac or iTunes on Windows as the one on your iPhone.
- You have a USB-to-Lightning cable to connect your iPhone to Mac or Windows.
- An active internet connection on your Mac or Windows.
With that out of the way, you can now connect your iPhone to the computer and follow the steps below.
- Open the Finder app on your Mac or the iTunes app on Windows.
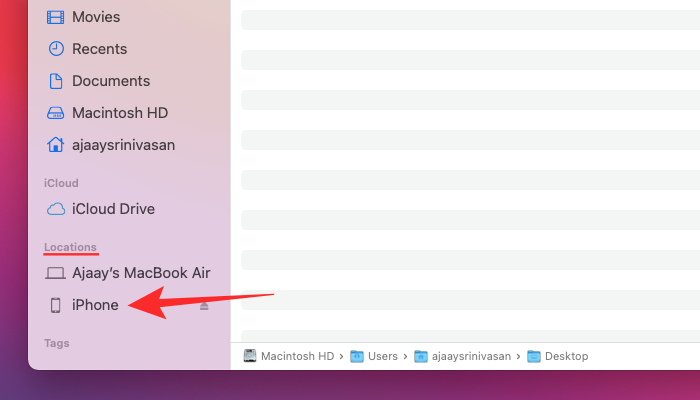
- When the respective apps, open select your iPhone from the left sidebar on Finder or click on the Phone icon on the iTunes app.

- If this is the first time you’re connecting your iPhone to the computer, click on Trust on your computer in the “Trust iPhone” prompt that appears on the screen.

- Similarly, you will get a “Trust This Computer” dialog on your iPhone to confirm your connection with the Mac or Windows. To proceed, tap on Trust. You may also need to enter your iPhone passcode to proceed further.

- Once all that is done, you will be able to see your iPhone and all its details inside Finder or iTunes.
- To sync the files from your iPhone to the computer, select the Files tab on this screen and click on Sync at the bottom right corner. On the Windows device, click on the File Sharing tab on the left sidebar, select the files you want to view, and click on Save.

The process should be similar regardless of the device you use but you could get things done with ease if you own a Mac as Apple offers seamless connectivity when a user owns a bunch of their own devices like the iPhone, iPad, or Mac.
There are other ways you can connect your iPhone to a Mac to transfer content between them and you can read more on that in the post linked below.
▶︎ How to Connect iPhone to MacBook Without USB [9 Ways]
If you’re looking for a much easier way to share files to access them on a Mac, you can do that via AirDrop. You can learn more about that in the post linked below.
▶︎ How to Airdrop Between Mac and iPhone
That’s all there is to know about accessing files on your iPhone.


