
If you might have tried to source something originally published on a CD, then you might have come across ISOs. ISOs are virtualized disk images that you can mount and dismount on virtual drives for a similar experience. But how do you mount an ISO on Windows 11? Do you need any additional third-party tools? Let’s find out!
Why mount an ISO in Windows 11?
Mounting an ISO is always more beneficial than extracting its contents. Not only it’s super fast, it also helps you save disk too while giving quick access to its files and helps save the time spent extracting ISO images.
Mounting an ISO (or any other image file, for that matter) also has the advantage of getting access to Operating Systems and other boot drives that you can test beforehand to ensure they’re working as intended.
Related: How to Run Old Games on Windows 11
How to mount an ISO in Windows 11
You can easily mount an ISO in Windows 11 using the following methods. Follow either of the sections below depending on your current preferences.
Method 1: Using double click
Windows File Explorer has now full support for ISO images. This means that you can simply double-click an ISO image to mount the same to a virtual disk on your PC.

Once mounted, you can find the same in the This PC section of your system in the file explorer.

Related: How to Screen Record on Windows 11 With Audio
Method 2: Using the right-click context menu
You can also choose to mount an ISO on Windows 11 using the right-click context menu.
Locate the concerned ISO on your local storage and right-click the same.

Click and select Mount.

Once mounted, you will be able to find the virtual disk in the Devices and drives section of your PC.
Method 3: Using the toolbar
The Windows 11 File Explorer has received a major overhaul since its introduction. You can now find frequently used options in the Ribbon menu at the top. You can use the same to mount an ISO image on your Windows 11 system. Follow the steps below to help you along with the process.
Open the File Explorer and navigate to your desired ISO file. Click and select the same.

Click Mount at the top in the Ribbon menu.

The selected ISO should now be mounted to a virtual drive on your system. You will find the same in the This PC section of your file explorer.
Method 4: Using PowerShell
You can also use PowerShell to mount drives on Windows 11 depending on your current needs and requirements. Follow the steps below to help you along with the process.
Open the File Explorer and navigate to the desired ISO file. Right-click on the same once found.

Click Copy as Path.

Press Windows + R on your keyboard to launch Run.

Now type in the following and press Ctrl + Shift + Enter on your keyboard.
powershell

Use the following command to mount your ISO. Simply replace PATH with the path to the ISO we copied earlier.
Mount-DiskImage -ImagePath "PATH"

Note: The path will be pasted with quotes automatically when using Copy as Path. However, if that does not happen, ensure that you add quotes to your Path.
Press Enter once you’re done.

And that’s it! The selected ISO will now be mounted to a virtual drive on your system.
Method 5: Using third-party tools
There are tons of third-party tools out there that allow you to manipulate ISO images. These tools also come bundled with the ability to mount your ISOs in Windows 11 easily. You can use the same to your advantage and mount your ISOs. Follow either of the sections below depending on your preference.
Option 1: Using WinCDEmu
WinCDEmu is an open-source tool that can allow you to mount ISO images on Windows 11. Follow the guide below to help you along with the process.
- WinCDEmu | Download Link
Click the link above and then click Download to download WinCDEmu to your PC. Once downloaded, double click and launch the same.

Check the box for Customize installation options.

Choose an installation directory for WinCDEmu as needed on your PC.

Additionally, check the box for Require administrator rights (UAC) to mount images if you wish to safeguard against unauthorized users mounting ISOs on your system.

Once done, click Install.

Once installation completes, click OK.

Now navigate to the concerned ISO in the File Explorer and Shift + Right-click on the same.

Click Select drive letter & mount.

Use the drop-down menu at the top and choose the desired letter for your virtual drive.

Use the next drop-down menu to select your disk type if applicable. This will be the emulated disk type on Windows 11.

Check the following boxes depending on your preferences.
- Disable autorun for this time: The disk won’t use its autorun functionality if you check the box for this option.
- Keep drive after restart: The virtual drive with your mounted ISO will persist after a restart.

Click OK once you’re done.

And that’s it! The selected ISO image should now be mounted to a virtual drive on your PC.
Option 2: Using PowerISO
PowerISO is another long-standing utility that can help you mount ISO files on your system. Use the guide below to help you along with the process.
- PowerISO | Download Link
Click the link above and choose one of the download links depending on your CPU. The download should automatically initiate in your browser. Simply save it to your local storage. Double click and launch the same once done.

Click I Agree.

Click Browse and choose a custom installation directory for PowerISO if needed.

Click Install once you’re done.

Click Next.

Select the additional file associations on the left if you wish to open additional file types with PowerISO. ISO will be selected by default at the top.

Use the drop-down menu to choose the number of virtual drives you wish to add to your PC.

Additionally, check the boxes for the following options depending on your preferences.
- Autostart on boot up: This will launch PowerISO in the background each time your PC turns on.
- Automount on boot up: This option will automatically mount the last mounted ISOs to your virtual drives each time your PC turns on.
- Integrate PowerISO into Shell: This will add PowerISO options to your File Explorer including the right-click context menu.
- Check for updates automatically: This option will allow PowerISO to check for new versions and pending updates in the background automatically.

Click Close once you’re done.

Restart your system at this point. This is a necessary step to install PowerISO virtual drives on your system as needed.
Once done, navigate to the concerned ISO file in the File Explorer and Shift + Right-click on the same.
Hover over PowerISO in the context menu.

Select Mount image to drive [N:] <No Media> where N is the drive letter you assigned to your virtual drive.
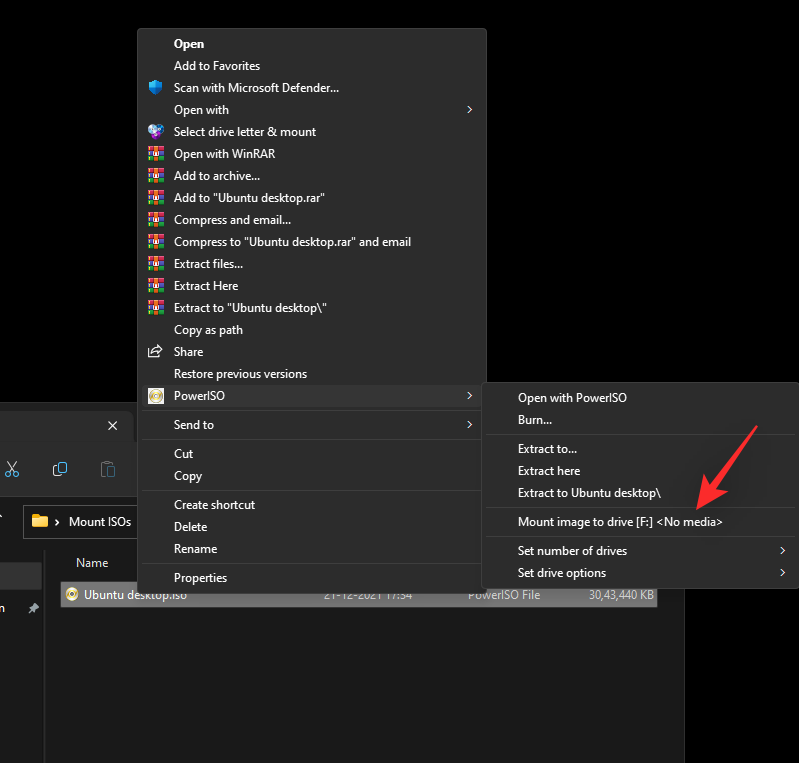
The selected ISO will now be mounted to your PowerISO virtual drive. You can access the same in the This PC section of Windows 11 File Explorer.
How to unmount an ISO
Unmounting an ISO is quite simple in Windows 11 thanks to its in-built options. Simply right-click on your virtual drive and click Eject. This will work for all the native methods above that do not use a third-party tool.

If you used a third-party tool to mount your ISO instead, then you will need to use its dedicated section in the context menu to unmount the same from your system. The option will be named Eject or Unmount depending on the tool you used.
We hope this post helped you easily mount ISOs in Windows 11. If you have any more questions, feel free to drop them in the comments below.
RELATED
- How to Remove the “System requirements not met” Watermark on Windows 11
- How to Disable Speech to Text on Windows 11 in 2022
- How to Search Messages in the Phone Link App on Windows 11
- Switch Out of S Mode Not Working? How to Fix
- 6 Ways to Shutdown Windows 11 Without Updating [Works 100%]
- 4 Easy Ways to Customize and Change Icons in Windows 11


