The one thing that we can always hedge our bets on is that change is an inevitable constant. One would think that a video conferencing app has achieved its peak if the app is people’s preferred means to join meetings and communicate effectively. Zoom, however, felt the need to take it to the next level as a video conferencing app and they decided to bring a change that we consider super exciting.
Que drumrolls for the latest feature on this popular video conferencing application, say hello to Zoom Studio Effects.
Related: How to Change Name on Zoom on PC and Phone
What is Studio Effects on Zoom?
As real-life is shifting more and more towards the virtual, Zoom decided to bring some excitement to the everyday monotony of video-conferencing by introducing a new feature called Zoom Studio Effects. With Studio Effects, users can do cool things like changing the way they look, alter/add facial features, and apply cool filters.
Related: How to record a Zoom meeting without host permission
Whether Zoom hopes to monetize from this feature eventually or not, we cannot be certain, however, the one thing we do know is that Studio Effects creates a virtual environment that users can customize to their heart’s content. So whether one wants to create a background that represents their brand, or use fun colors for their class, Studio Effects will provide the tools that are necessary to achieve some cool results.
While this feature is still in beta testing, users can access a Social Mediaesque array of filters to change the way they look as long as they have the latest updated Zoom application.
Related: 53 Best Zoom Games to Play: Codenames, Scavenger hunt, Math, Words, and more! [May 2020]
How to enable Studio Effects on Zoom
As of now, Studio Effects is only available for the Desktop app. So you need to have the Zoom application for Desktop on your computer before proceeding with this tutorial.
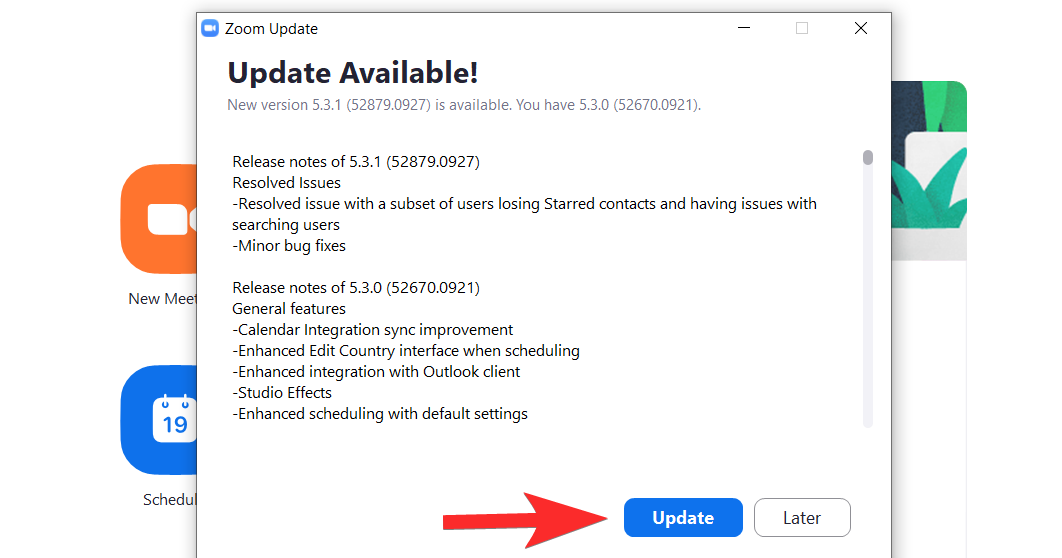
First and foremost, you need to confirm that you’re on the latest updated version (5.3.1) of Zoom. Once you have launched the Zoom app on your computer, click on your profile icon which is on the top right section of the Zoom Home page.

From the menu that will open, click on Check for Updates.

A new window will open to tell you whether you are using the latest updated version of Zoom. If you are, then you will see this notification. In which case, click on Close.

If you don’t have the latest updated version, Zoom will inform you regarding the same. When you see this window, click on Update.

The latest update will be downloaded now.

Wait for a few minutes till the update is downloaded, then the app will relaunch on its own. In case it doesn’t, then launch it from the Start Menu again. Once the app is open, go to the Settings page by clicking its icon which is right below the profile icon.

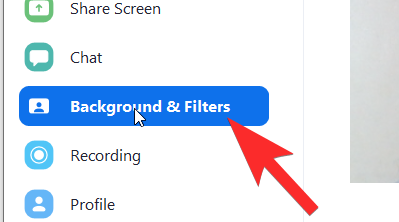
From the Settings menu, select Background & Filters. This action will also switch on your webcam so that you can see yourself as you apply the Studio Effects filters and gauge how you look.

In Backgrounds & Filters, you will see the Studio Effects (beta) option towards the bottom right side. Click on it.

Towards the right side, a panel will open with different sections that cover each facial feature.

Before we proceed into the tutorial for each effect, keep in mind that each effect comes with three customization options: Shape, Color, and Opacity. These three options will be tweaked to achieve your desired look. Now, let’s explore how each effect works.
Related: Netflix on Zoom: How to watch movies together on a Zoom meeting
How to change your face on Zoom
Change Eyebrows
The first section in Studio Effects is for your eyebrows. All the customizations will be available on the right while you will be able to view the effect on yourself on the left in a window that uses your webcam as a mirror.
First, select the kind of eyebrow shape from the set of options provided. Zoom provides shapes like soft arch, thin arch, high arch, curved, straight, sharp, and fit straight. Click on the shape that you want.

1 is the shape that we chose and 2 is the way it’s reflected on the face, right over your own eyebrows. It will look like a slightly unkept layer.
 Next, choose the color of your eyebrows by clicking on the color wheel which is right after the eyebrow shape options. There are stock brown options as well in case you want something simple. The color wheel, of course, will have a much wider array of options.
Click on the color wheel to open the color palette. Once you’ve clicked on the color your want for your eyebrows, click OK.

Now, your eyebrows will reflect the color that you’ve chosen.

Next, increase/decrease the opacity of the eyebrow using the slider which is present right under Opacity. Keep moving the slider till you’re satisfied with the opacity of your new eyebrows.

That’s everything you need to know on how to edit and customize eyebrows using Zoom Studio Effects.
Related: 7 ways to fix Zoom virtual background not working problem
Change Beard and Moustache
The second section of Studio Effects is dedicated to adding and editing a beard/mustache. Zoom offers beards named Blaze Royale, Pencil, Circle, Handlebar, Horseshoe, and Chevron.
Choose the beard option that you want by clicking on any of the options from the Beard and Moustache section (1). The beard will appear on your face (2).

Similar to how it was for eyebrows, click on the color palette that’s right below the moustache shape options to select the color you want to give your beard. Once you’ve done this, click OK.

Move the slider till you’re satisfied with the opacity of your beard and with how you look.

Related: What Does Pin Video on Zoom Mean? Do They Know If You Pin a Video?
Change Lip color
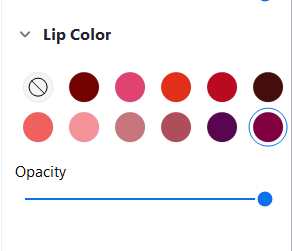
The final section allows the user to change the color of their lips. For lip-related customizations, you will only get color and opacity options.

Go to the color palette in the lip color section to change the color of your lips. From the palette, pick a color that you want on your own lips. There are also stock options that can be selected. Click OK once you’ve picked your lip color.

Adjust the opacity using the slider you will see right under opacity just like we showed you for eyebrows and beard. Your final result can be as refined as you want or as absurd as you’d prefer depending on the customizations you’ve chosen.

Related: How to blur your background on Zoom
How to remove the changes to your face
Studio Effects is a very useful feature to go crazy on special occasions, support your favorite teams, or even attempt to look civilized for an official meeting if that’s what you need. It’s an effective and convincing virtual make-up with great creative scope and more importantly, the option to completely start over should you need.
Once you’ve set a look for yourself using Studio Effects, it will stay when you get on a Zoom call. However, should you wish to return to normal, then click on the Reset button that you will find right after the Lip Color section in the Studio Effect panel.
 Keep in mind that once you press Reset, all previous customizations will be lost and there will be no way to retain the previous looks that you created (at least for now).
Related: Zoom Error Code 3113: How To Fix the Issue
Studio Effects is an extremely smart addition on Zoom’s part. We cannot truly predict when life will go back to actual meeting rooms and away from the domination of video-calls. But at least for the foreseeable future, features like Studio Effects will drive away from the monotony of video-calls and bring some life and color to people who have to take part in meetings throughout the day.
This feature is extremely thoughtful, intuitive, and well-executed, especially considering it’s still in Beta and we look forward to its positive effects on the app and its users. Take care and stay safe!
RELATED:


XD nice
Super Awesome
Hallo!