
Why not root the best gaming phone, the Poco F1?
Poco F1 is an amazing phone, that is also dubbed as simply the best gaming phone given its price — and the fact that it gives you the fastest processor in Snapdragon 845 (that powers the Galaxy S9, the Galaxy Note 9 and will even power the Pixel 3).
No wonder then that the Poco F1 s garnering a lot of attention. If you have bought one, you will be glad to know that a TWRP recovery is available for the device. And using TWRP, you can unlock the full potential of your device by rooting it. Do we need to explain why you should root your device? Well, if you have come so far, we don’t think we need to, but let’s talk about it in very short.
If you are looking to play with stuff like Xposed, substratum, etc. to super customize your Poco F1, or take with-data backup of your apps using Titanium backup and similar apps, then you definitely need root access.
Related:
FYI, you will need to unlock the bootloader of your Poco F1 first, so that you can install TWRP, using which you can flash the Magisk 16.7 package to gain root access. We have covered all of this in the guide below.
So, let’s see how to root the Poco F1 right now.
Warning!
Do not try anything given on this page if you do not know completely what you are doing. In case any damage occurs, we won’t be held responsible.
Compatibility
The downloads and the guide given here are compatible only with the Xiaomi Poco F1. Do not try this on any other device as you may end up bricking it.

Xiaomi Poco F1 TWRP Recovery
Grab the TWRP recovery file from below.
- Poco F1 TWRP recovery: twrp-3.2.3-1-beryllium.img
To install TWRP, see the root guide below. As installing TWRP is what you do first in order to root the device, we have merged the TWRP and root guides into one guide. Just skip step 14 related to rooting the device in the guide below if you only need to install TWRP recovery. Don’t forget to install the Force Encryption disabler file (step 11 below).
You could also check for the latest TWRP Recovery for the POCO F1 here.
Related articles:
Xiaomi Poco F1 Root
Here’s an easy step-by-step guide to help you install TWRP recovery on your Xiaomi Poco F1. You can use the TWRP recovery to easily gain root access on the device.
- Make sure that you’ve unlocked the bootloader for the Poco F1 before proceeding. Take your time doing this.
- Download the required files:
- TWRP recovery: twrp-3.2.3-1-beryllium.img
- Force encryption disabler – DisableForceEncryption_Treble.zip
- Root file (Magisk 18.0): Magisk 18.0.zip
- Connect your Poco F1 to PC using the USB cable that came with it.
- Transfer all the downloaded file (TWRP, Magisk, and Encryption disabler) to your Poco F1. Do keep a copy of TWRP file on your PC too. Keep the Poco F1 connected to PC.
- Make sure you have enabled USB Debugging on your Poco F1, as explained in the bootloader unlock post above (step 1). You may need to re-do it after unlocking the bootloader.
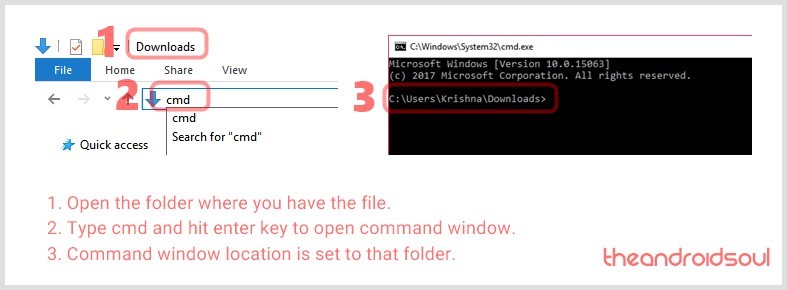
- Now open a command window inside the folder where you have the TWRP file from above. For this, go that folder, and then type cmd in the address bar of that folder’s window, and then hit the enter key. A command window will open up, and its location will be that folder.
- Boot your Poco F1 into bootloader/fastboot mode. For this run this command:
adb reboot bootloader
└ If you get a permission dialogue on your device to “Allow USB debugging”, tap OK.

- Install TWRP recovery on your device by running the command below. To run a command, simply type this in the command window and then hit the enter key.
fastboot flash recovery <name of the TWRP file>.img
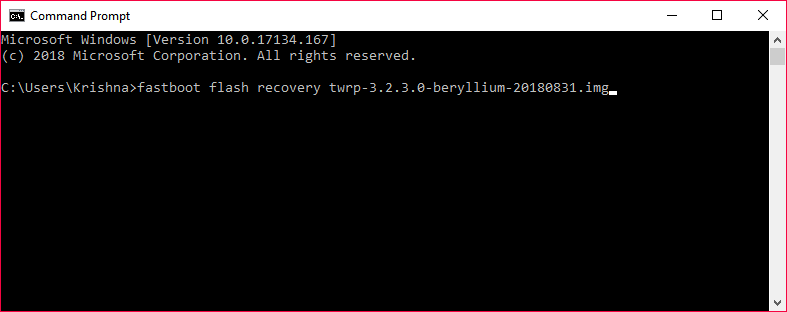
Example command to flash twrp recovery - Reboot into recovery mode to access TWRP before starting Android. For this, run the command below:
fastboot boot <name of the TWRP file>.img
- You will see TWRP recovery now. When asked to ‘Keep System Read only?’, tap on the ‘Keep Read Only’ button to not allow for system modifications.
- Install Force Encryption disabler. Tap on Install, then select the Force Encryption disabler file (DisableForceEncryption_Treble.zip) and confirm on the next screen.
- Reboot to TWRP recovery again. On the home screen of TWRP, tap on Reboot, and then on Recovery.
- When back in TWRP, tap on Wipe, and then on Format data option. Type yes on the next screen to confirm wiping of data. This will delete everything on the device.
- Time to root the Poco F1! [In case you don’t want to root the device, ignore this step.]
- Transfer the Magisk file to your Poco F1.
- Install Magisk root package. Go back to the home screen of TWRP and tap on Install, > then select the ZIP file, Magisk-v18.0.zip, and confirm on the next screen.
- Restart the device: tap on Reboot > System. Your Poco F1 is rooted now. You can verify root access on your Poco F1 using a root checker app.


That’s all about rooting and installing TWRP recovery on your device.
Related: Best Android hacks that don’t need root access
That should help you easily root the Xiaomi Poco F1. Let us know in the comments box below if you need any help with this.


One response to “How to root Xiaomi Poco F1”
well this is a good tutorial, execpt that the TWRP image is the wrong one, it didnt worked and i had to download a twrp with decryption.