
From juicy tidbits to important texts, screenshots have sneakily become a part of our daily lives. Needless to say, your shiny new Galaxy Note 10 is capable of capturing screens whenever you need it to, and in multiple ways. This section is all about making you aware of all the tricks you can use on your Note 10 to take a screenshot. So, without further ado, let’s get to it.
RELATED: When will Galaxy Note 10 get Android 10 update

Galaxy Note 10 combines the Power and Bixby keys into one, calling it the Side key.
Using Bixby/Google Assistant
Samsung has tried its best to make Bixby the primary digital assistant on Samsung devices, but the assistant’s laggy interface and sub-par listening skills have not served the company well. Google Assistant, on the other hand, is the most widely used digital assistant on Android and pretty much carry out most tasks with ease.
When it comes to screenshot capturing, both assistants can carry it out quite gracefully.
Note: Before doing the above, you will need to set up Bixby, Google Assistant, or both as you wish, to be able to use the screenshot trick.
Using S Pen
The S Pen is one of Note 10’s standout features. Not only can it be used to take notes and photos but it can also be employed to captures screenshots.
It will immediately take a screenshot and open the S Pen annotation tools.
Using Good Lock
The Good Lock is Samsung’s very own system customization tool, which allows you to personalize your device exactly the way you want to. The app has a bunch of different modules, letting you customize various sections of the UI.
Step 1: Install Good Lock.
Step 2: Open it.
Step 3: Tap and install NavStar module.


Using Smart Select
Not many use the Samsung Edge panel as much as they should. Not only does it allow quick access to your favorite apps, but it also has a Smart Select screen that comes in really handy every now then.

Using Palm Swipe Gesture

The Samsung Galaxy Note 10 supports a comprehensive set of gestures. And while not all of them come in handy or are practically useful, this particular gesture is quite beneficial. Before using Palm Swipe to Capture, make sure it’s turned on.
To turn, go to Settings > Advanced features > Motions and gestures > Toggle on Palm swipe to capture.
After it’s enabled, follow these steps to capture a screenshot.
Using Smart Capture

Smart Capture allows you to extend your screenshot, crop, or edit it just after you’ve captured it. To enable, go to Settings > Advanced features > Toggle on Smart capture.
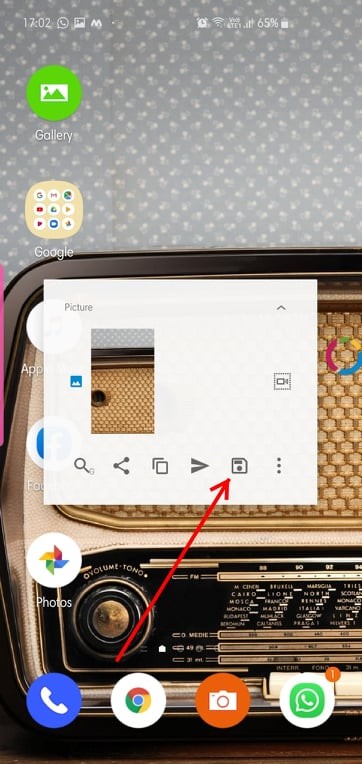
After you’ve enabled it, you’ll get a popup after every screenshot.
Here are the options you’ll get:
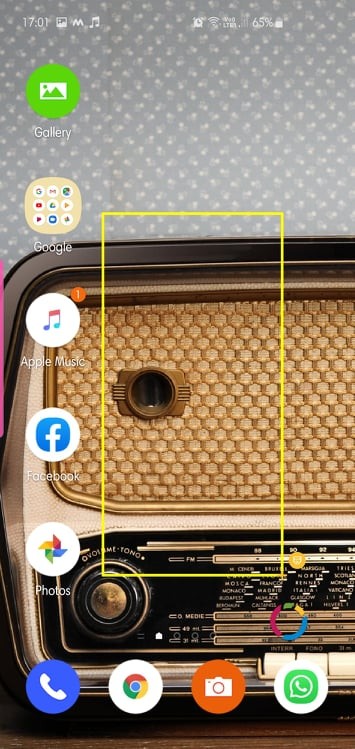
- Scroll to capture more: This feature lets you capture a longer screenshot in case you want to capture an entire list or page in a single screenshot.
- Draw: As the name suggests, you would be able to quickly doodle on your screenshot if you tap on the Draw icon.
- Crop: This is super useful in case you do not want to save the entire screen in the screenshot. Once you’ve taken a screenshot, simply tap on the Crop icon to crop the screenshot.
- Share: Lastly, you’ve also got the option to quickly share the screenshot.
Using FooView Android app
The Samsung Galaxy Note 10 is a gigantic device, making it almost impossible to use it convincingly without committing both hands. So, if you’re looking for a way to access all your favorite apps without breaking out a sweat do check the app out.
Apart from the regular, full-screen screenshots, FooView also allows you to take selective screenshots.
Here’s how to:
Alternately, you can set a gesture for full-screen screenshots. For example, in the GIF below, we are using the long swipe down to capture the screen.

How to tag your screenshots
In the Note 10 devices, you can use keywords (tags) to describe and organize your screenshots.


Searching for tagged screenshots is as easy as creating them.

So, which was your favorite trick to take a screenshot on your Galaxy Note 10 and Galaxy Note 10 Plus?


One response to “How to take a screenshot on Samsung Galaxy Note 10”
The [Smart capture] feature is now called [Palm swipe to capture]. 24/10/2019