
Samsung released the Galaxy J7 2017 edition back in July 2017, and it’s easy to say that it was one of the most sought-after device among users looking to buy a device without breaking their bank. But we know what else you crave for, well, that is root and TWRP recovery for the device, because once you get fond of the superuser access and custom ROMs, you need these two hacks on your device to be able to feel satisfied with its ownership.
Well, good news then! The Galaxy J7 2017 root, and its TWRP recovery, both are available. Of course, root is fairly easy to achieve on this set once you get TWRP recovery, which became available only now.
Note that this is model no. SM-J730F/G/GM/FD we are talking about, as carriers in USA did enough to confuse the world by presenting SM-J727(x) as J7 2017, which is not correct. SM-J730(x) is the J7 2017.
‘Oreo update for Galaxy A3, Galaxy A5 and Galaxy A7‘
Now, with Google having released the Oreo update already, we know many of you are kinda just waiting for the Android 8.0 custom ROMs to drop for the device too, which we think should arrive in due course. Further, the device is fully eligible for the Samsung Oreo update too, which should arrive as an OTA sometime in Q2 2018.
Anyhoo, enough talk, let’s go about how to root Galaxy J7 2017 and install one cool TWRP recovery on to it.
Galaxy J7 2017 Root and TWRP Recovery: Downloads and How to install guide
Downloads
Supported devices
- Samsung Galaxy J7 2017, model no. SM-J730F/FM/G/GM
- Note: Only the Galaxy J7 models powered by Exynos 7870 processor are eligible with this TWRP recovery and root guide.
- Don’t try on any other device whatsoever!
Important: Check your device’s model no. on its packaging box, or in Settings > About device. BTW, be sure to use an app like Droid Info to make sure that your device’s model no. is the one given above. If you don’t see the same model no. and codename, then DO NOT try this on your device.
Warning!
Warranty may be void of your device if you follow the procedures given on this page. You only are responsible for your device. We won’t be liable if any damage occurs to your device and/or its components.
Backup!
Backup important files stored on your device before proceeding with the steps below, so that in case something goes wrong you’ll have backup of all your important files. Sometimes, Odin installation may delete everything on your device!
Step-by-step Guide
- Go to Settings > About phone, and then tap ‘Build number’ 7 times or until you see the ‘you’re now a developer’ message pop up.
- Now go back to Settings, and into Developer options. Now, look for OEM Unlock, and select it using its toggle button.
In case you can’t find the OEM Unlock option in Developer options as given above, ignore this step. Maybe this is not available for your device, which is not bad. We’re happy to not ahve it, actually. However in case you run into error called ‘Blocked by FRP lock‘, then it means you have the OEM unlock option, and you need to enable it.
Step 1. Download TWRP, SuperSU and Odin file from above.
→ Transfer the root kernel and SuperSU file to your Galaxy J7 2017. Keep Odin and TWRP file on PC.
Step 2. Install Galaxy J7 2017 driver (method 1 there!) first of all. Double click the .exe file of drivers to begin installation. (Not required if you have already done this.)
Step 5. Boot Galaxy J7 2017 into download mode:
- Power off your Galaxy J7 2017. Wait 6-7 seconds after screen goes off.
- Press and hold the three buttons Power + Home + Volume down together until you see warning screen.
- Press Volume Up to continue to download mode.
Step 6. Double click on extracted file of Odin, Odin3 v3.10.6.exe, to open the Odin window, as shown below. Be careful with Odin, and do just as said to prevent problems.

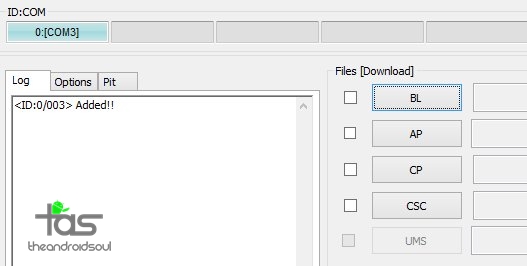
- You cannot proceed until Odin recognizes your device and you get the Added!! message.
- If it doesn’t, you need to install/re-install drivers again, and use the original cable that came with device. Mostly, drivers are the problem.
- You can try different USB ports on your PC too, btw.
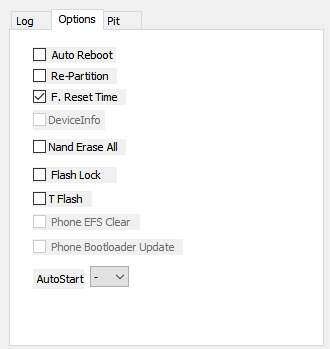
Step 9. Make sure Re-partition and Auto Reboot checkbox are NOT selected, under the Options tab. Don’t use PIT tab either. Go back to Log tab btw, it will show the progress when you hit start button in next step.
- If Odin gets stuck at setup connection, then you need to do this all again. Disconnect your device, close Odin, boot device into download mode again, open Odin, and then select the TWRP and flash it again as said above.
- If you get FAIL in the top left box, then also you need to flash the TWRP file again as stated just above.

- Press and hold Volume down + Home + Power button together until screen goes off, but once screen goes off, do this quickly: while still holding the Power and Home button, press Volume Up button in place of Volume down button to reboot into recovery mode.
→ That’s it. Enjoy the TWRP and root access on your Galaxy J7 2017!
To access TWRP recovery, you have to reboot into recovery mode:
- Power off your Galaxy J7 2017. Wait 6-7 seconds after screen goes off.
- Press and hold the three buttons Volume up + Home + Power together until you see Samsung logo on the screen.
If you need any help with this, let us know via comments below and we will try our best to help you out.
Big thanks to ashyx for this!
Check out: OnePlus 5 Root | Pixel Android Oreo Root


