The much awaited Android Oreo is now available for download for Pixel and select Nexus devices. The update comes with Android version 8.0 and has been under tests since the past couple of months under the name Android O.
Google released 4 developer preview builds of Android Oreo, the last one was released about a month back only, and fortunately, it was easily root-able through SuperSU and Magisk. Now it’s time for the final and public release of Android Oreo to get tested for root.
As you all know, there are currently only two safe solutions to root your Android device. One is the SuperSU root by Chainfire, the other is Magisk which has been gaining popularity lately. Latest versions of both of these root methods were reported to work fine with Android O developer preview builds, and fortunately the final release — Android Oreo — supports them as well.
Note: To be able to root Android Oreo by either SuperSU or Magisk, you must have a custom recovery like TWRP installed on your device.
Let’s get started..
How to root Android Oreo with SuperSU
→ Download SuperSU v2.82 SR3 (.zip)
- Download and transfer the SuperSU zip file from the download link above to your device’s storage.
- Boot your device into TWRP recovery.
- Tap on Install and select the SuperSU zip file that you transferred to your device in Step 1.
- After selecting the .zip file, do Swipe to Confirm Flash on the bottom of screen to begin the flashing process.
- Once SuperSU is flashed, you’ll get Reboot System option, select it.
How to root Android Oreo with Magisk
→ Download Magisk installer (.zip)
→ Download Magisk Manager (.apk)
- Download and transfer both the Magisk zip and Magisk Manager apk files from the download link above to your device’s storage.
- Boot your device into TWRP recovery.
- Tap on Install and select the Magisk zip file that you transferred to your device in Step 1.
- After selecting the .zip file, do Swipe to Confirm Flash on the bottom of screen to begin the flashing process.
- Once Magisk is flashed, you’ll get Reboot System option, select it.
- Once your device reboots, open a file manager app » go to the folder where transferred the Magisk Manager apk file in Step 1 above, and install it.
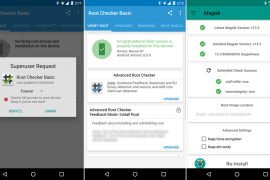
- Open the Magisk Manager app and check for your device’s root status.
That’s it. Hope you were able to get your device running on Android Oreo rooted with the step-by-step guide above.


2 responses to “How to root Android 8.0 Oreo with SuperSU zip or Magisk”
This article is now 15 months old!
Is there any update for Oreo version dated November 2018?
Recent update to AOSP AEX 5.5 and magisk 16.0 causes Titanium Backup to find root and fail.