
Storage space is like time: there just is never enough. I’m not big on cloud services and cannot rely on staying online just to access my own files, which is why I prefer having them locally. But that has its own issues. Every time an app is installed, or a file is brought in, the storage space gets eaten up. Even if I’m not doing anything it seems to run out of its own volition. And just as time is a precious resource that I try to manage as best I can, so is my system’s disk space.
Though Windows has its own disk and storage space management tools, they leave a lot to be desired. But there’s a program for everything under the sun, and for storage space management, TreeSize is as good as they come.
Figuring out a new app without any reference, however, can be tricky. Below I share my views on TreeSize, how to set it up, and how to start using it so you can save yourself some time, as well as disk space.
Related: How to Find Large Files on Windows 11
What is TreeSize
TreeSize is a disk management tool by JAM Software built only for Windows. It is free to use though there is a paid version as well for personal and professional use. They are available for comparison on JAM Software’s website if you’d like to know the difference between them.
Briefly, the paid version has additional features such as a duplicate file finder, more export options, as well as command line options (professional only). But for all intents and purposes, the free version has everything I need, and that is what I’ll relate below.
TreeSize Free Features
TreeSize isn’t the only disk space management tool out there which is why it’s crucial that its features and offerings align with my (and your) needs. Fortunately, one glance at the main features listed on the website is good enough to have me reach for the download button.
Quickly find out which files are hogging space, monitor free space and file information, scan and export results, and get a File Explorer-like tree view of whatever you’ve got on your system – I couldn’t ask for anything more.
On top of that, TreeSize also allows for smartphone and mobile device scanning via MTP which is something else to look out for.
How to set up TreeSize Free on your PC
TreeSize is available to download freely. Follow the link to get it on your system:
> TreeSize Free: Download Link
Once you’re on the website, click on the Free Download button at the top right corner.

On the next screen, you can select whether you want the installer or the portable zipped file. Then click on Download.

TreeSize will ask you if you want to try the Pro version instead. But after 30 days of trial, you’re going to have to switch anyway. So just click on Continue with TreeSize Free at the bottom.

Once downloaded, double-click on the setup to start the installation.

Click OK.

Accept the agreement and click Next.

Click Next to continue installing at the default location.

Click Next again.

That’s it! Click on Finish to finish.

Now open TreeSize Free (as Administrator).

Related: How to delete temporary files in Windows 11
How to use TreeSize Free
I’ll quickly run down the steps to install and set up TreeSize Free on Windows so we can take a deeper look into the features and how to use them to manage space on a computer.
1. Select your directory for file scanning
Once you have TreeSize in front of you, the first thing to do is select a directory and start scanning for file data. Click on Select Directory at the top left.

Then select the drive or the folder to scan. It’s best in my opinion to scan the C: drive first because that’s where most of the important files generally are. But you can go ahead with any folder you like. TreeSize will automatically start scanning the selected drive.

Once the scan is finished, you’ll find the folders and files in a tree-like view, similar to File Explorer which makes it quite intuitive to use.

To check out the subfolder and files within a given folder, just click on the small arrow before it to expand it.

2. View used space by size, allocated space, percent, and file count
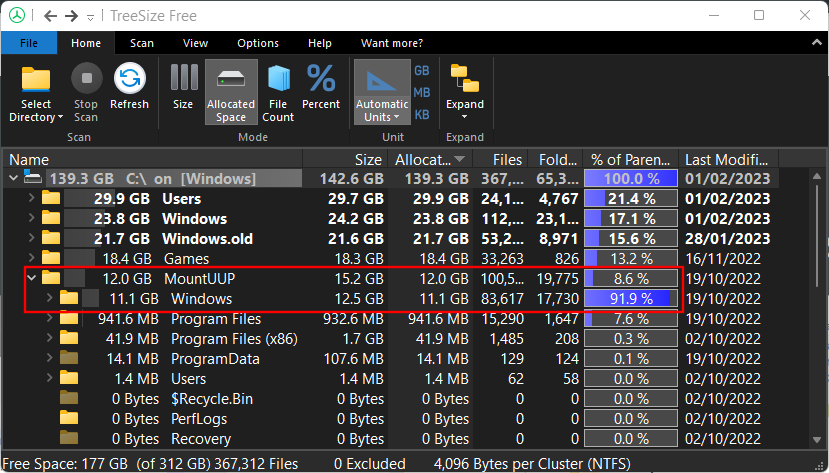
To the left of every folder, you will see how much space that folder is taking up. But the percentages given to the right can be a bit confusing at first.

At first glance, I asked myself: Why does TreeSize show 100% on the ‘C’ drive? After all, I had more than half of the disk free. But when I expanded a folder, the logic became clear.
These percentages show how much a given folder is taking up the overall used space of its parent folder/disk, not the whole disk. And since I had selected ‘C’ to scan, that would be its own parent folder and would have a hundred percent of its own files, naturally.
So when a different folder is expanded, you will see, as a percentage, the share of space the subfolders within it are using up. In my instance, the ‘Windows’ subfolder is using 91.9% of the total space of its parent folder ‘MountUUP’ which in turn is using up 8.6% of the total used space of C (see image below).
Besides viewing the allocated space and its percentages relative to the parent folder, there is also a “File Count” viewer.

This gives an exact count of the number of files there are in each folder (and subfolder) and, on the right, the percentage of files in that folder out of the total files in its parent folder.

Similarly, there are “Size” and “Percent” view options as well. As far as I can tell, these will mainly change what you see next to the folders.

The “% of Parent (Size)” and “file count” view options are primary. However, you will want to play around with all four options depending on how you want to view your files and folders.
3. Delete a file to free up space
Say you want to delete a few files in TreeSize. After all, what good is all this visual representation if you can’t delete files, right? No good at all. And deleting is a cinch with TreeSize. Simply right-click on a file or folder, as you would in File Explorer, and select Delete.

That’s pretty much it. No confirmation prompts or pop-ups. And it’s good that it’s that simple.
Apart from the basics that I’ve talked about, you’ll do good to play around with the other options available in TreeSize. Go through the different tabs and experiment with the different viewing and sorting styles, check out the user interface options (dark, light, and touch optimization), the size units (view in TBs, GBs, MBs, or KBs), and the search function.
All these options help simplify the task further so do make sure to check them out and see what all you can work with.
4. Delete files permanently when you need to
Normal ‘Delete’ will send the files to recycle bin. If you want to delete a file permanently, then you need to use the shift+Delete combination. For this, simply select the file in TreeSize by clicking on it, and then press shift+delete.
On the prompt, select Yes.

This is particularly helpful if you are sure that you won’t need the files. When a file is very big in size, TreeSize will automatically ask you to confirm the permanent deletion.
5. Using the Treemap chart
Perhaps the most useful of all features that I’ve found is the Treemap Chart. This option is available in the toolbar under the “View” tab.

The Treemap Chart will display your files and folders based on their respective sizes and how deep they are within the parent folder.

You can also have the Treemap Chart appear at the bottom by clicking “Show at bottom” under the “Chart Options” tab, which is how I prefer it.

Now before I go on, let’s clarify the layout of this Treemap Chart. The area of a given folder box is proportional to its size. The larger the size, the bigger its box will be. In my case, the “Games” folder is slightly smaller than the “Windows” folder because it uses up lesser disk space.

As I’ve already said, the levels indicate how deep a subfolder/file is within the parent folder, indicated by different shades of blue. For instance, the “Virtual Machine” subfolder is around level 5 (light blue), while the primary folder ‘C’ is level 0 (darkest blue).

Of course, all this is in relation to the scanned folder. The main folder will always be at level 0 while everything within it will have different shades of blue depending on how many subfolders deep it is.
But that’s not all! The Treemap Chart can also be viewed in 3D, the option for which is given under the “Chart Options” tab.

I find this an even better way to view the files and subfolders within the main scanned folder. The level colors will change, which is good for easy viewing. But within each folder, you’ll also see ‘bubbles’ of files and folders.
No matter how small or big they are, or how many there are, you can literally get access to every file here just by hovering over them or right-clicking on them.

The ‘Windows Explorer’ option will work as the context menu.

6. Export Scan results
All the information about storage allocation is quite useful, and not least to identify which file/folder is hoarding how much space, and where. But what I found particularly useful was that I can share this information with others with a quick export.
Sure, sometimes I don’t quite understand all the technical matters about disk management. But I’ve got friends who do and it’ll be easier for them to suggest what I can do once they have information about my disk utilization.
Exporting the scan results is easy. Click on the “File” tab in the top left corner, select Export, and choose the “PDF File” option (exporting as Excel is reserved for paid professional users).

Find a place to save your pdf and click on Save.

FAQs
There are a few frequently asked questions that I’d like to shed some light on.
What does TreeSize do?
TreeSize is a disk management tool by JAM Software. It provides a tree-like view of the files and folders on your system by arranging them in easily viewable layouts based on allocated space, size, file count, etc.
How do you run a TreeSize?
To view your files and folders in a tree-like fashion, select a folder to scan and wait for the results to be displayed. Refer to the guide above to know more.
How do I export TreeSize to excel for free?
Exporting TreeSize scan results for excel is reserved for the paid version of the program. You can, however, use the trial version (free for 30 days) and export your scan results as an excel file. To do so, simply click on the “File” tab, select “Export”, and then select “Excel”.
TreeSize is one of the better disk management tools that I’ve come across and it’s easy to see why it’s gained in popularity. The depth at which it analyzes the files, how they’re stored, and the different presentation options make it a program worth having. I hope you found this tool as useful as I did and are able to better understand how storage space is allocated to your files and folders on your PC. Until next time, stay safe!


