CapCut is the latest video editing app by Bytedance, the makers of TikTok that has managed to top the charts in the US app store. If you have been on the hunt for a good video editing app for mobile devices then CapCut deserves your attention. It has a minimal UI with a plethora of effects and filters that you can use to customize and enhance your videos.
The editor also allows you to use a green screen and remove backgrounds on CapCut, If you have been looking to do the same, then here’s how you can get started.
Related: How to do 3D Zoom on Capcu4t
How to use green screen in CapCut
Make sure you have downloaded the CapCut app on your phone. Download: iPhone/iPad | Android
Green screen can be used in two ways in CapCut. CapCut has its algorithm-powered background removal tool that can remove the green screen for you. Additionally, it also comes with a chroma key option where you can key out any color you wish. Follow one of the methods below that best fits your current needs and requirements.
Method #01: Use Background remover (Android only)
Sadly, background remover is unavailable for iOS users. If you wish to remove the green screen in CapCut on iOS, then you can use the next guide.
Download and install CapCut on your Android device using the link above. Once, installed, launch the app and tap on ‘+ New project’.

Now select your background clip from your local storage. If this is your first time using CapCut, then you will need to grant it the necessary storage permissions.

Tap on ‘Add’ once selected. You can also select multiple background clips.

The clip will now be added to your timeline. Trim the clip if needed and then deselect the clip. You will now get general menu options at the bottom of your screen. Tap on ‘Overlay’.

Tap on ‘+ Add overlay’.

Now select your green screen clip you wish to add from your gallery.

Tap on ‘Add’ in the bottom right corner of your screen.

Tap on ‘Remove background’ in the bottom right corner of your screen. Depending on your resolution and screen size, you might need to scroll to the right on the bottom of your screen.

CapCut will now automatically remove the green screen background from your clip. You can now proceed to edit your project as you wish.

And that’s it! You will now have keyed out the green screen in CapCut.
Method #02: Key out green screen (Android and iPhone/iPad)
The option to key out green screen is available for both iOS and Android users, and the layout for the app is same on both devices. Hence you can use the common guide below on both platforms.
Open CapCut and tap on ‘+ New Project’.
Tap and select your background clip from the local storage.
Tap on ‘Add’ in the bottom right corner once you are done.
The clip will now be added to your timeline. Tap on ‘Overlay’ at the bottom of your screen.
Now tap on ‘+ Add overlay’.
Select your green screen clip from your local storage and tap on ‘Add’ once selected.
The clip will now be overlayed on top of your background. Tap and resize the preview if needed. Once done, scroll the tools at the bottom to your right and tap on ‘Chroma Key’.

You will get a color picker in the preview at the top of your screen. Tap and hold on to the picker and move it around to select the desired color you wish to key out.

Once selected, tap on ‘Intensity’.

You will now get a slider to adjust the intensity of your color removal. Use the slider until you achieve the desired effect you had in mind.

Repeat the same step above for ‘Shadows’. Ideally, a mix of shadows and intensity will help you get the perfect green screen effect for your clip.
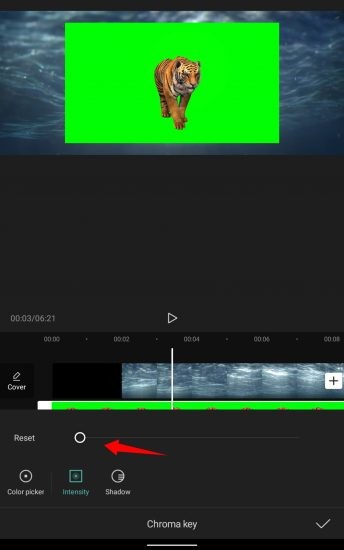
Once you are happy with the outcome, tap on the ‘check mark’ in the bottom right corner of your screen
 .
.
You can now select the clip and reposition it according to the preview if needed.
Finalize your project by making other essential edits and export your project as you normally would. And that’s it! You will now have easily keyed out your green screen in CapCut.
Customize background removal: Tips
Sadly, CapCut only gives you limited control when it comes to keying out colors from your clips. You get access to the following sliders.
Intensity: This slider helps you adjust how intensely the color is removed from your clip. In practicality, this slider in turn helps you manage and dictate the edges of your subject when removing the color. This can be quite useful in certain textures like fur where you are dealing with tons of fibers and edges. Sadly, this doesn’t mean that the intensity slider offers you tons of control, rather you get access to a basic slider that doesn’t feature any tools to fine-tune the edges. But something is always better than nothing.
Shadows: The Shadows slider allows you to apply artificial shadows to the edges of your green screen subject to help enhance their outline without having it look out of place. This is quite a useful feature in case there is a lot of noise in the background or if the subject’s lighting is different from the lighting used in the background. You can use the shadow slider depending on your current screen to increase or decrease the number of shadows at the edges.
We hope this guide helped you easily learn how to use green screen in CapCut. If you have any questions or suggestions, feel free to drop them in the comments section below.


One response to “How To Use Green Screen on CapCut”
Hi
How are you
I am Mansoor Saleem,a passionate SEO and marketing Expert.
I am providing websites for Guest posting with high metrics.
I can also outreach the websites manually for your requirements too.
I have access to more than 5000 websites.
Let me know if you are interested so we can work together.
Thank you very much