
Virtual meetings and video conferences have become the norm now for workplaces, institutions, and even social gatherings.
And apps like Microsoft Teams have been nothing short of lifesavers. The Redmond giant’s remote conferencing solution has garnered a soaring user count since the pandemic first broke out and with several users depending on it daily, the service has been ramping up on its productivity features over the past few months.
One of the features that were added to the service recently was Breakout rooms – an option that let meeting hosts create multiple subgroups from the main meeting so that participants can interact with others who have the same interests or expertise. In this post, we’ll explain what this feature is all about, what you may need to get it to work, how to create and use them inside Microsoft Teams.
What are Breakout rooms in Microsoft Teams?
When you’re in a large meeting, you’ll have a hard time garnering attention and have an open and meaningful discussion with others. The basic purpose of Breakout Rooms is to split a main (large) meeting group into multiple subgroups so that all members from an organization with the same field of expertise can work together.
While meeting hosts will have the option to interact with and control the proceedings of all the subgroups, members of one subgroup can only discuss with other members in the group. Breakout Rooms can be helpful for organizations with multiple departments, allowing hosts to delegate work easily and check in on subgroup discussions at any time.
What do you need to have to host Breakout Rooms?
Before you create a Breakout room, you need to make sure that you have the following things sorted out:
- You need to be the meeting host of your organization to be able to create Breakout rooms for everyone.
- The meeting host is using a Windows or Mac computer. This is important because breakout rooms can only be created if the organizer is using a PC running macOS 10.14 Mojave or higher or Windows 8.1 or later. Participants can, however, join breakout rooms from any device including iOS and Android phones as well.
- You are running the latest version of the Microsoft Teams Desktop client on your computer.
How to Create Breakout Rooms on Microsoft Teams (Organizers only)
Once you’ve ensured the aforementioned requirements, you can go ahead and create a Breakout room for your meeting inside Microsoft Teams. To host Breakout Rooms, create a meeting for your organization on Teams and then click on the Breakout rooms button at the top where you access other meeting controls.

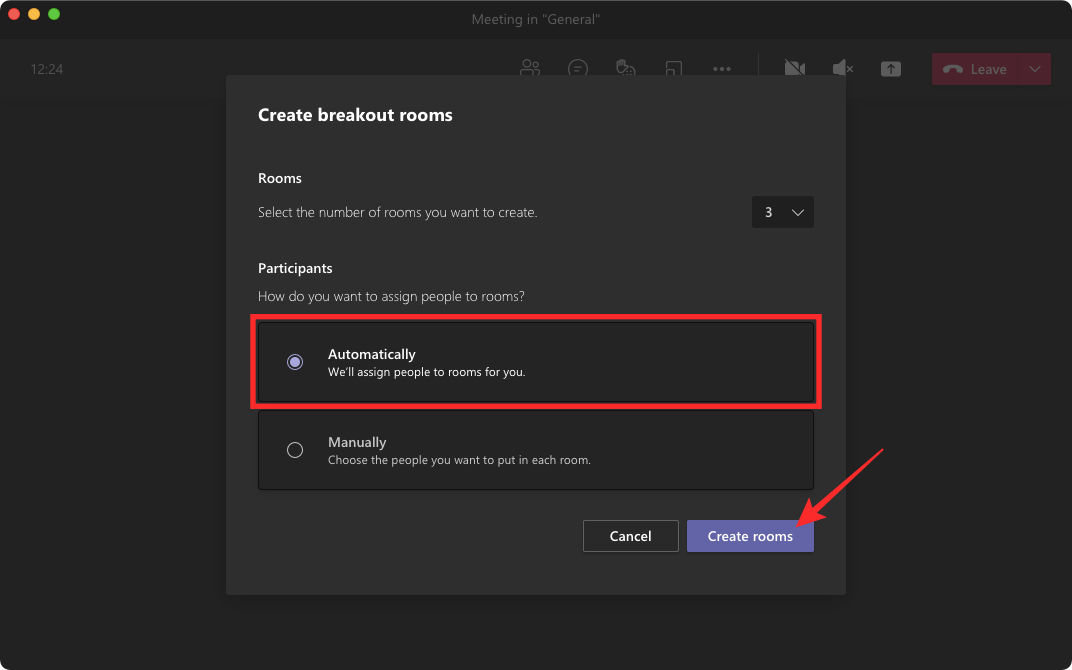
You will now see a ‘Create breakout rooms’ box appears on the screen. Here, select the number of rooms you want to create for the different departments of your primary group by clicking on the drop-down menu beside the ‘Rooms’ option. Teams allows you to create up to 50 breakout rooms within a meeting.

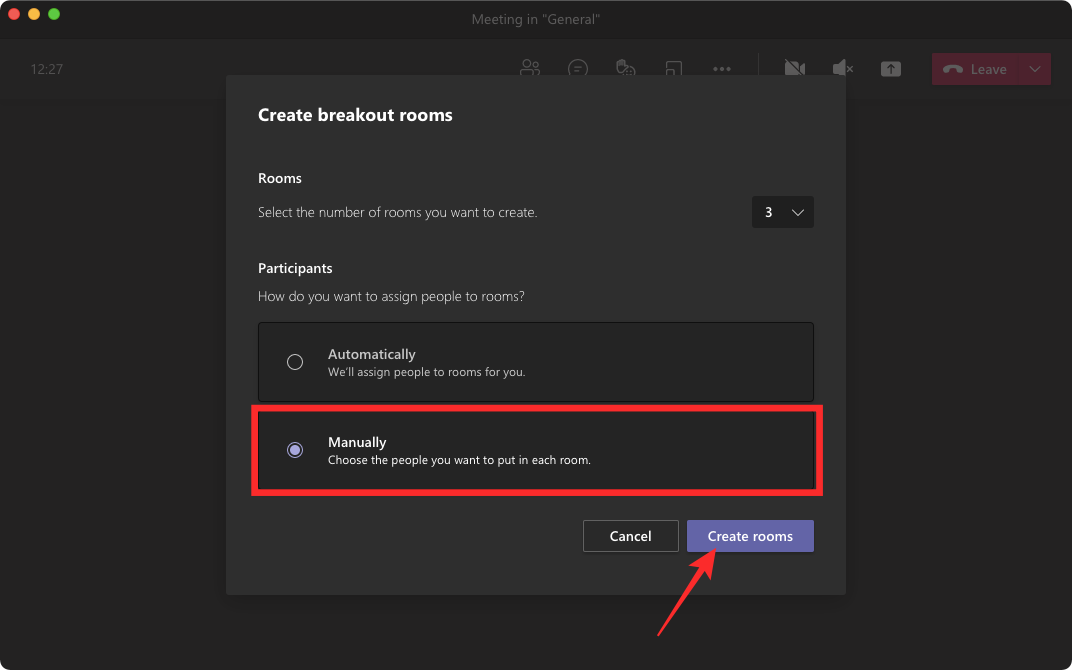
Once you’ve selected the number of rooms you want to create, you can select either of the following options for assigning people to their rooms:
Automatically: When you select this option, Teams will assign participants to their rooms for you. If you’re choosing this option, you can click on the ‘Create rooms’ button at the bottom right to complete the process.
Manually: This option will let you assign whom you want to add to each of your breakout rooms. When you choose this option, you can click on the ‘Create rooms’ button.
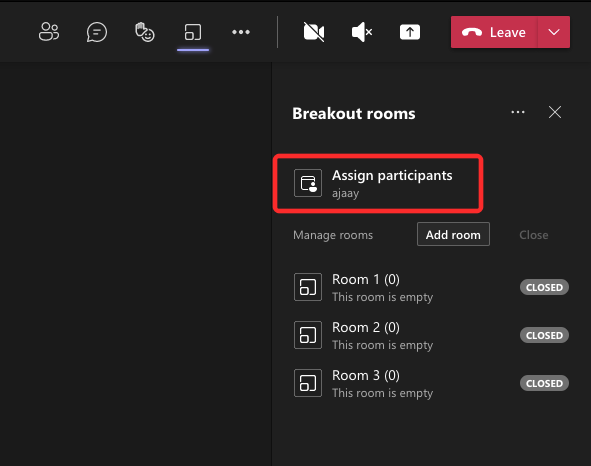
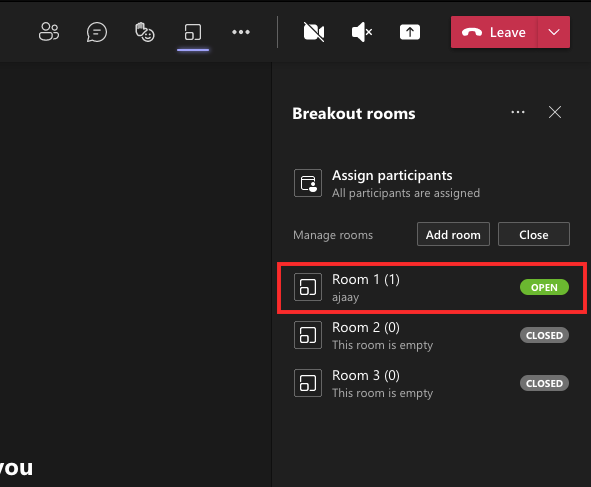
On the next screen, you will see all the rooms you created, inside the ‘Breakout rooms’ sidebar on the right-hand side of the meeting screen. Here, you can add participants to your room by selecting the ‘Assign participants’ section.
Now, click on the checkboxes adjacent to the names of the people you want to add and then select the ‘Assign’ inside the sidebar.
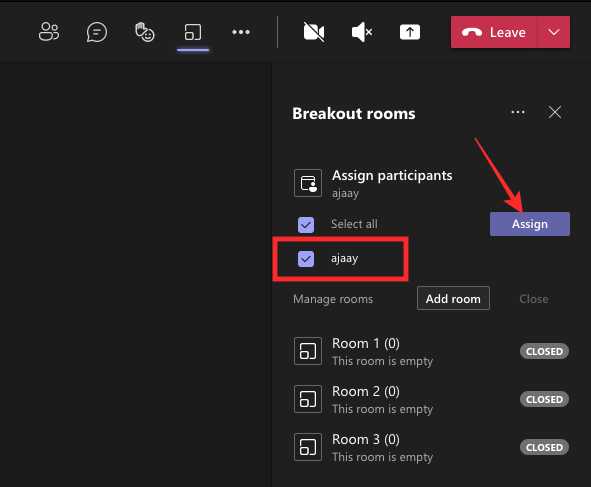
Next, select the room you want to add these participants to.
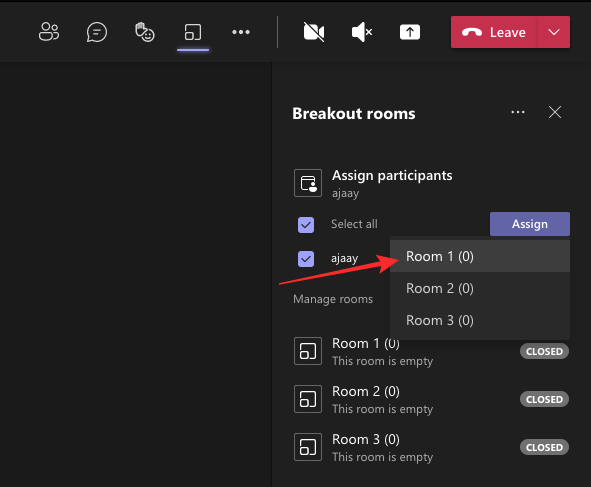
The selected people will now be assigned to one room. You can repeat this for adding other participants to another room and so on.
How to Use Breakout Rooms as an Organizer
Once you’ve created a breakout room inside Microsoft Teams, you can start using it and manage all of its different controls as an organizer.
Start rooms within a meeting
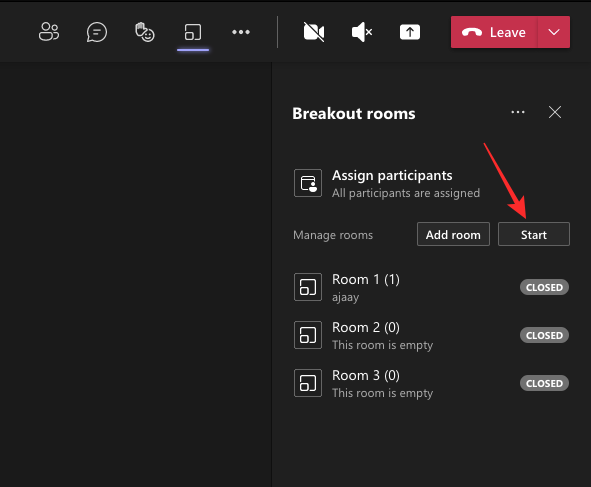
When you create rooms inside a meeting, the first thing you need to do after creating a room is to open it so that all the people you have assigned are moved to their respective rooms. Microsoft Teams lets you open all rooms that you’ve created in one go. For this, enter the meeting you’re organizing and click on the Breakout rooms button at the top.
When the Breakout rooms sidebar appears on the right, click on the ‘Start’ button at the top.
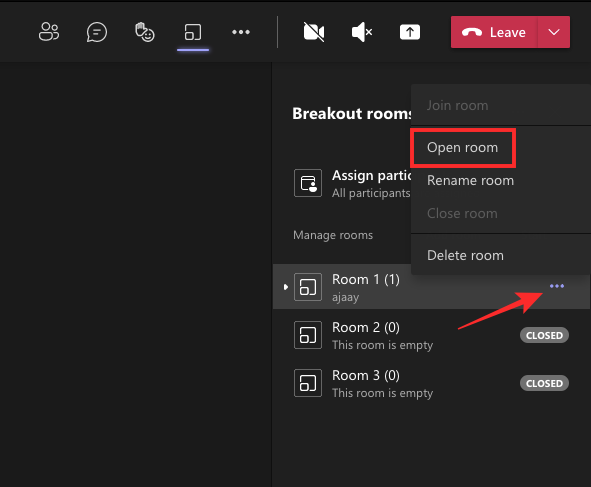
If you wish to open only one specific room and add the assigned participants to that one room, you can do so by clicking the 3-dots icon adjacent to the selected room and then select the ‘Open room’ option from the drop-down menu.
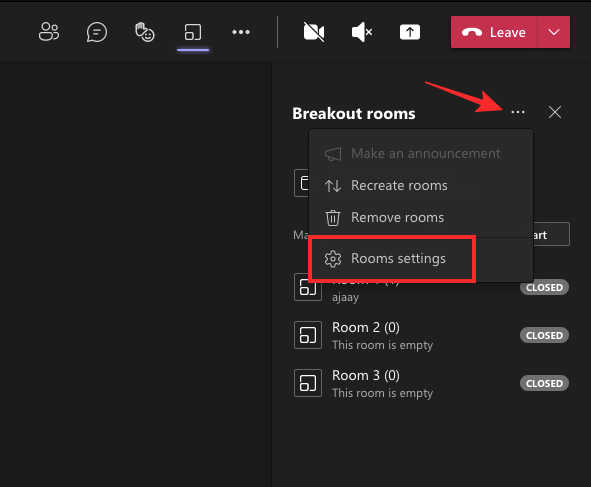
To make sure the participants you’ve assigned are moved into their respective rooms automatically, you need to make sure that you’ve enabled the ‘Automatically move participants to rooms’ feature inside the breakout rooms. For this, click on the 3-dots icon adjacent to the ‘Breakout rooms’ title at the top and select the ‘Room settings’ option from the drop-down menu.
When room settings opens up, check the box that reads ‘Automatically move participants to rooms’.
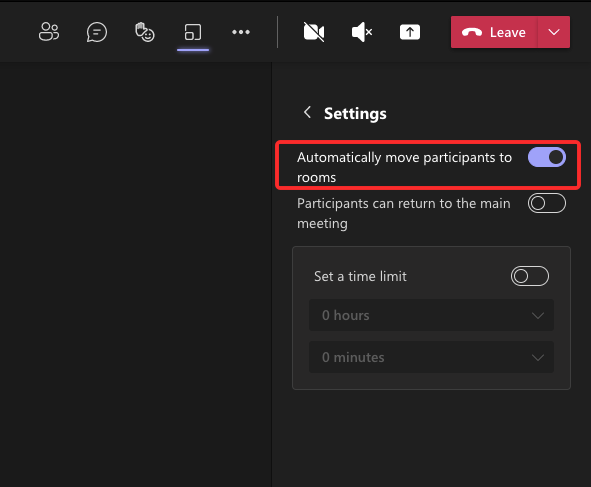
This will add all the participants who are assigned to an open room into their room when it is started.
Add someone to a breakout room
If you’ve forgotten to add someone to a breakout room, you can assign them to be moved inside a room by first selecting the ‘Assign participants’ section inside the Breakout rooms sidebar.
When you see a list of participants who haven’t been added to any groups, you can add them to one by checking the boxes adjacent to their names and then clicking on the ‘Assign’ button.
When you assign someone to a room within a meeting, they’ll be assigned back to the same room every time you open this particular breakout room.
Ask someone to join a breakout room
If the meeting organizer has disabled the ‘Automatically move people into opened rooms’ option for a meeting or if one participant has switched back to the main meeting instead of their breakout room, you as a meeting organizer will ask them to join a room. To do that, click on the Breakout rooms button at the top of the meeting screen.
Next, click on the room where you added the participant to.
Now, hover over the participant who you wish to ask to join. When you’ve located the person you want to join your room, click on the 3-dots icon next to their name and select the ‘Ask to Join’ option.

When you send the ‘Ask to Join’ invite to a participant, they will see a prompt on their screen which they can Accept to join their assigned Breakout Room.
Make announcements in all rooms
Meeting organizers have the option to broadcast a message to all breakout rooms like when they have to remind participants of a deadline or when they want the participants to know when their breakout rooms will cease to exist. Announcements can only be made inside rooms when at least one of them is open and active during a meeting. This option would not be available if the rooms you created are closed.
To announce within rooms, click on the 3-dots icon adjacent to the ‘Breakout rooms’ title at the top and selecting the ‘Make an announcement’ option from the drop-down menu.
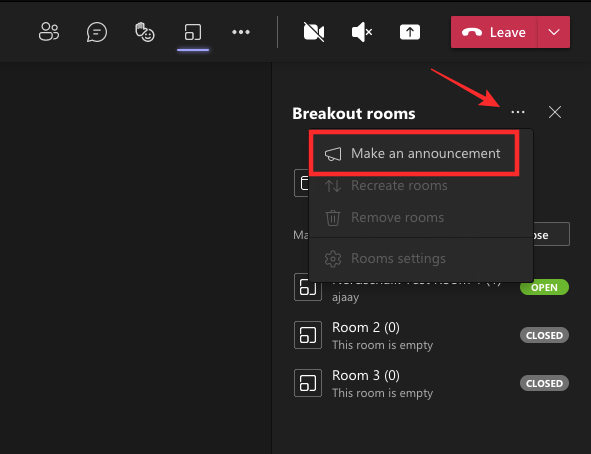
In the small box that appears, enter the message you want to be broadcasted across all rooms in the text box and then click on the ‘Send’ button under it.
When you make an announcement inside your breaking rooms, all of the rooms will now show your message inside their Meeting chat section.
Set a time limit for a room
Organizers of a meeting can designate participants to be present for a certain period of time inside a room so that they are switched back to the main meeting after a specified duration. To do that, open the Breakout rooms sidebar by clicking on the Breakout rooms button at the top of the meeting screen.
In the sidebar that appears, click on the 3-dots icon at the top and select the ‘Room settings’ option.

When the Settings screen appears inside the sidebar, check the ‘Set a time limit’ toggle.

Now, select a duration you want your rooms to be active for.
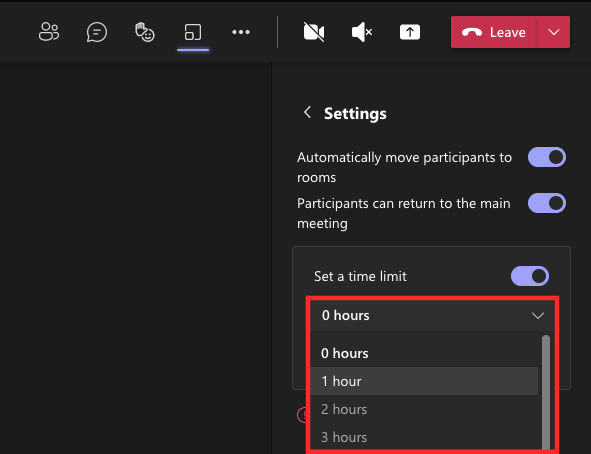
When you do that, all participants within a room will be moved back to the main meeting when the room exceeds the specified duration.
Allow people to switch between rooms and meeting
When you’re assigning people to breakout rooms, you must allow your participants to move in and around their allotted rooms with ease without worrying about losing access to their room’s chats and files. If a participant accidentally exits their room, they’ll instantly lose access to the content that’s available in the room and will only be able to read those that were shared at the time they were present in the room.
If you’re an organizer of a meeting, it’ll be helpful for your participants if you allow them to freely switch between their room and the main meeting screen. To do that, open the Breakout rooms sidebar on your screen by clicking on the Breakout rooms button at the top.
When the sidebar appears, click on the 3-dots icon at the top and select the ‘Room settings’ option.
On the next screen, check the ‘Participants can return to the main meeting’ box.

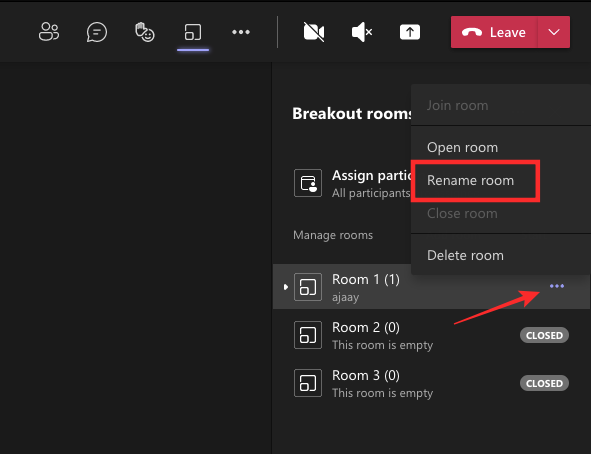
Rename a room
Teams allows you to assign a name for each of your rooms so that you can differentiate between them and anticipate what topic is being discussed. To rename a room inside a meeting, hover over it, click on the 3-dots icon and then select the ‘Rename room’ option.
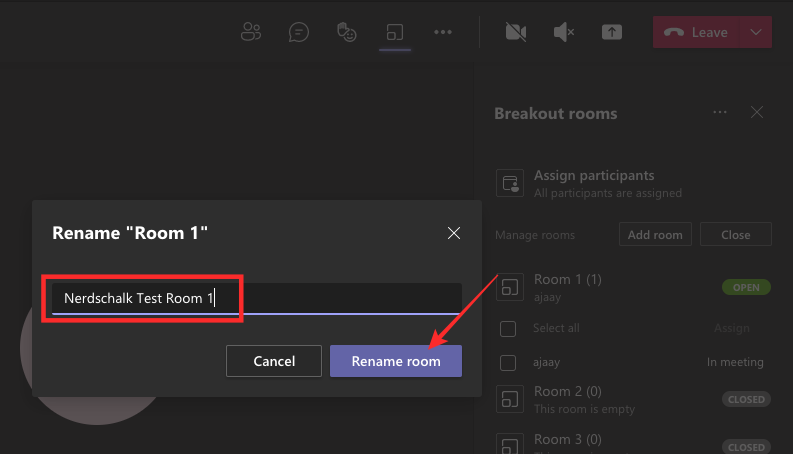
Now, enter the desired name for this room and then click on ‘Rename room’ to save changes.
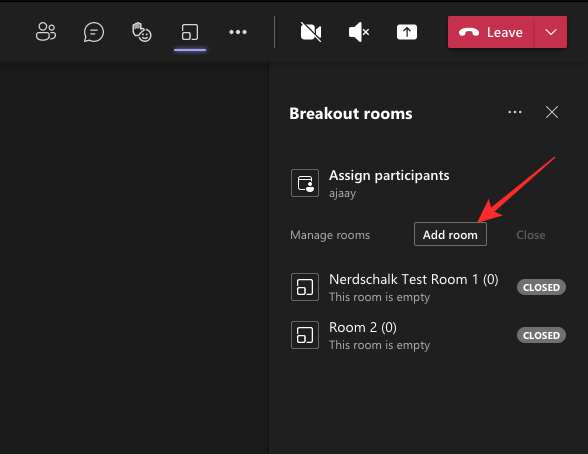
Add more rooms to a meeting
If you mistakingly created a lesser number of rooms, you can always add more after you have created them. To do that, open the Breakout rooms sidebar by clicking on the Breakout rooms button at the top.
Inside this sidebar, click on the ‘Add room’ option at the top.
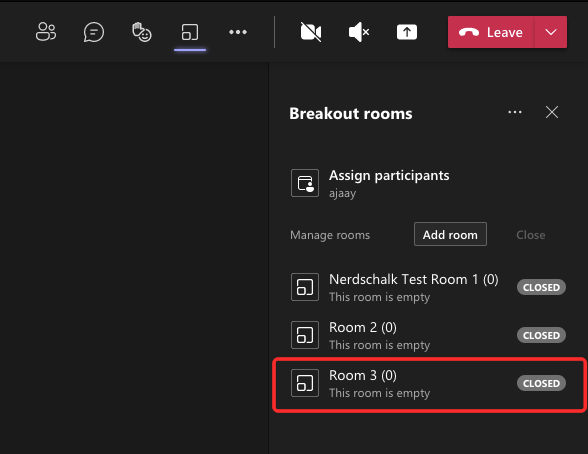
The new room will have a default name that can rename later at any time.
Close rooms
Once participants in your meeting have completed discussing their relevant topics inside a room, you can close them so that all future discussions take place inside the main meeting. To close all the rooms created inside a meeting, click on the Breakout rooms button and then select the ‘Close’ button at the top of the sidebar on the right.
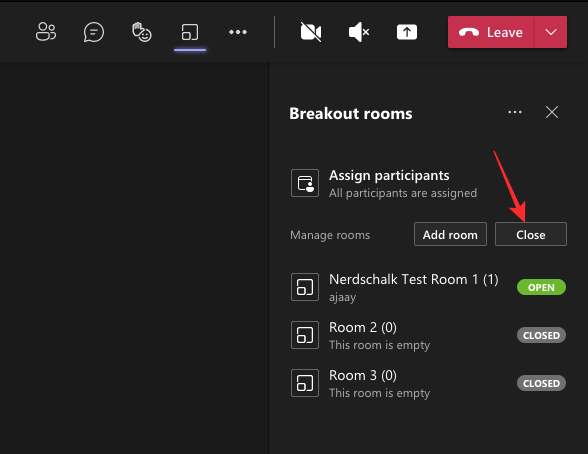
If you wish to only close an individual room, hover over the room you want to close, click on the 3-dots button adjacent to the room name, and select the ‘Close room’ option from the drop-down menu.

Delete Breakout rooms
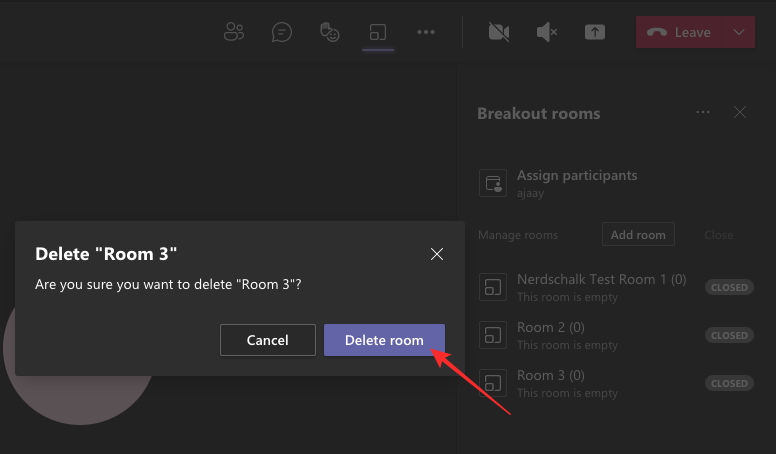
If you no longer want to use a room inside a meeting, not even for a future period, you can delete it by first opening the Breakout rooms sidebar by clicking on the Breakout rooms button at the top.
Inside this sidebar, hover over the room you want to delete, click on the 3-dots icon and then select the ‘Delete room’ option.

In the prompt that appears next, select the ‘Delete room’ button again to confirm your choice.
If you wish to remove all the rooms you created within a meeting, you can do that by clicking the 3-dots icon at the top of the Breakout room sidebar and then selecting the ‘Remove rooms’ option from the drop-down menu.

When you do that, you will be asked to verify if you really want to delete all the existing rooms. Here, click on the ‘Remove’ button to complete the process.

How to Use Breakout Rooms as a Participant
While breakout rooms do give all participants access to be presenters of the group, most of the controls of this group are still organizer-centric. However, there’s a handful of things you can do as a participant inside Breakout rooms.
Entering or exiting a room automatically
In most cases, organizers would have the ‘Automatically move people into opened rooms’ option enabled for all participants in a meeting. In such cases, participants cant do anything when a room is being opened or closed.
When the organizer of such a room opens the room you’ve been allotted to, you will see a notification at the top of the Teams window saying “your breakout room session has started”. When this message appears, you will be automatically moved to your assigned room within 10 seconds.

Similarly, participants will also be notified when the meeting organizer has closed the room. When you receive such a notification, you will be reassigned back to the main meeting window inside Microsoft Teams within the next 10 seconds.
![]()
Join a Room you’re invited to
If your meeting organizer hasn’t enabled the ‘Automatically move people into opened rooms’ option, you will not be moved into your assigned room when the organizer opens it. Instead, you will receive a ‘Join breakout room’ prompt where you can click the ‘Join room’ option to enter the room you’ve been invited to.
If you closed this prompt or clicked on the ‘Later’ option, you will have to wait till the organizer sends you an invite again so that you can enter the breakout room you’ve been assigned to.
Switch back to the main meeting screen
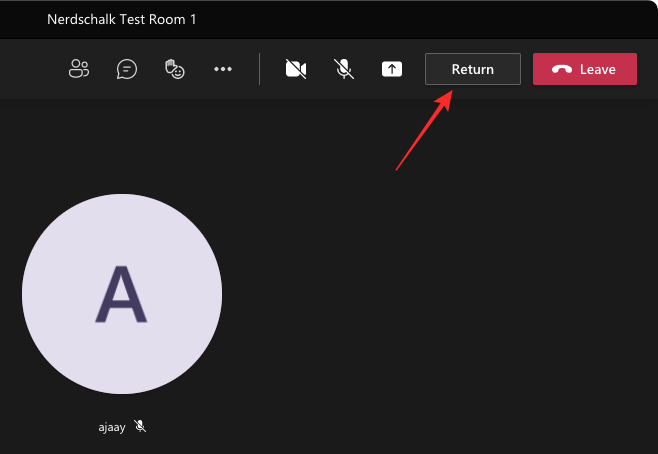
By default, if you’re a participant of a meeting, you will be moved in and out of your breakout room automatically when the organizer opens or closes it on their device. If your meeting organizer has enabled the ‘Let people go back to the main meeting’ box, however, you will be able to move in and out of your assigned room at any time without needing to request your organizer again and again.
If your organizer has enabled such an option, you can switch back to your main meeting window from your assigned room by clicking on the ‘Return’ option at the top.
You can also switch back into your breakout room from the meeting screen by clicking on the ‘Join’ button.
That’s all there is to know about Breakout rooms on Microsoft Teams.
RELATED