It’s almost a given that account removal tends to be a more difficult process and sometimes even rather convoluted depending on the reasons you want to remove it. In the case of Microsoft and Windows, this process understandably involves more steps because of how inter-dependent the two are on each other.
Of course, this relationship is crucial to the smooth functioning and well being of a Windows system, but it can create minor roadblocks when you need to remove your Microsoft Account from Windows 10 for whatever reasons you may have.
Here’s everything you need to know about how to go about this process.
Related: How to Change User Folder Name in Windows 10
Performing an account removal from the Settings is the easiest and quickest way to remove your Microsoft Account from Windows 10. Here’s how you go about it.
Type Settings in the Start Menu search bar and click on the Settings option when it appears to open it. Another way to open Settings is to simply press the Windows button on the keyboard, or clicking the Windows button in the bottom left of your screen, and then selecting Settings. You can also use Windows + X key combo to access settings.

Once the Settings menu is open, click on the Accounts Section.

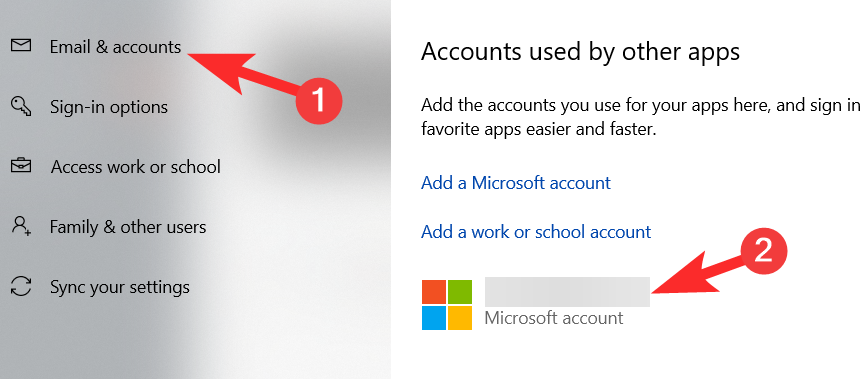
In the Accounts section, click the Email & accounts section on the left panel. Now, you will see your Microsoft ID on the right, click on it to expand it.

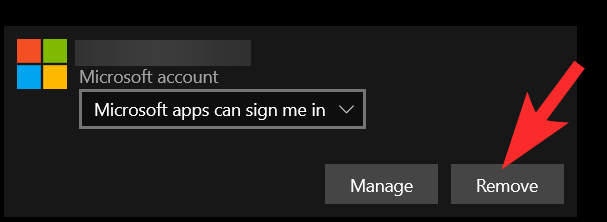
Click on your Microsoft ID to expand it. You will see a Remove button, click on it.

You have now successfully removed your Microsoft Account from Windows 10.
Related: How to Stop Discord From Opening on Startup on Windows 10
There are two instances when you will not be able to see the Remove button, instead, all you will end up seeing is the Manage option. One of these instances pertains to the lack of a local account. If you don’t provide an alternative in the form of a local account, then removing your Microsoft Account is impossible. There are two solutions that you may need to follow when this happens depending on what notification you are seeing.
Solution #1
In Solution #1, you will learn how to create a Local Account which will then enable you to remove your Microsoft Account
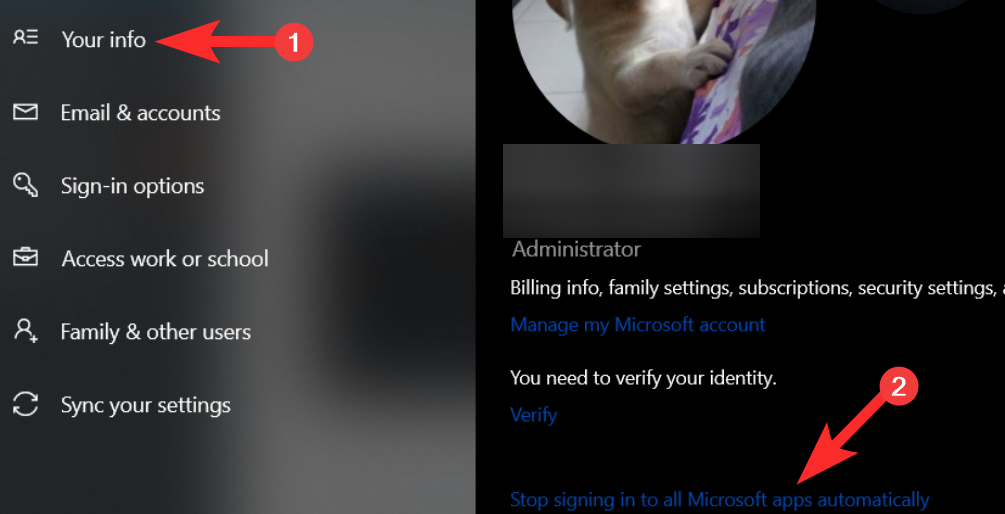
Go to Settings > Accounts as we showed you in the previous section. From the Left menu panel, go to the Your Info section. On the right, click on the Sign in with a local account option.
Note: If instead of seeing the Sign in with a local account option you see Stop signing in to all Microsoft Apps automatically, refer to Solution #2.
Windows will begin the process of Sign In. On a new dialog box, it will ask you to proceed with your current account verification. Click on Next in this box.
Now, verify your account by typing in the password/pin.
You will now be prompted to type in the details for a local account. Here, provide a substitute Google or Outlook Account information and password.

After adding the information, click on Next.

After clicking Next, your PC/Laptop will automatically Sign Out of the Microsoft account and restart the entire system. Once your system is back on again, follow the steps from the previous section. Now, you will see the Remove button appear next to Manage. Click on it and you’re done.
Solution #2
If instead of the Sign in to a local account option, you will find yourself with the Stop signing in to all Microsoft Apps automatically option instead. Click on it.
Your account Settings will now change automatically. Once this is done, ideally, you should be able to see the Remove button after following the steps that we have elaborated in the previous section. However, if the Remove button is still missing, then follow the steps in Solution #1 to create a local account. After implementing this solution, you will be able to see the Remove button as well. Go ahead and click on it.
How to remove a Microsoft Account from the Control Panel
If for any reason, you are unable to access your Settings or are unable to remove the Microsoft account using the Settings on your system, you can remove the account from the Control Panel. Here’s what you need to do.
Search for Control Panel and open it from the Start Menu.
In the Control Panel, click on User Accounts and open it.
In User Accounts, you will see the Remove user accounts option right under the heading, click on the option.

Now, select the Microsoft Account that you want to remove from Windows.

Click on Delete the account.

Your Microsoft Account will now be removed from Windows 10.
Related: How to Remove Quick Access on Windows 10
How to create a local account using the netplwiz command
Certain users might not be able to create a Local Account using the #Solution 1 or we provided earlier due to technical difficulties or issues related to Settings or even because of a problematic Microsoft Account. This poses a big problem because Microsoft Accounts cannot be removed unless an alternative local account option has been made available. Here’s an alternate solution to creating a local account.
Simultaneously click the Win button + R keys together to open the Run menu. Copy netplwiz and paste it into the command box. Then press Enter or click on OK.

From the User Accounts menu, click on the Add button.

Next, add the email address of your non-Microsoft account and then click Next.

Click on Finish and your account will be added as a local account.

Perform a Factory Reset
A Factory Reset is not recommended, however, if none of the methods above are working, then consider a Factory Reset your last resort. Performing a Factory Reset will not just remove your Microsoft Account but also all other data, information, and customized settings on your system. It is advisable that you backup anything you need in an external hard drive before proceed with performing a Factory Reset.
From the Settings menu, click on the Update & Security option.

From the left panel, click on the Recovery menu.

Click on the Get started button that you will see under the Reset this PC section.

Select from the two options on how you want to preserve your files.

Choose how you want to reinstall Windows.

Finally, click on the Reset button.

Your system will now go through a Factory Reset.
We hope you found this article helpful. Take care and stay safe!
RELATED


