In all honesty, Microsoft Teams is, without a doubt, one of the most complete video conferencing solutions out there. Sure it has its set of quirks and throws a tantrum every now and then, but that should not take anything away from its ability to deliver consistent results in a professional work environment.
At the start of the pandemic period, Microsoft Teams found itself to be miles behind the leader, Zoom, in terms of functionality. Zoom already had almost all the features everyone wanted, including a Virtual Background system. Thankfully, Teams didn’t stand on ceremony and chose to take the fight to the leader of the pack.
Related: Can’t Upload a File on Microsoft Teams? Here’s How To Fix the Issue
Teams now has a fully-decked Virtual Background system, which is more than capable of matching Zoom’s efforts. And if that wasn’t impressive enough, Teams houses a pretty powerful noise suppression system, which is a lifesaver when you’re trying to filter out the unwanted domestic cacophony.
Today, we’ll take a look at Microsoft Teams’ noise suppression system and tell you how to get it up and running in your meetings.
Related: Microsoft Teams Backgrounds Option Missing? Here’s How To Fix
How does noise suppression work?
Similar to Zoom, Microsoft Teams’ noise suppression system filters out unnecessary noise, making sure only your voice — and some extras, when needed — are heard by the meeting participants.
Remember that it’s not active noise cancellation, so you won’t need a specially-made, noise-canceling microphone for it to work its magic. All you need is a Microsoft Teams account and let Microsoft Team’s built-in noise suppression system take care of the rest.
Related: Download 100+ Awesome backgrounds for Microsoft Teams
How to turn on noise suppression
Tired of being embarrassed by the dog down the street that just keeps on barking during an important meeting? It’s time to turn on noise suppression and drown the barks.
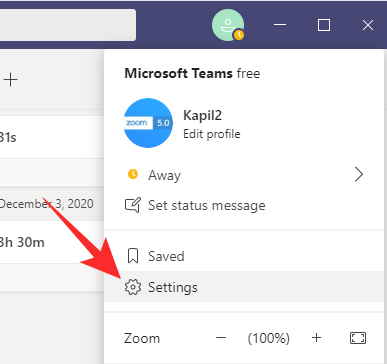
First, you’ll need to launch the Microsoft Teams desktop application and log in with your username and password. Once you’ve done that, click on your profile picture thumbnail. Now, go to ‘Settings.’

Then click on the ‘Devices’ tab and hit the dropdown menu under the ‘Noise suppression’ banner. Usually, it’s set to ‘Auto’ by default, which, we believe, drowns some of the noise.

If you set noise suppression to off, nothing will get filtered by the system. Setting it to ‘Low’ will allow some noise to patch through while picking ‘High’ will filter out almost everything except for your voice. Pick this mode to get the best results.
Depending on your microphone, your sound might lose some of its charm, but the result will be there for all to see — well, hear. After making the change, close the window and host/join a meeting.
Related: Microsoft Teams Multi-Account Sign-In: What Is It and When Is It Coming?
Can you turn on noise suppression on mobile?
If you’ve been left impressed by the Microsoft Teams voice suppression system on your PC, you’re likely to look for the same on your Microsoft Teams mobile application. Before you go too deep, we’d like to inform you that noise suppression is available only on PC, not on Android or iOS. Smartphones usually come with a secondary noise cancellation microphone, making them quite adept at noise cancellation.
- How to turn off chat notifications using Mute in Microsoft Teams
- How to Use Parallel Space to use Multiple Facebook and Instagram accounts on One Device
- How to solve Microsoft Teams pop-ups on the screen problem
- 11 Ways to fix Microsoft Teams Audio Not Working, No Audio issues


