
When it comes to comparing mechanical hard disk drives (HDD) with modern solid-state drives (SSD), the result is a foregone conclusion. The latter is much better than its legacy counterpart in almost all areas. And so, upgrading your storage space with a new SSD is the smart thing to do, for not only will it future-proof your PC, but will also make your system run much faster.
So, if you’re thinking of purchasing a new SSD (or already have one), here is how you can make it the primary drive after installing or cloning Windows 11 to make the most of your SSD.
Why make SSD the primary drive in Windows 11? Advantages explained
The difference between HDD and SSD is not a matter of degree but of kind. HDDs have a lot of moving parts – spindles, spinning disks, read/write arms, etc. – damage to any one of which could lead to a dead disk. Durability is not, therefore, HDD’s strong suit. Nor can they compare to the speeds that SSDs provide.
Where HDDs use mechanical components, SSDs use flash memory to hold and access data. The lack of moving parts makes them sturdy and less vulnerable to damage from falling, while also making them speedier and more power efficient.
SSDs will also last longer than their legacy counterparts, in most cases. SSDs will degrade over time if you frequently introduce new files to them. But if you rarely do so and leave your SSD to host Windows and other commonly used files only, they can last a very long time. On the other hand, as iterated before, it takes one malfunction of one of the moving parts of the hard drives to become unusable.
Sure, SSDs are also four times as expensive as HDDs (per gigabyte), but their cost has reduced over time and they will only become cheaper as demand grows.
How can you make the most of your SSD and HDD?
Since SSDs tend to degrade with frequent writes, it’s best to use them for particular tasks. If you’re aiming for a higher lifespan, it’s good to use them for hosting Windows, resource-hungry applications (such as games and editing tools), and files that you need to access fairly often. For everything else – storing large files, saving and deleting files, and basic computing – use HDDs.
Using an SSD and an HDD in conjunction will get you the best of both worlds while minimizing their drawbacks, such as the higher prices of SSDs and slower HDD speeds.
How to make SSD the primary drive in Windows 11
Now that you know why you should use the SSD as your primary drive, let’s look at a few ways in which you can do so.
Method 1: After installing Windows (using BIOS key at startup)
If you have a new SSD and want to make it the primary boot device before installing Windows, here’s how you can do so:
Of course, if you’re installing Windows, you will need the Windows installation media in the form of a bootable USB in the first place. You can use the following link to download the media creation tool:
Download: Windows 11
- Choose the “Create Windows 11 installation media” option.
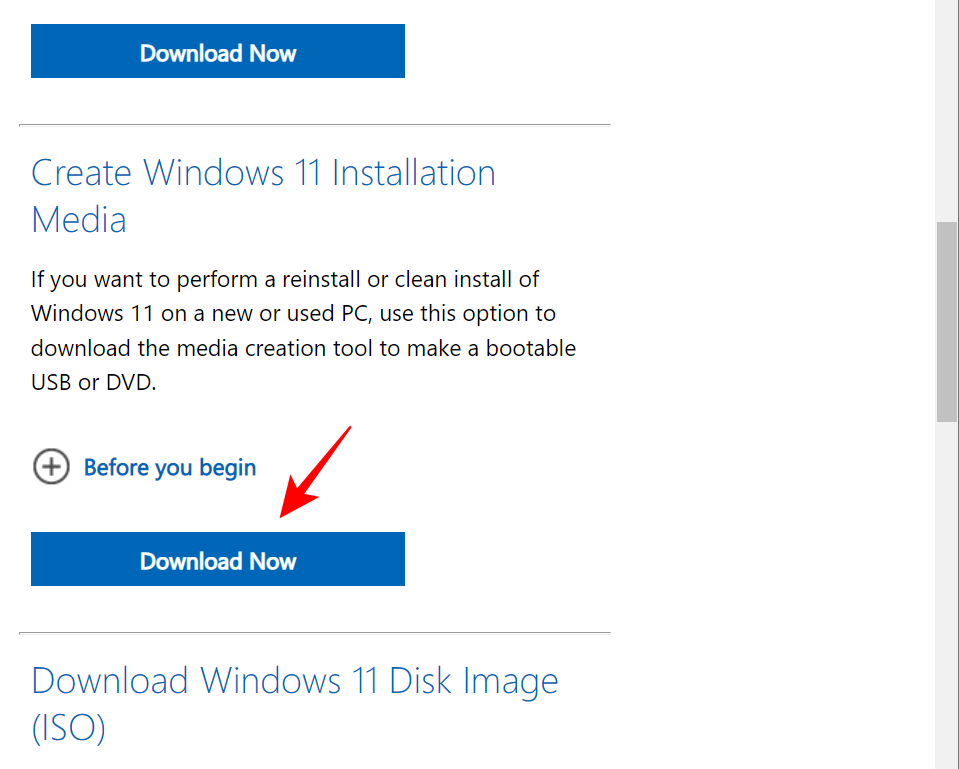
- Download and run the media creation tool and use the USB option to make it bootable.
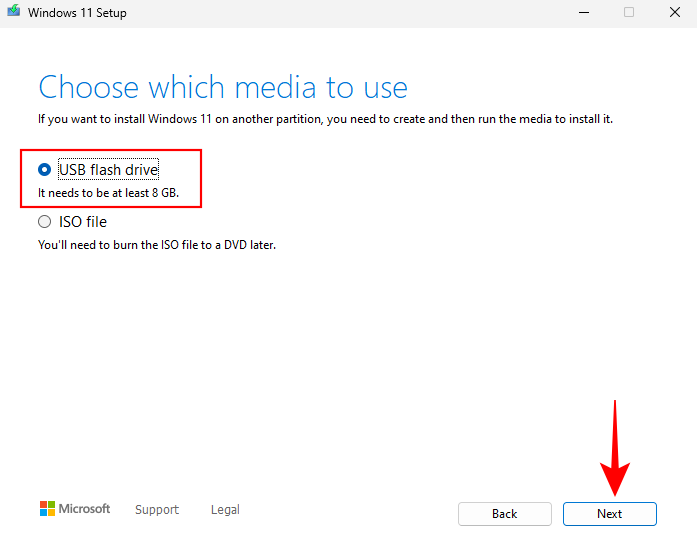
- Then follow the on-screen prompts to make your USB bootable.
Prepare your SSD
Now, it’s time to prepare your SSD.
- Power off your PC and unscrew the side panel.
- Then plug your SSD into a SATA connector and a power cable, screw the side panel, and power on the system.
- Once you’re booted up, right-click on the Start menu and choose Disk Management.

- Device Manager would automatically detect the SSD and take you to the initialization window. If it doesn’t, right-click on the disk and select Initialize.
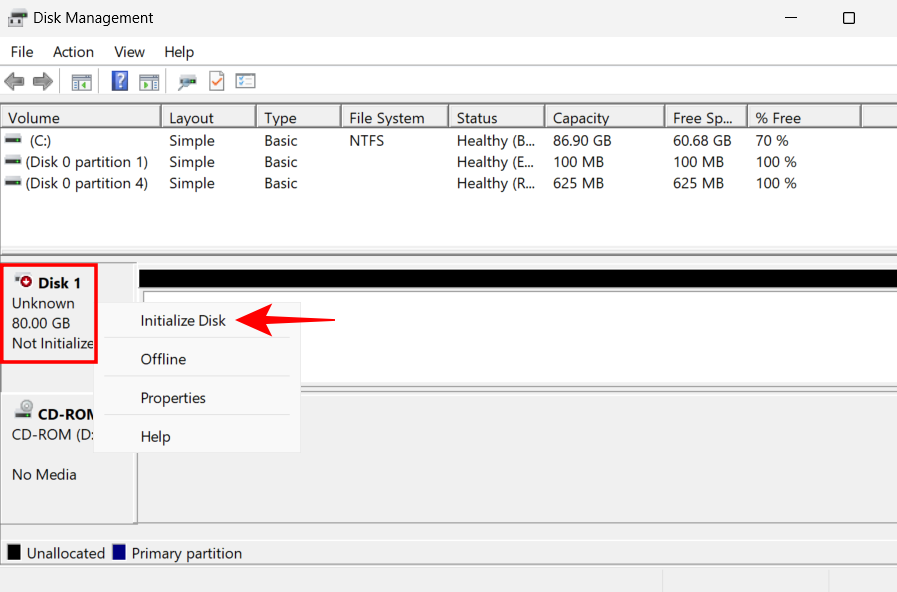
- Then select GPT (for better Windows 11 compatibility), and click OK.

Note: If you’re going to use the MBR format, you’ll have to ensure that the boot mode is set to legacy in the BIOS. To know more about accessing the Boot sequence from the BIOS, refer to the section on accessing the BIOS given below.
Install Windows on SSD
- Now, plug in the USB drive for Windows installation.
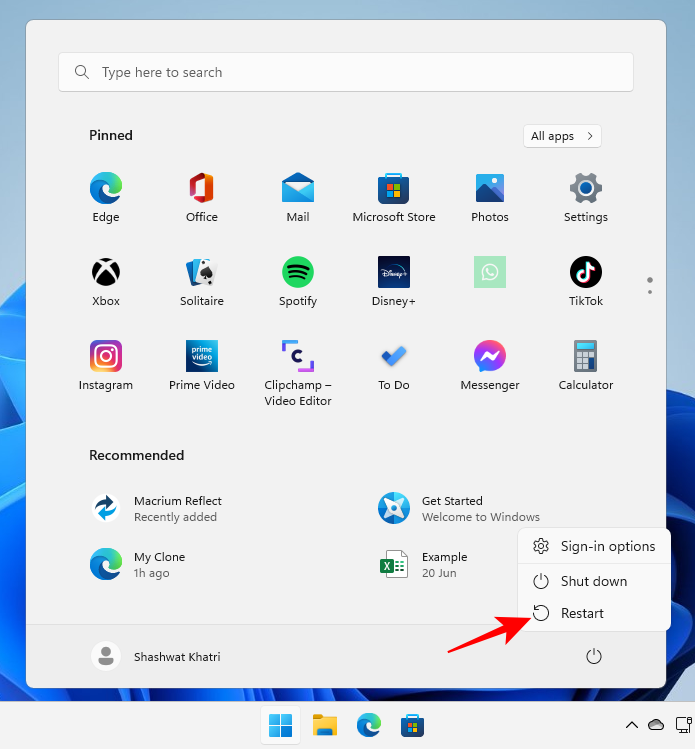
- Then press Start and click on the “Power” button.
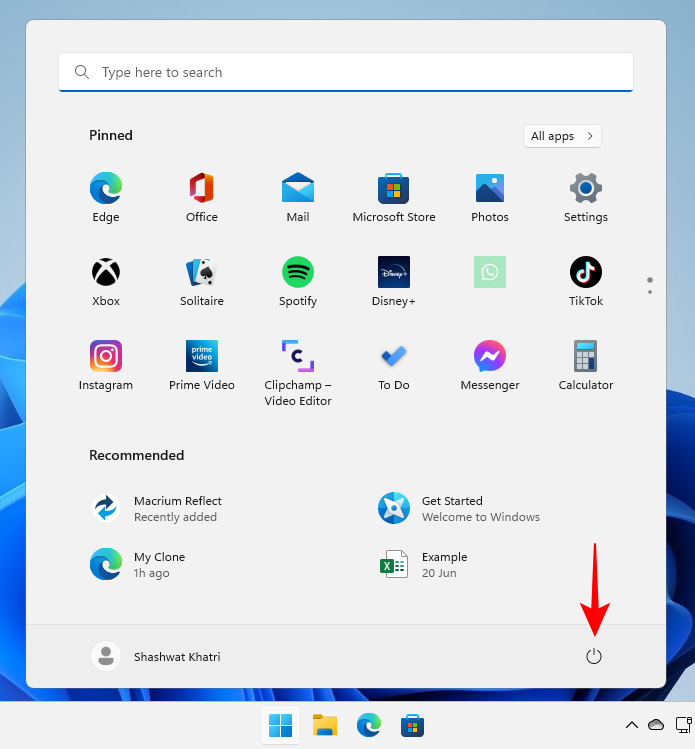
- Hold down the
Shiftkey and click Restart.
- Your computer will now boot in the Windows Recovery Environment. Click on Use a device.

- Choose your bootable USB drive.

- Wait for the system to restart and boot to the Windows setup. Then click Next.

- Click on Install now.

- Enter your product key if you have one and click Next.

- Otherwise, click on “I don’t have a product key”.

- Choose your desired Windows version and click Next.

- Accept Microsoft’s software license terms and click Next.

- Then click on Custom installation. This is the important bit since the next screen will let you delete previous partitions and select the new SSD for Windows installation (and later make it the primary drive).

- To delete the hard drive partition, select the drive where Windows is installed (Primary), and then click on Delete.

- When prompted, click Yes.

- Otherwise, you can simply choose the SSD (with unallocated space) and click on Next to install Windows.

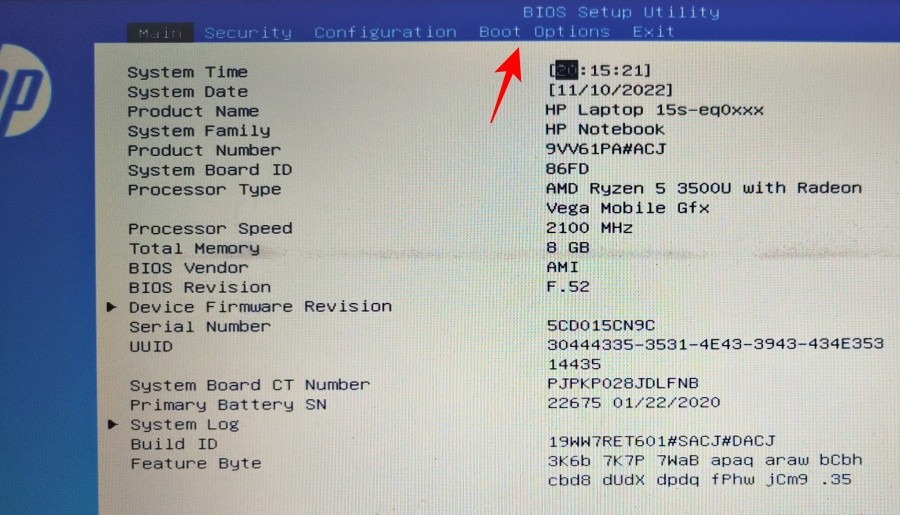
- Follow the on-screen prompts to install Windows. Once finished, your PC will boot straight to the BIOS (since we deleted the primary boot partition).
- In the BIOS, go to Boot Options tab.
- Then select OS boot manager.
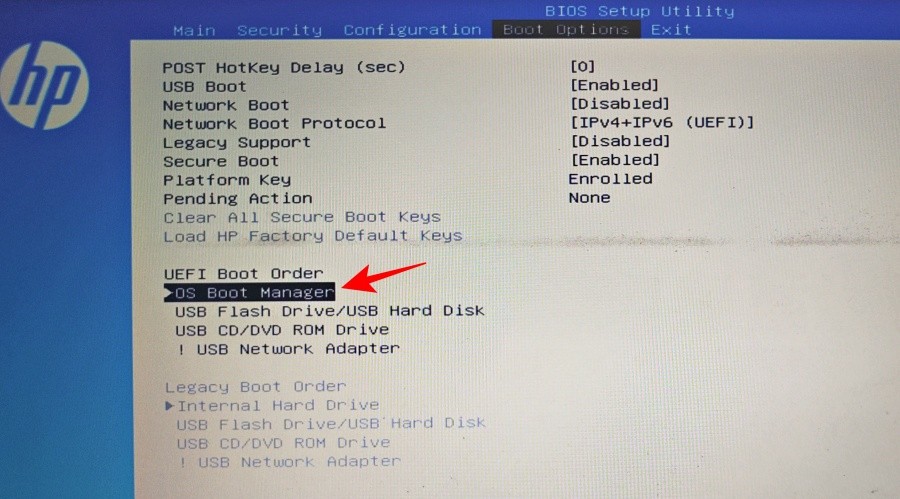
- Then select your SSD.
- If you didn’t delete the hard disk partition, you’ll have two operating systems – one on your hard disk and the new one on your SSD.

(Note: Your original Windows will be on a lower volume number, and the new one on the SSD on a higher volume number).
Access the BIOS and make SSD the primary drive
If you had deleted the previous Windows version on the hard disk, the new installation on the SSD would automatically be made the primary drive. But if you had installed it alongside the existing Windows on the HDD, you will have to access the BIOS to make it the primary drive. There are a few ways to access the BIOS, depending on your manufacturer and whether you have the legacy or the UEFI boot mode.
This first method involves accessing the BIOS in the traditional way, i.e, by pressing the F2, F8, F10, or the Del key while your system is starting up (the key will vary based on your PC manufacturer. To know more, refer to the later section on accessing BIOS).
But briefly, you’ll be using the arrow keys in the BIOS menu to get to the “Boot Options” tab, selecting OS boot manager and choosing your SSD to make it the primary boot drive.
Quick TIP: If you want to change the Boot mode between Legacy and UEFI, you can do so from the Boot Options menu as well, depending on whether you chose the MBR or the GPT mode respectively.
Method 2: After installing Windows (Change default Windows from WinRE)
- If you have two Windows installed (one on your HDD and one on your SSD), you can make SSD the primary drive after installing Windows by letting the computer restart, and then, on the Windows selection page, click on Change defaults or choose other options.

- Click on Choose a default operating system.

- Here you’ll be presented with the Windows installed on the system as on the first screen. But this time you’ll be able to make it the default for good. Select the one that has the higher volume number (which is the SSD that was introduced later).

- Alternatively, click on Choose other options from the Windows selection page.

- Click on Troubleshoot.

- Now click on Advanced options.

- Click on UEFI Firmware Settings.

- Click on Restart.

- Now you will get to the BIOS/UEFI settings page. Use the arrow keys to get to the “Boot Manager”.

- Then go to your SSD and select it to make it the priority boot order.

Note: Your BIOS might look different from the one shown above. However, the options will more or less be the same.
Once you have booted to Windows 11, you can delete the other Windows on your hard disk by formatting the drive. Alternatively, you can also delete the partition (and all its content) by deleting the drive during the Windows installation as shown in the first method.
Method 3: After cloning Windows 11 to SSD
You may also want to change the boot order after cloning your Windows from an HDD to an SSD to make sure that the latter is being used as the primary drive.
To learn about cloning Windows 11 to SSD, refer to our guide on “How to clone Windows 11 to SSD“.
Then, as before, in order to make the SSD the primary boot drive, press the F8 key at startup to get to Boot Manager and select your SSD.
How to set SSD as the primary boot drive from BIOS for different PC manufacturers
Now, since every manufacturer has a different key that needs to be pressed at startup, and a different BIOS layout, let’s take a look at how you can set the SSD as the primary boot drive for some of the popular manufacturers.
HP
- Turn on your computer. Then, while the screen is still blank, press the F10 key repeatedly to get to the BIOS menu options. Make sure to do this before you see the Windows logo. If you miss your window of opportunity and Windows starts to boot up, power off the system and try again.
- Once the BIOS menu opens up, use the arrow keys to get to the “Boot Options” tab (on desktop computers, you will have to go to the “System configuration” tab, then select Boot Options from there).

- Here, under Boot order select OS Boot Manager and hit Enter.

- Select your SSD and hit Enter.
- Then go to the “Exit” tab using the arrow keys and select Exit saving changes.

ASUS
Here’s how to access the BIOS on an ASUS system and make SSD the primary boot drive:
- Restart your PC and press the F2 key (or Delete) on the first screen.
- Click under “Boot priority” to access boot options.
- Now use the mouse to drag or the keyboard to select your SSD.
- Alternatively, you can press the F7 key from BIOS to enter “Advanced Mode”.
- If you’re in the “Advanced Mode”, click on the “Boot” tab.
- Then go to “Boot Option Priorities” towards the bottom and select your SSD.
- Now simply click on the “Exit” button and, when prompted, select Save Changes & Exit.
Gigabyte
Here’s how to access the BIOS on a Gigabyte motherboard and make SSD the primary boot drive:
- Restart your PC and press the Del key on the first screen.
- If you’re in Easy Mode, click on the Boot Sequence section towards the bottom left of the screen.
- Then use the mouse to drag the SSD toward the top of the list.
- Then click on “Esc” at the bottom.
- Then towards the bottom right, click on Save and Exit (or press the F10 key).
- Click Yes when prompted.
If you’re in the “Advanced mode”, either press F2 to get to Easy mode and continue with the steps as shown above, or navigate to the “Boot” tab to make the changes.
Dell
Here’s how to access the BIOS on a Dell system and make SSD the primary boot drive:
- Restart your PC and press the F2 key repeatedly.
- Navigate to “Setting” and then select Boot Sequence.
- On the right, you will see the boot options. Make sure there is a check next to the SSD.
- Then, select the SSD in the list towards the right and click on the up arrow to bring it to the top of the boot order.
- Click on Apply and then click OK when prompted.
FIX: Cloned SSD won’t boot
If you had cloned Windows 11 to SSD and are finding that it’s not booting up, there are a few things that could have gone wrong.
- Firstly, you have to make sure that Windows 11 is cloned properly, without any interruptions. Refer to our guide on How to clone Windows 11 to SSD for the same.
- Secondly, ensure that SSD is indeed the primary boot drive. This you can do by referring to the methods given above in this guide.
- Thirdly, you may encounter the problem if the BIOS boot mode is incompatible with your SSD. This could be the case if your boot disk is MBR (legacy BIOS) and not GPT (UEFI boot mode). If so, you will either have to set your SSD as GPT or make the partition active if you’re going to stick to MBR.
Note that after converting from MBR to GPT, you will have to clean the disk and reinstall Windows on it.
To convert the disk from MBR to GPT, follow the steps below:
- Boot to the Windows setup screen using the Windows installation disk (USB).

- On the setup screen, press
Shift+F10to open the command prompt. - Now type the following command:
diskpart

- Hit Enter. Then type the following:
list disk

- Hit Enter. Take note of the SSD disk number.

- Then type the following command:
select disk (disk number) - Make sure to change “(disk number)” with the actual disk number.

- Then hit Enter.

- Once the desired disk is selected, type the following:
clean

- Hit Enter. This command is important since the command prompt can only convert an empty disk.

- Now type:
convert gpt

- Hit Enter.

- Now close the command prompt and reinstall Windows.
In case you want to stick to the legacy BIOS (MBR), then you will have to make the partition active. To do so, follow the steps below:
- On the Windows setup screen, press Shift+F10 to open the command prompt. Now type the following command:
diskpart
- Hit Enter. Now type the following:
list disk - Hit Enter. You will get a list of disks on your system. Take note of the disk number associated with your SSD.

- Now type:
select disk (disk number)
Replace “(disk number)” with the actual disk number associated with your SSD, then hit Enter.

- Now type:
list partition - Hit Enter. Take note of the partition number to be made active.

- Then type:
select partition (number)
Replace “(number)” with the partition number to be made active, then Hit Enter.

- Now type:
active - Hit Enter.

You have now made your SSD with the MBR partition type active and should now be able to boot from your SSD.
FAQs
How do I move Windows 11 from HDD to SSD?
Moving Windows 11 from HDD to SSD is a fairly simple cloning process. To do so, refer to our guide on How to clone Windows 11 to SSD.
How do I make my SSD the secondary drive?
If you want to make your SSD the secondary drive because, say, you have another even faster SSD such as the NVMe type, then you can do so using the boot order sequence in BIOS as mentioned in the guide above. All you have to ensure is that Windows is installed on your faster SSD so that when it is made the primary drive, you can actually boot to Windows.
We hope you now know how to make your SSD the primary drive. Whether you’re doing so after a fresh installation, a secondary Windows, or after cloning Windows from the HDD, the BIOS is the main screen that you need to access to make your SSD the primary drive. We hope you were able to do so depending on your PC manufacturer and the scenario that best suits you.


