
Raspberry Pi has been the go-to unit for tech tinkerers and enthusiasts. It offers a variety of upgradability options and comes with its own chipset and RAM in many cases which allows for multiple use cases. You can use it to manage your security cameras, create a remote workstation, create a media center unit, and much more.
Many people have been trying to run Android on the Pi 4 for quite some time now and we saw a few major releases back in 2019. All of them were based on Android 10 but thankfully, a new build has just been released which will allow you to enjoy Android 11 on your Raspberry Pi 4. Let’s take a quick look at it.
What is OmniROM?
OmniROM is the new build for Raspberry Pi based on Android 11. It comes in a flashable .zip and can be obtained from XDA developers. OmniROM has been a prominent name in the XDA community for quite some time now. They released a few builds based on Android 11 for a few phones in the past few months. This experience has likely made them bold enough to create a build for the Pi 4.
The OmniROM for Pi 4 comes in two variants, one is bundled with microG apps while the other one allows for stock Gapps installations. The microG build is more privacy-focused as it does not rely on Google’s Play Services or the Play Store.
The weekly builds are meant for installation with Google Apps when you are flashing the ROM to your SD card. While the build is pretty stable out of the box, it is only the first one yet. There can be a few bugs and hence it is not recommended to use this as your daily driver.
Additionally, while the new OmniROM supports installation on USB media and hard drives, you will be needed to create your own partitions and then format them based on file systems supported by the Pi 4. Hence we will only be taking a look at the procedure for SD cards that are automatically recognized as the boot drive when plugged into your Pi 4.
Related: How to install official Android 11 update
Things you should keep in mind
This is the first build of OmniROM based on Android 11 for Pi 4 and it is not recommended as a daily driver for most users. Additionally, the current build lacks support for hardware encoding and decoding which will refrain you from streaming HD content in most popular apps. However, in case you still wish to stream content, you can try Firefox for Android which seems to work pretty well as a workaround for now.
Additionally, you should also go through the readme page published by the developer at this link. This will help you identify additional drawbacks of the build which will help you determine whether you should shift to it or not.
How to install Android 11 on the Raspberry Pi 4
To get Android 11 running on your Pi 4, you will need to ensure that you are running the latest firmware for your device. If you have updated the firmware recently then you can skip this guide and jump straight to the flashing procedure. But in case you haven’t updated your Pi 4 in a while, then let’s take a quick look at the procedure.
How to update your Raspberry Pi 4 Firmware first
Before installing OmniROM, we will need to update the firmware first.
Required
- Your Pi 4 running Raspberry Pi OS
- Your Pi 4 connected to the internet
Guide
Power on your Raspberry Pi 4 and launch the Terminal Window from your taskbar.
Once the Terminal window is open, type in the following command.
sudo rpi-eeprom-update

Note: You only need the text within the quotes.
Hit Enter to run the command.
Your Pi 4 will now check the installed firmware in conjunction with the latest firmware available on the Raspberry servers. It will then display all the information about your device. The last two lines will show your current firmware and the latest available firmware. If these two numbers match, then you are running the latest firmware.
But in case they do not match then you will need to update to the latest firmware. Type in the following command to update to the latest firmware.
sudo apt update && sudo apt upgrade

Your Pi 4 will now communicate with the servers and get all the necessary files required for the installation. Once this process is complete, use the command below to install the latest firmware.
sudo apt install rpi-eeprom

Your Pi 4 will now start updating itself to the latest available firmware. Ensure that you do not power off your device during this procedure as this could corrupt the installation forcing you to perform recovery on your Pi 4.
Once the process is complete, your Pi 4 should be running the latest version of Pi OS. We can now move forward and install OmniROM based on Android 11 on your device.
How to install OmniROM for Android 11
Before starting the OmniROM installation, you will need to source a few files. Mainly the OmniROM build for your Pi 4, Gapps if you need them, and a flashing tool. You can download all of them from the links below.
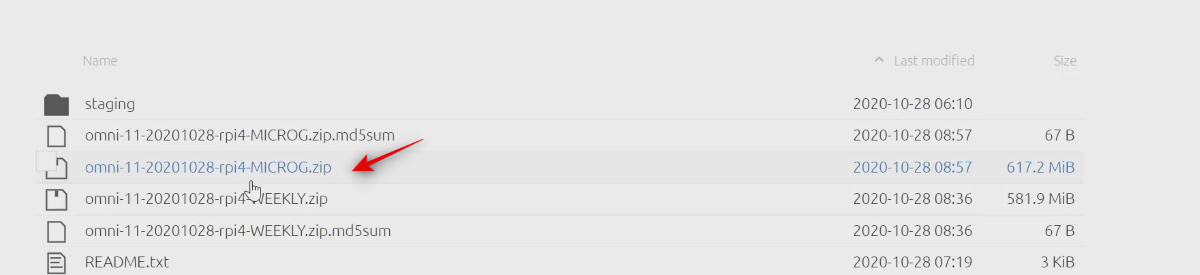
Note: If you do not wish to use Google apps in OmniROM then ensure that you download the microG version as shown below.
If you wish to use Gapps with OmniROM then ensure that you download the latest weekly build of OmniROM. Additionally, when downloading Gapps you will get tons of choices. We recommend the nano apps package for your Pi 4 but you can get more information about each build at this link. For this procedure, we will be using the microG build of OmniROM. The microG build comes preinstalled with Aurora services and the Aurora store.
► Gapps Package variants and their descriptions
Required
- OmniROM for Pi 4 | Download Link
- Etcher Flashing tool | Download Link
- Gapps | Download Link
- A Windows, macOS, or Linux desktop/laptop
Guide
Once you have downloaded everything to your storage, start by launching the Etcher flashing tool. This comes as a portable executable for Windows systems and as an installer for macOS and Linux. If you are using Windows then simply double-click the .exe file to start the program. If you are using macOS or Linux, follow the installation instructions and then launch the app once it is installed.
Now click on ‘Flash from file’.
This will open up a window showing you the local storage on your device. Browse and select the OmniROM build you just downloaded and click on ‘Open’ once you are done.
Now plug in the SD card you plan on using with your Pi 4. Wait for the card to get recognized. Once it is recognized, click on ‘Change’ below the drive icon in the middle.
Check the box for your Pi 4 SD card.
Click on ‘Select’ at the bottom.
Finally, click on ‘Flash’.
The OmniROM build will now be flashed to your SD card. This process could take some time depending on the data transfer speeds available for your SD card. Once the process is complete, you will be able to use OmniROM on your Pi 4.
Your PC might display a few error messages but these are common as the card is now formatted to be recognized by your Pi 4 hence Windows will face errors reading its contents.
Note: If you downloaded the weekly build, now would be the time to flash the .zip file to your SD card. Use Etcher in the same way as stated above but instead of selecting the OmniROM build at the start, simply select the Gapps package you downloaded from OpenGapps and flash it to your SD card.
Once flashed, plug in your SD card to your Pi 4 and power it on.

And that’s it! You should now be running Android 11 on your Pi 4. The first boot-up might take some time, so ensure that you are patient and do not turn off the device midway. Once booted, you will automatically be taken to the desktop on your device. You can now use the new Pi 4 running Android 11 however you want.
Note: The current OmniROM build does not support Hardware encoding or decoding for video which means that you will not be able to stream high-quality content on your Pi 4. However, Firefox as a browser seems to be working quite well when streaming 720p content that requires hardware encoding. So you can try Firefox as an alternative for now until an update is released to OmniROM with support for Hardware encoding and decoding.
We hope this guide helped you easily install Android 11 on your Raspberry Pi 4. If you have any questions for us or face any issues, feel free to reach out to us using the comments section below.


5 responses to “How to Install Android 11 on Raspberry Pi 4”
Very helpful . Thank you keep it up .
what magic incantation configures the raspberry pi4 ethernet?
Wrong steps. Didn’t you miss the steps to install gapps? I don’t believe you can simply reflash as you state. You must transfer the zip file to the raspi, boot into recovery mode and then try to install the gapps apps…
bro pls help me I want to install gapps in OmniRom RPI 4. I tried and got some errors, and I’m unable to get out of the recovery boot mode…