
File sharing between your iPhones, iPads, and Mac devices has always been a simple affair and the same thing can be translated when moving files between each of those devices. Besides being able to copy and back up everything on your iPhone, you can download pictures and videos shot on your iPhone individually and transfer them onto your Mac.
In this post, we have all the ways you can save photos from iPhone to Mac.
How to download photos from iPhone to Mac [4 methods]
There are several ways you can download the pictures from your iPhone onto a Mac.
Method 1: Using iCloud Photos on the web
You can download a copy of your original photos or videos from iCloud Photos on the web at any time, meaning you can access it from any of your devices. If you’re logged into your iCloud account on your Mac, then you can easily access your entire Photos library which includes all of your photos and videos.
The items in your Photos library will be organized into Years, Months, Days, and All Photos and you can view and download any of them anytime you want directly from your web browser, preferably Safari.
- To start downloading pictures from iCloud Photos on the web, open the Safari app, go to iCloud.com, and sign in with your Apple account.
- Your Mac will either ask you to enter your iCloud password or your Mac password, depending on how you have it configured. You will be taken to your iCloud account screen once you enter your credentials.

- Inside the iCloud.com Home Screen, click on Photos.

- Select the photos and videos you wish to download on your Mac. If you wish to download an individual item, you can select it by just clicking on it. For multiple selections, you will have to hold the Command key on your keyboard, and then click on the items you wish to download.
- After you have made your selection of photos and videos, long-press on the Download button (the one indicated by a cloud and a downward-facing arrow).

- When you do that, a popup menu will appear, asking you to select whether you wish to download the items in the Unmodified Original format or the Most Compatible format.
- When you select Unmodified Original, the photos you selected will be downloaded as it was originally imported or captured on your phone. Choosing Most Compatible will save your photos in JPEG or H.264 formats. After you have selected your preferred format, click on the Download button inside the popup menu.

The selected items will be downloaded in your default downloads folder on your Mac.
Method 2: Using the Finder app
If you wish to download photos from your iPhone to a Mac using a wired connection, then you can do so using the Finder app on macOS. Apple’s Finder app has a built-in iPhone management utility (on macOS 10.15 Catalina and newer versions) that replicates the functionality of iTunes on a Mac.
- Before you start downloading your photos, you need to make sure that both the iPhone and Mac devices are updated to their latest OS versions – iOS 12 or later and macOS Catalina (10.15) or newer respectively. With the iPhone and Mac turned ON, establish a connection between them using a USB-to-Lightning cable that comes with your iPhone.
- For this method to work, the iCloud Photos option on your iPhone should be disabled. You can do this by going to your Apple ID card > iCloud > Photos and turning off the iCloud Photos toggle.

- After connecting your iPhone to your Mac, open the Finder app on the Mac.

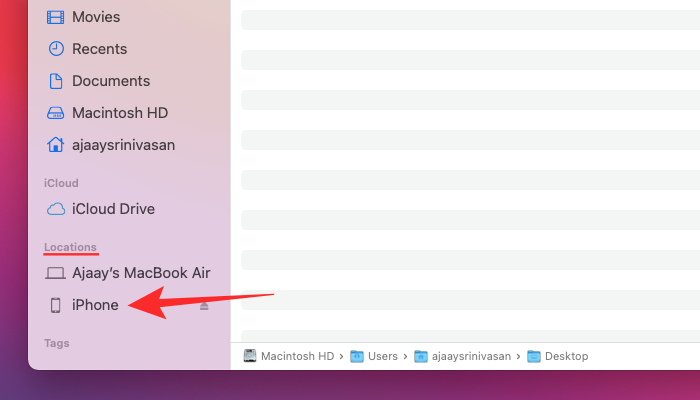
- Inside the Finder app, you should be able to see your iPhone in the left sidebar. If not, click on Locations from the sidebar to expand it and select your iPhone.
- If this is the first time you’re connecting your iPhone to the Mac, then you’ll be prompted with a dialog asking you whether you “Trust iPhone”. You will need to click on Trust on your Mac.

- In the next step, you will have to tap on Trust on your iPhone when it prompts you with the “Trust This Computer” dialog.

- After you select the ‘Trust’ option, enter your device passcode on your smartphone.

- Once this authentication is complete, you will be able to see your iPhone data inside the Finder app on your Mac. This is your iPhone device management screen which hosts all the controls that you will need to back up your iPhone.
- In this screen, click on the Photos tab at the top, check the Sync photos to your device from box, and choose the app or folder you want to download photos from.

- On the same screen, select All photos and albums next to “Sync” if you wish to move all the photos in the selected app or folder to your Mac. If you want to move photos only from a few albums, select Selected albums.
- You can also customize your options by selecting your preferences inside the Options section. This section lets you download only the items you liked, include videos among the items you’re syncing, and the ability to automatically include photos from a recent period like last week, month, etc.

- When you’re done choosing your preferences, click on Apply at the bottom right corner.
- All the photos that you selected for syncing will be downloaded to your Mac and will be available inside the Pictures tab in the Finder app.
Method 3: Using the Photos app
Similar to the above method, you can use the Photos app on your Mac to download pictures and videos from your iPhone with the help of the data cable.
- With the iPhone and Mac turned ON, establish a connection between them using a USB-to-Lightning cable that comes with your iPhone.
- After you have successfully connected your iPhone to the Mac, open the Photos app on your Mac and select your iPhone from the left sidebar.

- If this is the first time you’re connecting your iPhone to the Mac, then you’ll be prompted with a dialog asking you whether you “Trust iPhone”. You will need to click on Trust on your Mac.
- In the next step, you will have to tap on Trust on your iPhone when it prompts you with the “Trust This Computer” dialog.
- After this, enter your device passcode on your iPhone to establish a connection between your Mac and iPhone.
- You will now be able to see all the photos that are available on your iPhone.

- Select the pictures and videos you wish to download on your Mac by simply clicking on the items you want.
- To download the selected photos on your Mac, click on Import Selected at the top right corner. You can also download all your recent pictures by clicking on Import All New Photos.

- All your pictures and videos will be imported to the Photos app on the Mac. After the importing process is finished, your photos will be found inside the Imports tab on the left sidebar.

After this, you can disconnect your iPhone from the Mac.
Method 4: Using Airdrop to share photos
You can send and receive files between all your Apple devices wirelessly using Airdrop. These can be anything that’s present on your phone including documents, pictures, videos, and other files and you can use the following method to share just about any file from your iPhone to Mac or vice versa.
Requirements and setup
Before you use Airdrop to transfer your photos from your iPhone to your Mac, make sure you have the following things configured correctly:
- Both your Mac and iPhone have WiFi, Bluetooth, and Airdrop enabled on each of them.

- Both devices are within each other’s Bluetooth and Wi-Fi range.
- Airdrop on the Mac is set to ‘Contacts Only’ or ‘Everyone’.
- Both devices are connected to the same WiFi network.
How to download photos to Mac
- Open the Photos app on your iPhone.
- To select the photos you want to transfer to the Mac, tap on Select at the top right corner, and then start selecting your desired photos and videos.

- After you have selected the photos, tap on the Share icon at the bottom left corner.

- When the Share menu pops up, select AirDrop.

- Inside the AirDrop screen, select your Mac.

- If you have previously shared files using Airdrop on your Mac, the files sent from your iPhone will be easily downloaded inside the Downloads folder in the Finder app. If not, you will need to click on Accept when prompted on the Mac.

That’s it. These are all the ways that you can download photos from your iPhone onto your Mac. For more stuff about the iPhone, check out our dedicated iOS section.
RELATED


