
Unless you’ve been living inside a cave for the past month, you’d have heard about Zoom and how easy it has made video conferencing for organizations, educational institutions, and casual users around the globe.
Zoom offers the ability to add up to 1000 people to video meetings at a given time and with so many people sharing ideas in groups, it might be for the meeting host to conduct meetings and control the members at the same time.
To help meeting organizers sort this, Zoom offers the ability to add a co-host during a meeting session. When you, as a host, assign another participant as a co-host, they will be able to share some of the controls you have including managing the attendees and other administrative aspects during a meeting.
The following guide will help you set a co-host to your meeting and also teach you how a co-host is different from participants and alternative hosts in a meeting session.
Note: Co-hosting on Zoom is only available to Pro, Business, Education, or API Partner subscribers of Zoom, meaning only Licensed (Paid) Zoom users will be able to access the feature on the Zoom app.
What do you need
- Zoom app: Windows, Mac, Linux, Android, or iOS
- Licensed Zoom account: Any of the Zoom’s Pro, Business, Education, or API Partner plans
- NOT available in Zoom basic free plan
Who can be a co-host
A host will be able to assign any participant during a meeting as a co-host. After the host assigns them as co-host, they will be able to share some of their hosting privileges with another user.
The co-host will be able to save meeting chats, start polls, mute/unmute others, stop participant videos, remove them, or put them on hold. Co-hosts can be used by hosts as a means of assistance when managing the meeting without giving them entire control over the meeting session.
How is a co-host different from an alternative host
While they share most of the privileges that hosts have, co-hosts lose out on the ability to start a meeting.
That’s where alternative hosts step in. Alternative hosts share the exact same controls during a meeting as co-hosts do but with the added benefit of starting a meeting. If a host is not present, then a scheduled meeting cannot start, unless the alternative host is available.
While hosts can schedule a meeting and set them to start with an alternative host, the latter also has the right to schedule meetings in the host’s absence.
This means that an alternative host can be assigned prior to a scheduled meeting but co-hosts can only be assigned during a meeting and not ahead of time.
What controls do co-hosts have over participants
As has been explained before this, any participant can be assigned as a co-host by the meeting host. When a participant turns into a co-host they will be able to execute the following duties over other participants:
- Remove participants
- Keep attendees on hold after a meeting starts
- Save chats of the meeting session
- Create and conduct polls
- Mute or unmute other participants in the meeting
- Turn participants’ video OFF
- Request participant to switch video ON
- Spotlight a participant to push a participants video to all members
- Control who the attendees can chat with
- Rename attendees
- Start a recording or prevent participants from recording
How to enable the Co-host feature on Zoom
The Co-host feature on Zoom can be enabled for yourself as well as for all participants in a group or the entire organization. You can do so my follow the steps below.
Note: Make sure you’re subscribed to any one of Zoom’s Pro, Business, Education, or API Partner plans before trying to enable it on your Zoom account. Here’s how you can upgrade your Zoom account from the free Basic plan.
For your own use
Step 1: Log in to your Zoom account on the web and head over to My Account > Settings.

For all participants in your organization
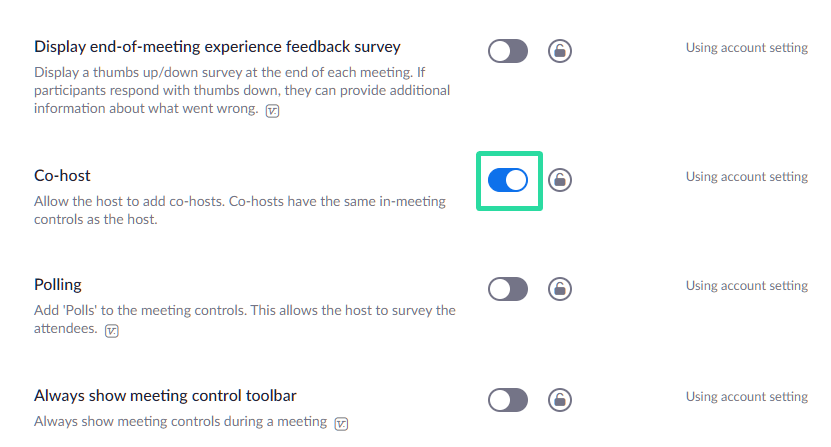
Step 1: Log in to your Zoom account on the web and then click MY ACCOUNT in the top right corner > Account Management > Account Settings.
Step 2: Now, under ‘In Meeting (Basic)’ settings in the Meeting tab, you will find the Co-host option. Toggle it ON.

For all participants of a group
Step 1: Log in to your Zoom account on the web and then click MY ACCOUNT in the top right corner > User Management > Group Management.
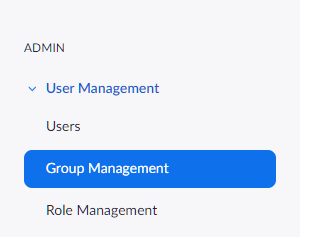
Step 2: Click the group name whose settings you want to change. Then click the Group Settings.

Step 3: Now, under ‘In Meeting (Basic)’ settings in the Meeting tab, you will find the Co-host option. Toggle it ON.
How to assign a co-host during a Zoom meeting
A host can assign a participant as co-host only after the meeting commences. If you’re a host, you can set a participant as co-host through an individual’s video feed or the Participants window that lists all the participants available in a meeting.
Through the participant’s video feed inside a meeting
Step 1: Start a meeting as a host on Zoom.
Step 2: On the meeting screen, click on the 3-dot icon which appears over the participant’s video feed when hovering over it.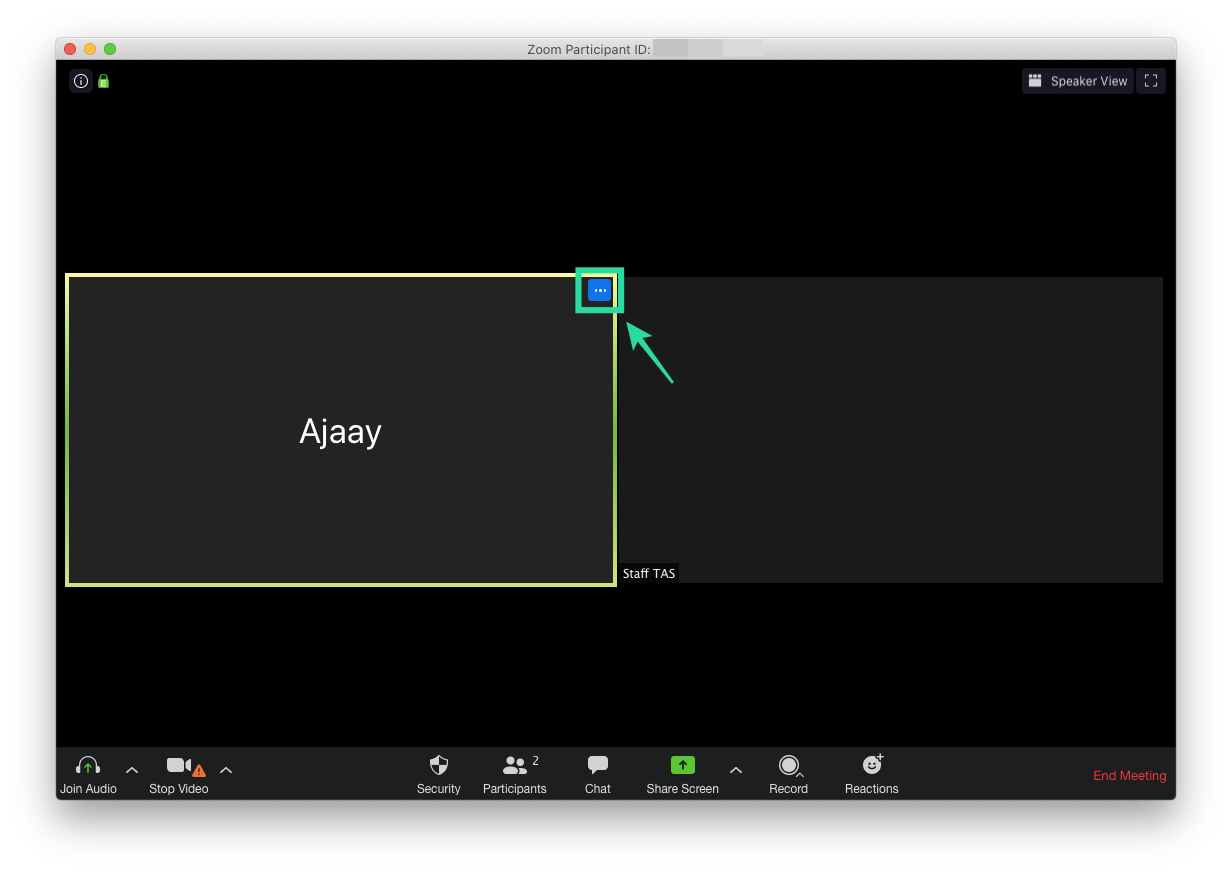
Step 3: In the drop-down menu, select the ‘Make Co-Host’ option.  This will make the selected participant as co-host.
Through the Participants window inside a meeting
Step 1: Start a meeting as a host on Zoom.
Step 2: Inside the Zoom meeting scree, click on the ‘Participants’ option from the bottom toolbar. 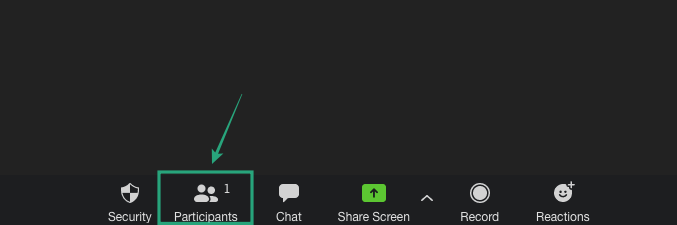
Step 3: When the Participants window opens, hover over the desired participant and click ‘More’.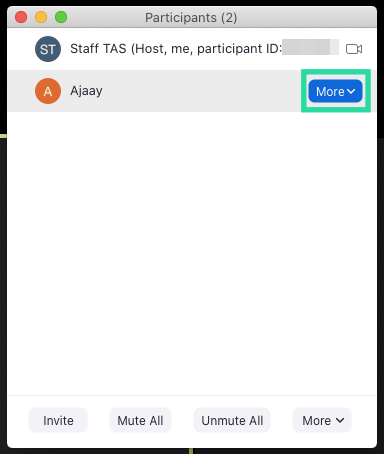
Step 4: When a drop down menu appears, select the ‘Make Co-Host’ option.  Step 5: Confirm the process by clicking on ‘Make Co-Host’ when prompted.
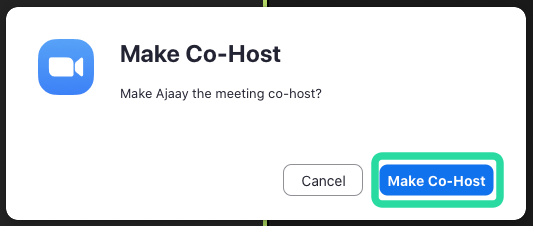
When a participant has been turned into a co-host, they will have all the controls that are mentioned above.
How to remove a co-host in a Zoom meeting
If you wish to remove a participant from their co-host role during a meeting, you can do so by following the steps below.
Step 1: During a Zoom meeting, click on the ‘Participants’ option from the bottom toolbar.
Step 2: Inside the Participants window, hover over the co-host you want to remove, click ‘More’
Step 3: When the drop down menu appears, select the ‘Withdraw Co-Host Permission’ option. 
That’s it! The participant you selected as co-host has been withdrawn from their co-host role.
Do you want to assign a co-host for your meeting sessions on Zoom? Did the above guide help you set a participant as a co-host in Zoom? Let us know in the comments down below.


2 responses to “How to add a co-host on Zoom for own, group and account”
my zoom app only allows me to make another participant the host – there is no “make co-host” option. I am the only administrator of this account. How do i get the “make co-host” option?
i think it’s because your plan is Basic. if you’re using from your school’s email account, like me, that’s likely. i also didnt see the co-host option :<