
Samsung officially released the XXJW4 firmware, which is the Value Pack firmware Samsung promised for the Galaxy S after they announced that it won’t be getting Ice Cream Sandwich. The Value Pack brings along a few features from ICS, along with general speed and performance improvements.
Those who flashed the XXJW4 firmware can root it and install ClockworkMod (CWM) recovery (which lets you flash custom ROMs on the phone) by flashing the CF-Root kernel released by XDA recognized developer Chainfire, who’s always quick with his releases of rooted kernels every time a new Galaxy S firmware is released.
Read on for the full step by step procedure to install CF-Root kernel on your phone to root the XXJW4 firmware.
Compatibility
This firmware and the guide below are compatible only and only with the Samsung Galaxy S, model number GT-i9000. It’s not compatible with any other device and may render an incompatible device unusable. Check your device model in Settings » About phone.
Warning!
The methods and procedures discussed here are considered risky and you should not attempt anything if you don’t know completely what it is. If any damage occurs to your device, we won’t be held liable.
Pre-Installation Requirements
- If you have Samsung’s PC software Kies installed, un-install/shut it down completely from the taskbar first because it may interrupt the flashing process.
- Drivers! — it’s important you’ve the proper drivers installed. Download links below:
How to Root and Install ClockworkMod Recovery on XXJW4
- Make sure you’ve installed XXJW4 firmware. Try this only on XXJW4 firmware and not on any other firmware.
- Download CF-Root kernel from the official download page → here.
Filename: CF-Root-XX_OXA_JW4-v4.4-CWM3RFS.zip - Unzip the above file to a folder once. You will get the .tar file – CF-Root-XX_OXA_JW4-v4.4-CWM3RFS.tar — inside the extracted folder. It’s recommended to use 7-zip free software to extract it. DO NOT extract the .tar file (even if you see it as a zip file, which it is not). You need to flash the .tar file using Odin to gain root access and install ClockworkMod Recovery (CWM) alongside. If you’re getting zImage file, it means you’ve extracted the .tar file too! — and that’s not a right thing to do.
- Use the Odin software you used while flashing the XXJW4 firmware. In case you don’t have it anymore, download it again.
Download Link | Filename: Odin3 v1.7.exe - Switch off your phone. Wait for vibration to confirm complete switch off.
- Now, put the Galaxy S in Download Mode — press and hold these keys together: Volume_DOWN + Home + Power until a screen saying Download comes up.
- Open Odin now. Connect your phone to PC now. You’ll notice “Added!!” message in the Odin’s message box in the bottom left.
- In Odin, click the PDA tab and select the .tar file you got in step 3 — CF-Root-XX_OXA_JW4-v4.4-CWM3RFS.tar.
- Important! Do not touch any other button or make any other changes in Odin except selecting the required file as given in step 8.
- Click the Start button in Odin to flash the CF-Root kernel.
- After CF Root is installed, the phone will restart automatically. When you see PASS written in top left box, you can disconnect the phone from the computer.
IMPORTANT Note: If ODIN gets stuck at some stage and doesn’t seem to be doing anything, do this — disconnect the phone from the PC, close ODIN, remove battery, re-insert it, turn phone on in Download mode again, and do the procedure again from Step 7. Same if you get a FAIL message in Odin. - If you face any problems while flashing CF-Root, let us know and we’ll try to help you out.
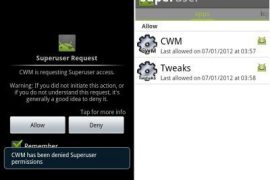
Your phone is rooted now and CWM recovery has been installed on it. Whenever you try to use an app that requires root permissions, you will get a Superuser prompt, where you can select Allow to grant root access to the app. Custom ROMs can be flashed by booting into CWM recovery when needed. And that’s it. Enjoy!






171 responses to “XXJW4 Root and ClockworkMod Recovery for Galaxy S”
please help….in odin it doesnt get past this screen
Added!!
Odin v.3 engine (ID:9)..
File analysis..
SetupConnection..
Initialzation..
Get PIT for mapping..
it freezes over here…….i have a galaxy S I9000 with XXJW4 firmware…wat should i do ?
die
please help….in odin it doesnt get past this screen
Added!!
Odin v.3 engine (ID:9)..
File analysis..
SetupConnection..
Initialzation..
Get PIT for mapping..
it freezes over here…….i have a galaxy S I9000 with XXJW4 firmware…wat should i do ?
die
Anyone had the reboot problem solved yet?
Anyone had the reboot problem solved yet?
Anyone had the reboot problem solved yet?
rooted using method shown i now have no internal or external sd cards so i now have no g mail or market . help please.
rooted using method shown i now have no internal or external sd cards so i now have no g mail or market . help please.
rooted using method shown i now have no internal or external sd cards so i now have no g mail or market . help please.
I tried to root as per the above instructions and my mobile is stuck in the Samsung Galaxy SII GT-I9100 boot screen pls help
Did you read their warning that this guide is ONLY for Samsung Galaxy S model i9000?
I tried to root as per the above instructions and my mobile is stuck in the Samsung Galaxy SII GT-I9100 boot screen pls help
Did you read their warning that this guide is ONLY for Samsung Galaxy S model i9000?
I tried to root as per the above instructions and my mobile is stuck in the Samsung Galaxy SII GT-I9100 boot screen pls help
Did you read their warning that this guide is ONLY for Samsung Galaxy S model i9000?
Can someone tell if this rooting will affect the data and configuration on the phone ?
I would like to apply it to my i9000 JW4 but would not want to re-install everything on it.
Thank you !
Can someone tell if this rooting will affect the data and configuration on the phone ?
I would like to apply it to my i9000 JW4 but would not want to re-install everything on it.
Thank you !
Can someone tell if this rooting will affect the data and configuration on the phone ?
I would like to apply it to my i9000 JW4 but would not want to re-install everything on it.
Thank you !
I tried tried and tried. I almost gave up. I stumbled up on this page. Odin rocks! Such simple instructions. Thank you so much!!!
I tried tried and tried. I almost gave up. I stumbled up on this page. Odin rocks! Such simple instructions. Thank you so much!!!
I tried tried and tried. I almost gave up. I stumbled up on this page. Odin rocks! Such simple instructions. Thank you so much!!!
All I’m doing fine. When the phone is turned on I got CWM, Tweaks and supers. I installed Root Checker and he tells me Sorry! This device does not have proper root access. Why?
Repaired, I went into the supers and allowed chacker root access and now says This device has root access! Do I need to allow and Tweaks and CWM?
All I’m doing fine. When the phone is turned on I got CWM, Tweaks and supers. I installed Root Checker and he tells me Sorry! This device does not have proper root access. Why?
All I’m doing fine. When the phone is turned on I got CWM, Tweaks and supers. I installed Root Checker and he tells me Sorry! This device does not have proper root access. Why?
Repaired, I went into the supers and allowed chacker root access and now says This device has root access! Do I need to allow and Tweaks and CWM?
Repaired, I went into the supers and allowed chacker root access and now says This device has root access! Do I need to allow and Tweaks and CWM?
Worked like a charm for me. Thanks!
Now I was able to make a full backup of my stock 2.3.6, this felt safe before doing more flashing.
After this I installed CyanogenMod 10.0 (latest stable), and people, my i9000 really flies now!
For me it was either trying this, or buying a new phone, because my beloved i9000 was ‘dying’ of slowness. No need to buy new one now, this is fast and lean!
Worked like a charm for me. Thanks!
Now I was able to make a full backup of my stock 2.3.6, this felt safe before doing more flashing.
After this I installed CyanogenMod 10.0 (latest stable), and people, my i9000 really flies now!
For me it was either trying this, or buying a new phone, because my beloved i9000 was ‘dying’ of slowness. No need to buy new one now, this is fast and lean!
Worked like a charm for me. Thanks!
Now I was able to make a full backup of my stock 2.3.6, this felt safe before doing more flashing.
After this I installed CyanogenMod 10.0 (latest stable), and people, my i9000 really flies now!
For me it was either trying this, or buying a new phone, because my beloved i9000 was ‘dying’ of slowness. No need to buy new one now, this is fast and lean!
Excellent. I’ve bee searching for ages to find clear instructions. Yours worked perfectly. I used Odin3_v3.07 from http://forum.xda-developers.com/showthread.php?t=1722686
Excellent. I’ve bee searching for ages to find clear instructions. Yours worked perfectly. I used Odin3_v3.07 from http://forum.xda-developers.com/showthread.php?t=1722686
i went through the steps iot got passed but now after restarting m logo keeps on flashing but it does not moves ahead what to do……..
help please………………….
i went through the steps iot got passed but now after restarting m logo keeps on flashing but it does not moves ahead what to do……..
help please………………….
i went through the steps iot got passed but now after restarting m logo keeps on flashing but it does not moves ahead what to do……..
help please………………….
works perfect, nice work, thx 🙂
Hi
My phone keeps restarting after rooting please help me how to root…pls help….my email id is [email protected]
works perfect, nice work, thx 🙂
works perfect, nice work, thx 🙂
Hi
My phone keeps restarting after rooting please help me how to root…pls help….my email id is [email protected]
Hi
My phone keeps restarting after rooting please help me how to root…pls help….my email id is [email protected]
bad link for odin 1.7 please correct it else remove this page from your site
thank u
bad link for odin 1.7 please correct it else remove this page from your site
thank u
bad link for odin 1.7 please correct it else remove this page from your site
thank u
Worked for me! Make sure you use Odin3 v1.7.exe and follow the steps to the letter. Also, make sure that if you connect your phone to your PC before starting the tutorial, Windows DOES NOT prompt you about drivers or try to set them up. Windows should do nothing. I’ve got a feeling a lot of these cases of the install failing are caused by windows dicking around with drivers while Odin is running.
Worked for me! Make sure you use Odin3 v1.7.exe and follow the steps to the letter. Also, make sure that if you connect your phone to your PC before starting the tutorial, Windows DOES NOT prompt you about drivers or try to set them up. Windows should do nothing. I’ve got a feeling a lot of these cases of the install failing are caused by windows dicking around with drivers while Odin is running.
Worked for me! Make sure you use Odin3 v1.7.exe and follow the steps to the letter. Also, make sure that if you connect your phone to your PC before starting the tutorial, Windows DOES NOT prompt you about drivers or try to set them up. Windows should do nothing. I’ve got a feeling a lot of these cases of the install failing are caused by windows dicking around with drivers while Odin is running.