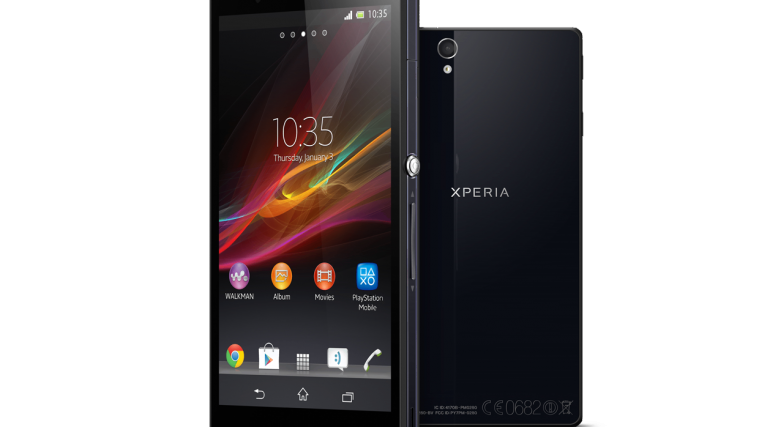
With the Xperia Z being Sony’s top-end flagship phone this year, it is not surprising that it is seeing a massive amount of community development in the way of custom ROMs and other hacks. If you’re looking to start installing custom ROMs on your Xperia Z, you’ll have to install ClockworkMod recovery. But what exactly is ClockworkMod recovery?
ClockworkMod recovery (abbreviated as CWM) is the most popular custom recovery for Android devices, developed by Koushik “Koush” Dutta. CWM recovery replaces the stock recovery that is present on every Android device and extends its functionality with a lot more features and options.
The one thing that CWM is mostly used for is flashing custom ROMs on devices, which are basically custom versions of Android that replace the default software that a manufacturer puts on their devices. Other functions of CWM include the ability to factory reset a device, backup and restore a device’s ROM, and flash custom kernels, hacks, and mods.
So if you’re looking to install CWM recovery on the Xperia Z but need a little help, you’ve come to the right place – our all-in-one guide for the Xperia Z has easy to understand step-by-step instructions to help you through the procedure to install CWM.
There are two separate methods – the first one is for locked bootloaders, which doesn’t require unlocking bootloader and hence does not void the phone’s warranty, but does make installing ROMs and mods a bit more complicated. The second method unlocks the bootloader, which voids warranty but makes it extremely easy to install custom ROMs etc.
So just pick the method you wish to use (more details are given with each), then follow the instructions to install CWM recovery on your Xperia Z.
Compatibility
The procedure described below is only for the Sony Xperia Z. Do not try it on any other device.
Warning!
The methods and procedures discussed here are considered risky, so try them out at your own risk, and make sure to read each step carefully before attempting anything. We will not be held responsible if anything goes wrong.
For Locked Bootloaders
This method is for those that don’t wish to unlock the bootloader on their device and hence not lose warranty. Unlocking bootloader also wipes all data from device, so if you want to retain warranty, you should use this method. For those that have no issues with unlocking bootloader (which makes hacking and modding a bit easier) should follow the method for unlocked bootloaders down below.
- Download and install the drivers for the phone on your computer.
Download Drivers | Alternate Link - Enable the following things on the phone.
- Go into the Settings » Developer options menu and enable the USB Debugging option. On Android 4.2, you’ll have to first unhide the Developer options menu by going into Settings » About phone then clicking on the Build Number field seven times.
- Enable Unknown Sources from the Settings » Security menu.
- Download the CWM recovery installer from the source page. Once downloaded, extract the downloaded file using a program like WinRAR or 7z to a convenient location on your computer. You should obtain a folder named “cwm-locked-bl-XZ” or something similar.
- Connect the phone to the computer, and let the drivers install if this is the first time you’ve connected the phone to the computer. You might need to finish the Windows driver installation manually, do that and go to next step.
- Now, double-click on the “install” file from the folder where you extracted the recovery installer’s files.
- The CWM installation procedure will now begin. Keep an eye out on the procedure and follow onscreen instructions, if any.
- Once recovery is installed, the phone will automatically reboot.
- ClockworkMod recovery is now installed on your Xperia Z. Make sure to read the “Booting into ClockworkMod Recovery” section below to find out you can boot into CWM when needed.
For Unlocked Bootloaders
This procedure requires unlocking the bootloader on the phone, which voids warranty and also factory resets it by wiping all data. This is useful for easy installation of ROMs and mods, and should be used by those who are comfortable losing the warranty and want to make it extremely easy to install hacks and mods.
Requirements
- Your phone must be running the 10.1.A.1.350 firmware/build number. Check the firmware/build number in the Settings » About phone menu. Don’t try this procedure if you are running any other firmware.
- Take a backup of all the data on your phone. Flashing CWM recovery requires unlocking the bootloader on the phone which wipes everything – including music, photos, videos, etc – and factory resets it. Use our Android Backup Guide for help on how to back up apps and other data, such as contacts, SMS, bookmarks, etc. Then, after you’ve backed personal data up, copy everything off the phone’s storage to a computer.
- NOTE: Backup is optional and you can skip this step if you do not wish to back up anything.
- Unlock the bootloader on your Xperia Z using this guide. Unlocking bootloader wipes all data from the phone so make sure you take a backup as mentioned in step 1.
- NOTE: If you’ve already unlocked the bootloader on your device, you can skip this step.
- Install the Android SDK using the guide → here. This is required for flashing the necessary files on the phone. NOTE: Skip this step if you already installed Android SDK when unlocking the bootloader.
- [Skip if you did this while unlocking bootloader] You’ll need to do the following things to install the fastboot drivers (fastboot is used for flashing the necessary files on the phone) for the phone on your computer.
- Download and unzip this file (use a program like WinZip or WinRAR for extraction) to obtain a file named android_winusb.inf.
- Copy this android_winusb.inf file to the extras » google » usb_driver folder where you installed the Android SDK. Replace the existing file when asked to do so.
Install CWM Recovery
- Download the latest version of ClockworkMod (CWM) recovery from the source page.
- Copy the recovery file to the Android SDK » platform-tools folder.
- Now, turn off your Xperia Z. Then, while holding down the “Volume UP” button, plug in the USB cable to your phone (make sure cable is connected to the computer before connecting to phone). This will start the device in FASTBOOT mode.
- [Skip if you already installed the drivers during bootloader unlocking] The device installation screen will pop up on your computer. Here, select the “Browse my computer for driver software,” followed by “Let me pick from a list of device drivers” option. Then click on “Have Disk”, browse to the Android SDK » extras » google » usb_driver folder, and select the android_winusb.inf file. Then, select “Android Bootloader Interface” from the list and finish the driver installation by following the onscreen instructions on your computer.
- Open the Android SDK » platform-tools folder. Here, press and hold down the SHIFT button on your keyboard, then right-click on an empty part of the screen. Then, click on the “Open command window here” option in the right-click menu to open a command prompt window.

- In the command prompt window, type in fastboot.exe -i 0x0fce getvar version and press Enter. If a value is returned as a response, such as 0.3 or 0.5, then the device is properly connected and you can go to the next step.
- Then, type in fastboot.exe -i 0x0fce flash boot name_of_file.img in the command prompt, replacing name_of_file with the name of the recovery file downloaded in step 1, and press Enter. This will flash CWM recovery on the phone.
- After you get a FINISHED message in command prompt, enter fastboot reboot to reboot the phone. You can close the command prompt window and disconnect the phone from the computer.
- ClockworkMod recovery is now installed on your Xperia Z. Make sure to read the “Booting into ClockworkMod Recovery” section below to find out you can boot into CWM when needed.
Booting into ClockworkMod Recovery
Whenever you want to use CWM recovery, do the following:
- Turn off and then turn on the phone. Once the Sony logo shows up and the LED light on the phone lights up, start pressing the Volume Up key repeatedly until the phone boots into CWM recovery. Remember to tap/press the volume key numerous time instead of keeping it pressed continuously.
- Once CWM recovery shows up, you can use the volume buttons to scroll up and down and the power button as the select/enter key.
- Rebooting back into Android from CWM recovery can be done by selecting the “reboot system now” option in the main menu of CWM.
ClockworkMod recovery is now installed on your Xperia Z, and you will be able to flash custom ROMs, hacks, kernels, take backups of and restore ROMs, and make other modifications such as factory resetting the device. If you run into any problems, let us know in the comments and we’ll help you out.


Hi, i installed recovery flawlessly but i cannot seem to boot into recovery menu. i pressed volume uo key several times and nothing happens. just reboots to normal. what seems to be the problem?
Hi, i installed recovery flawlessly but i cannot seem to boot into recovery menu. i pressed volume uo key several times and nothing happens. just reboots to normal. what seems to be the problem?
Hi, i installed recovery flawlessly but i cannot seem to boot into recovery menu. i pressed volume uo key several times and nothing happens. just reboots to normal. what seems to be the problem?