The Acer Iconia Tab A100 got a leaked Ice Cream Sandwich firmware a few days ago, which we’re sure was tried out by many A100 owners to get a taste of Android 4.0 on their devices. Now they can root ICS based firmware using this root exploit. Though not as simple as usual rooting methods, it’s the only currently known way to root, so people are gonna have to bear with it for now. But hey, no pain, no gain, right?
Anyway, on with the procedure. Read on to find out how to root ICS firmware on your Iconia Tab A100.
Compatibility
This hack and the guide below is compatible only and only with the Acer Iconia Tab A100. It’s not compatible with any other device and may render an incompatible device unusable. Check your device model in Settings » About phone.
Warning!
The methods and procedures discussed here are considered risky and you should not attempt anything if you don’t know exactly what you are doing. If any damage occurs to you or your device, including a bricked, non-functional device, we won’t be held liable. You have been forewarned!
Pre-installation Requirements/Tips
- ADB installed on your PC. You can install ADB using this step by step guide → here.
- USB drivers for the Iconia A100 installed. Get them from → here.
- [Optional] This procedure will not wipe your apps, data and settings. But to be on the safe side, backup your Apps and important data — bookmarks, contacts, SMS, APNs (internet settings), etc. This Android backup guide would help you.
How to Root ICS Firmware on Iconia A100
- Download the following files (Important: Check the original development page for updated files):
- mempodroid → Download Link
- busybox → Download Link
- su → Download Link | Filename: su-bin-3.0.3.2-efghi-signed.zip
- Now, make a new folder “tools” in the “platform-tools” folder where you have installed adb. Check screenshot below.
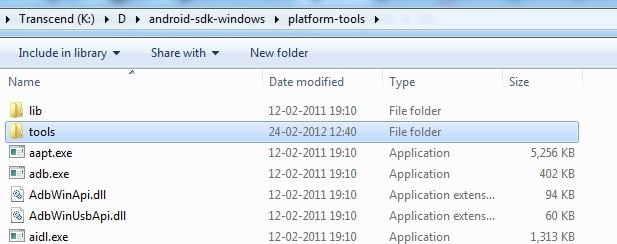
- Copy the mempodroid and busybox files (from step 1.1 and 1.2) to this tools folder that you created in step 2. Also open the su-bin-3.0.3.2-efghi-signed.zip file from step 1.3 and copy the file ‘su’ from ‘system/bin’ inside the zip to the tools folder. Check the screenshot below:

- Connect your Iconia Tab A100 to your computer.
- Now open the Command Prompt from Start » Accessories. Navigate to the platform-tools folder using the cd command. For example, my platform-tools folder is located in K:Dandroid-sdk-windowsplatform-tools. So I would navigate to it as shown in the screenshot below:
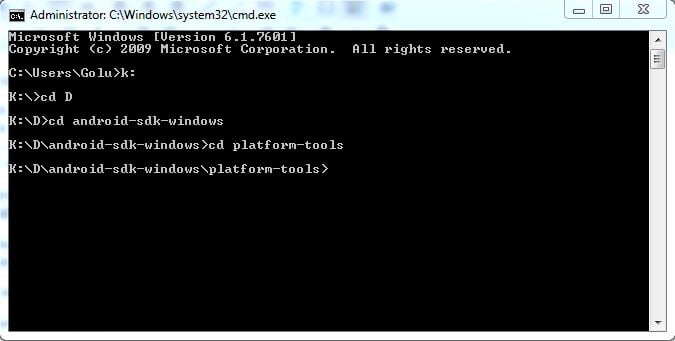
Taking the above screenshot as reference, navigate to your platform-tools folder. - Then perform the following commands, pressing Enter after each line (do not type the $ sign at the start)
$ adb shell mkdir tools
$ adb push tools /data/local/tools ; adb shell
$ cd /data/local ; chmod 755 tools/*
$ cd tools ; ./mempodroid 0xd9f0 0xaf47 sh
- If the above commands worked, the $ should change to # which indicates you have temporary root. Now enter the following commands to mount the /system partition of the device:
# ./busybox losetup -o $((512 * 51200)) /dev/block/loop7 /dev/block/mmcblk0
# mkdir loop ; mount -t ext4 /dev/block/loop7 loop
- Now we need to check if system partition is mounted and writable. Enter the following command:
# mount | grep loop
- You should get the following output (or similar to it) if everything worked properly:
/dev/block/loop7 on /data/local/tools/loop type ext4 (rw,relatime,errors=continue,barrier=0,data=ordered)
- Now we need to copy the busybox and su files to /system for permanent root. Perform the following commands in adb:
# ./busybox cp su loop/xbin/ ; ./busybox cp busybox loop/xbin/
# chmod 6755 loop/xbin/su
- If all went well, you should now have permanent root access on your Iconia A100. You can now disconnect it from the PC.
- You will need to download Superuser app from the Android Market to be able to grant root access to apps on your Tab. You can install it from → here.
So there you go. Your Iconia Tab A100 is now fully rooted. Be sure to download and install Superuser to be able to get root access. Share your thoughts and experience in the comments.




I got the error mkdir failed for tools, Read-only file system
same problem as phanto, read only file system error…
I got the error mkdir failed for tools, Read-only file system
I got the error mkdir failed for tools, Read-only file system
same problem as phanto, read only file system error…
same problem as phanto, read only file system error…
after I have #, I cannot write
after I have #, I cannot write
after I have #, I cannot write
read only file system error like everyone else….lost at step six; if you have any tips
please reply to this post or email mlowe1971@gmail.co
read only file system error like everyone else….lost at step six; if you have any tips
please reply to this post or email mlowe1971@gmail.co
read only file system error like everyone else….lost at step six; if you have any tips
please reply to this post or email mlowe1971@gmail.co
Step 6 should read:
“adb shell mkdir /data/local/tools”
and I had to push each file separately using:
“adb push tools/su /data/local/tools/su”
“adb push tools/mempodroid /data/local/tools/mempodroid”
“adb push tools/busybox /data/local/tools/busybox”
After that, it all seemed to work according to the original post
”
Step 6 should read:
“adb shell mkdir /data/local/tools”
and I had to push each file separately using:
“adb push tools/su /data/local/tools/su””adb push tools/mempodroid /data/local/tools/mempodroid””adb push tools/busybox /data/local/tools/busybox”
After that, it all seemed to work according to the original post”
Where am I entering this, within the cmd prompt in windows or in console of device?
If device, not really sure how to navigate from device to c:/Program Files/Android…
get error device not found
I’m using terminal emulator on my device to input the cmds you listed and it says device not found. Not really to familiar with droid file structure nor do I have a clue how to navigate from the device to the sdkplatform-tools folder on my pc.
help would be appreciated.
Thanks
Step 6 should read:
“adb shell mkdir /data/local/tools”
and I had to push each file separately using:
“adb push tools/su /data/local/tools/su”
“adb push tools/mempodroid /data/local/tools/mempodroid”
“adb push tools/busybox /data/local/tools/busybox”
After that, it all seemed to work according to the original post
”
Step 6 should read:
“adb shell mkdir /data/local/tools”
and I had to push each file separately using:
“adb push tools/su /data/local/tools/su””adb push tools/mempodroid /data/local/tools/mempodroid””adb push tools/busybox /data/local/tools/busybox”
After that, it all seemed to work according to the original post”
Where am I entering this, within the cmd prompt in windows or in console of device?
If device, not really sure how to navigate from device to c:/Program Files/Android…
get error device not found
I’m using terminal emulator on my device to input the cmds you listed and it says device not found. Not really to familiar with droid file structure nor do I have a clue how to navigate from the device to the sdkplatform-tools folder on my pc.
help would be appreciated.
Thanks
just got the OTA ICS build – by accident. everything goes fine right up until attempting to mount the loop7 device.
Here’s from my terminal:
shell@android:/data/local/tools # mount -t ext4 /dev/block/loop7 loop
mount: Invalid argument255|shell@android:/data/local/tools # mount -t EXT4 /dev/block/loop7 loop mount: No such device
note that dev/block/loop7 does exist (I’ve verified it with # ls /dev/block/loop7 ), but apparently losetup is failing silently.
there are lots of errors in these instructions: the proper method should be as follows:
$ adb shell mkdir /data/local/tools
$ adb push tools /data/local/tools ; adb shell
$ cd /data/local ; chmod 755 tools/*
$ cd tools
$ ./mempodroid 0xd9f0 0xaf47 sh
# ./busybox losetup /dev/block/loop7 /dev/block/mmcblk0p3
# mkdir loop
# mount -t ext4 -o loop /dev/block/loop7 loop
# ./busybox cp su loop/xbin/ ; ./busybox cp busybox loop/xbin/
# chmod 6755 loop/xbin/su ; sync
Hey… thanks for that… will correct and take it up on xda… btw will get back to you (you know what I mean, hehe).. see ya!