In most scenarios, audio devices are designed to go solo so it’s only you who’s listening to a song or enjoying a movie. But what if you wish to listen to a song on multiple audio devices? In the early days, you may have come across audio splitters that easily let you feed audio to two separate headphones. Those may not be of any use now since we’re dealing with wireless audio devices.
So, how do you connect more than one speaker or headset to your Mac without additional accessories? That’s what we’ll explain in this post.
Prerequisites
Before you set up your speakers and headphones as a single output, you need to connect all of them to your Mac. Following are some of the configurations that you could use to connect the audio devices you own to a Mac:
1. Connect more than one wireless headphone or speaker using Bluetooth
macOS lets you connect to more than one Bluetooth device at once. You can add and configure Bluetooth devices on your Mac by going to System Preferences > Bluetooth. Here, you can turn ON Bluetooth, add new devices, connect to them, and add the Bluetooth toggle inside the Menu bar at the top for easy access.

2. Plug in one Wired audio device using the audio jack and connect the rest via Bluetooth
If you have a wired speaker or headset, you can plug it inside the 3.5mm audio jack if your Mac has it. Unfortunately, you can only plug in one of your wired devices to your Mac and connect other audio devices via Bluetooth as you did in the step above.
How to set up multiple audio output on a Mac
Once you’ve figured out what your approach is going to be, you can proceed to set up all of your speakers and headphones together.
- Open the Audio MIDI Setup app by going to Applications > Utilities or by searching it on Launchpad or Spotlight.

- You should now see the Audio Devices window on your screen. Here, click on the + icon at the bottom left corner and select the Create Multi-Output Device option when a menu appears.

- You’ll now see a Multi-Output Device option listed on the left sidebar.

- You can now connect all the devices you want to add to the Multiple Output setup. When you do that, they will start appearing on the right-side pane inside the “Audio Devices” window.

- To add the devices to your Multiple Output setup, check the boxes under Use adjacent to their names in this list. If you have a wired headphone or speaker connected to your Mac, you will have to check the Built-in Output box to add it to your setup.

- Next, click on the drop-down menu adjacent to Master Device at the top.

- Now, select the audio output you wish to use as a Master device from the Master Device dropdown menu. This is the device that has all the control over the playback and volume adjustment.

- Once that’s done, select your secondary device under Drift Correction. This makes sure the audio on all your other devices doesn’t go out of sync because of varying sample rates.

- After this, right-click or Control-click on the Multi-Output Device option on the left sidebar.

- Now, click on Use This Device For Sound Output to enable it. You can also enable Play Alerts and Sound Effects Through This Device in the same way if you wish to. When you do that, your new multi-device setup will now be enabled on your Mac. You can now close the Audio Devices window.

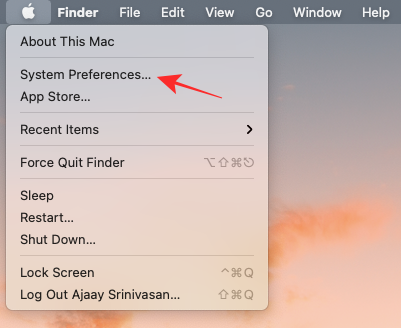
- To make sure this setup has been enabled, open System Preferences on your Mac from the Dock, Launchpad, or the Menu Bar (Apple logo > System Preferences).

- Inside System Preferences, click on Sound.

- On the Sound window, click on the Output tab at the top and make sure your newly configured Multi-Output Device is selected. If not, select the Multi-Output Device option by clicking on it.

Your Multi-Output audio is now set up. You can try playing a song or video on your Mac and see if you can hear its audio on all of your connected devices.
When and why would you set up multiple audio outputs?
If you are wondering why would you ever need to use more than one audio device as an output on your Mac. While you can get through most of your daily routine using a single speaker or headphones, there are some occasions when setting up multiple audio outputs can become a blessing.
- When you watch a movie with someone but in public: On most occasions, you may keep whatever you’re listening to yourself but when you’re with your friends or family in a public place, like on a flight or an airport, you may want to watch a movie or listen to songs with them. Since you won’t be playing them on your Mac’s speakers, you may want to connect two headphones to the Mac so that you and your friend can watch a movie without annoying others around you. You can use the steps mentioned below to connect multiple headphones on your Mac.
- When you have multiple speakers lying around and you want audio to be played on all of them: If you have a bunch of wireless speakers with you and you want to use all of them at once to enjoy a song or a movie, you can set up Multiple Audio Output. This will let you connect all of your speakers to the Mac and you can set it up in your room to have a surround sound effect.
- When you want one device to control all other audio devices: Setting up more than one speaker or headphone on a Mac is one thing but if you were wondering how you might control all of them, the Multiple Audio Output utility on a Mac lets you set a Master device. This Master Device is what has all the rights to adjust the volume and playback when all other devices are connected as your output.
That’s all you need to know about setting up multiple audio outputs on a Mac.
RELATED


So, if it only plays out of one device…then what?