
Google Photos is easily the most popular photo storage app on Android devices. Its high-quality backups and sharing features make it the go-to app for many. But since Google started monetizing the Photos app, it’s getting harder for people to stick with this otherwise perfect photo gallery app.
An easy alternative to keep your photos backed up is to download or transfer them to your PC. Of course, one could always save those photos directly to one’s phone. But as most PCs have larger storage space than smartphones (even with external storage), it’s better to transfer them to the PC. Here are all the ways that you can do so and have easy access to your photos and videos without worrying about the 15GB account storage limit.
Ensure your Google Photos are being backed up
Most of the methods described below require Google Photos backup services to stay turned on. Even if you don’t have a lot of account storage space left, make sure you have enough for the photos and videos that you want to transfer or download.
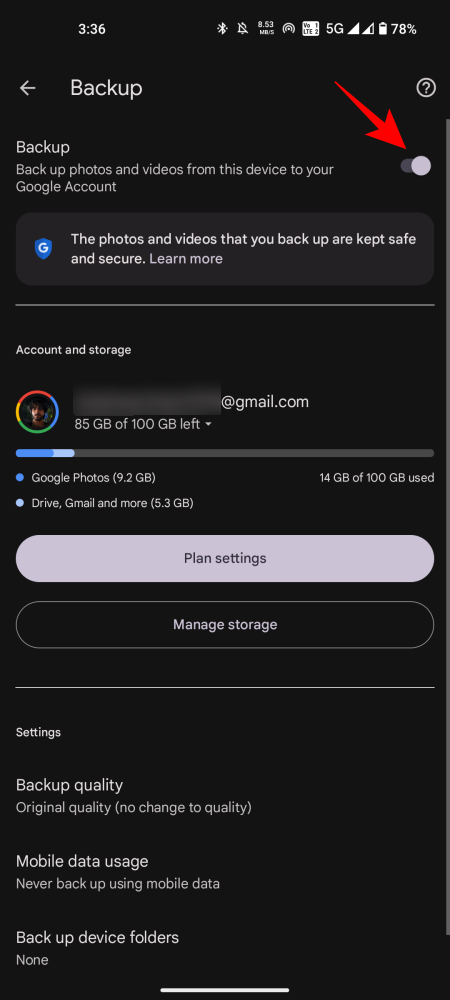
By default, the backup services are turned on. But you might want to ensure that that is actually the case as backup services can be turned off if you’re running out of storage space or you’re in battery-saver mode. Here’s how to ensure Google Photos Back up & sync is turned on:
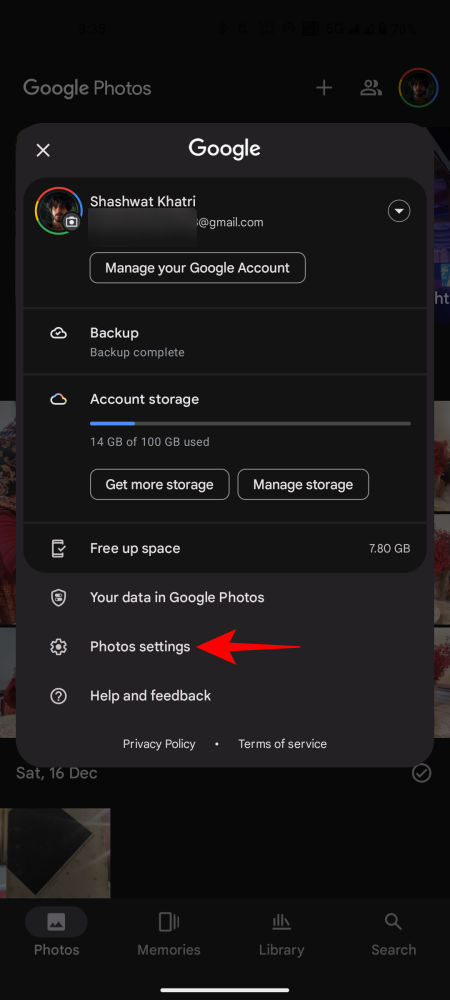
- Open the Google Photos app and tap on your profile icon at the top right corner.
- Tap on Backup Photos settings > Backup and ensure the Backup option is toggled On.
Method 1: Save Google Photos from the website on your computer
Once you’ve confirmed that your photos and videos are being backed up, the first thing to do is to fire up your favorite browser (Chrome, preferably) and visit photos.google.com.
Here, click on Go to Google Photos and move on to the next screen.

Option 1: Download a single photo or video
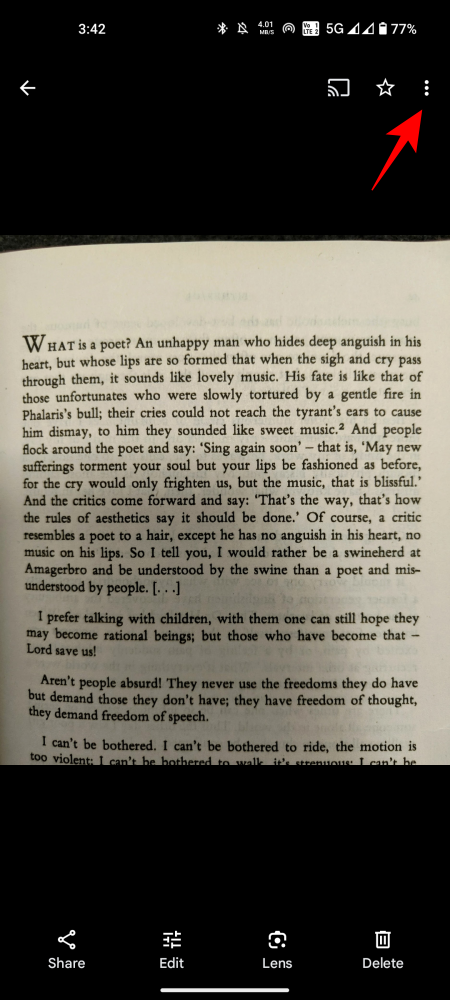
- Click on the photo or video that you want to download.

- Click on the three-dot icon at the top right corner and select Download.

- Your Google photos and videos will be downloaded on your PC.

Option 2: Download multiple photos and videos
- To download multiple photos and videos, instead of clicking on one, hover over it and click on the tick mark at its top left corner to select it.

- Do the same for all photos and videos that you want to download. Then, click on the vertical ellipsis at the top right corner and select Download.

- Your Google photos and videos will be downloaded in a zip file.

- Simply select the file and click Extract all to extract your Google photos and videos.

Option 3: Download all photos and videos in an album
If you’re the kind of person who categorizes his/her photos by album, you can download the entirety of the album to your PC. Here’s how to do so:
- Click on Albums in the left panel of Google Photos.

- Select the album that you want to download.

- Here, click on the vertical ellipsis at the top right corner and select Download all.

- Your album will be downloaded as a zip file that you can extract by right-clicking the file and selecting ‘Extract all’.
Method 2: Copy from mobile storage to your computer using a USB cable
You can easily transfer the photos on your mobile device to your computer using a USB cable. The following options will allow you to not only save the camera roll to your mobile storage but also copy it to your later. Here are the steps for these methods.
Option 1: Download from the Google Photos website
The tips we shared above for downloading your photos on your computer using the Google Photos website work on mobile too.
- Simply visit photos.google.com on your mobile on a browser app like Chrome and make sure you are signed in.
- Download a single photo, multiple photos, or an album as given above.
- As mobile storage is often scarce, be sure to not select a ton of media for download.
- Once you have downloaded the photos, simply transfer them to your computer using a USB cable.
Option 2: Download using the Photos app
The Photos app doesn’t let you select multiple photos for downloading, nor does it let you download albums. So this option is good only for downloading one photo/video at a time.
Note: To download an album or multiple photos on your mobile storage, you can use the Google Photos website in a browser app like Chrome as explained in the method above.
- Open the Google Photos app on your device and select the photo/video that you want to download.
- Tap on the three-dot icon at the top right corner to bring up more options (or simply swipe up) and tap on Download just below your photo.
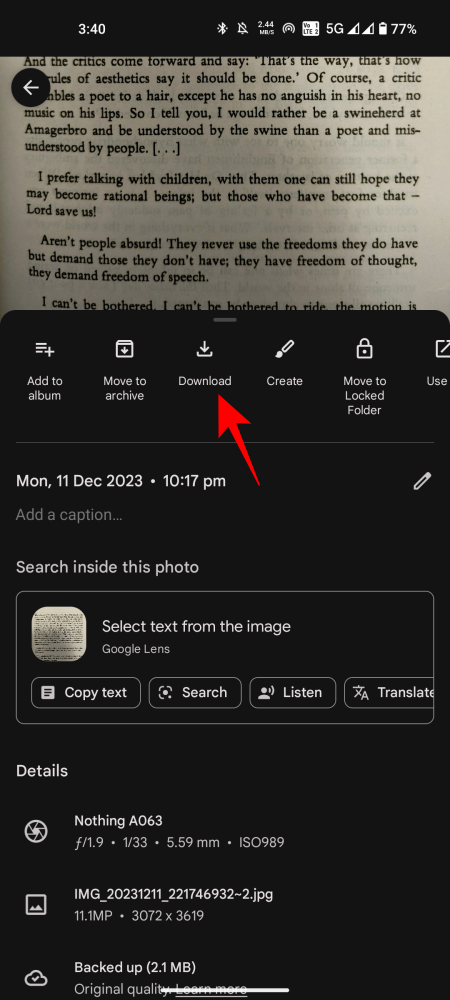
- Your photo will be downloaded to your phone’s storage.
Option 3: Copy photos from mobile storage to your computer
You can simply copy the photos in your Google Photos app to your computer using a USB cable. Whether these are the photos you took from your mobile camera or downloaded from the Google Photos app or website, you can simply copy them over to save them on your computer. Here’s how:
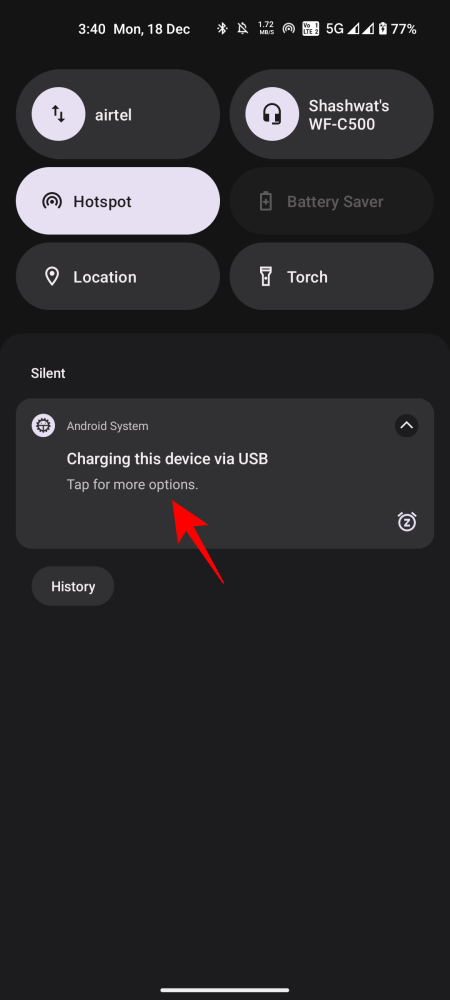
- Plug in your smartphone to your PC via a USB cable. Swipe down on your device and tap on Charging this device via USB to bring up more options. Then tap on File transfer. This will allow your PC to access your phone’s storage.
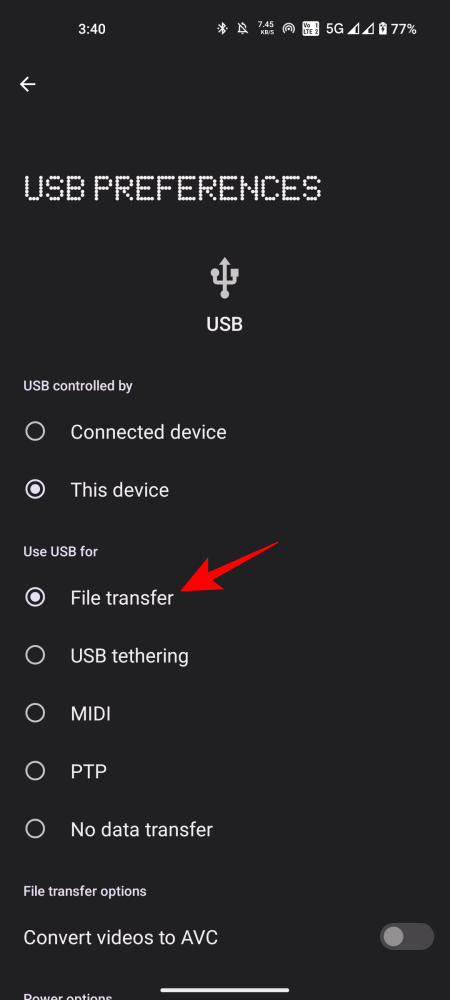
- Your Android device’s storage folder should automatically open up on your PC. If it doesn’t, open up File Explorer (
Win+E) and select your device in the “This PC” section. - Navigate to this DCIM Restored folder of your phone’s internal storage and copy the photos from here to your PC.

It’s a good idea to simply copy everything in the DCIM folder so that all your photos and videos from not only the camera but also the screenshots and media from other apps that save in DCIM, as saved on your computer.
Method 3: Using Gmail
If you don’t want to deal with cables or backup your photos, you can still transfer photos from Google Photos to your PC through the common Gmail route.
- Select your photo(s) in the Google Photos app, tap on Share at the bottom, and tap on Gmail under “Share to App”.

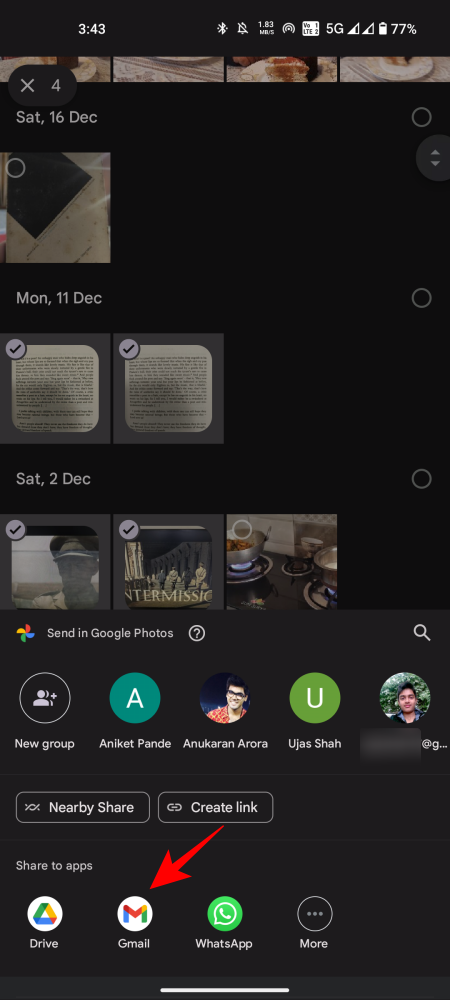
- Your photo(s) will now be added as an email attachment. Exit this screen by going back or swiping up. Gmail will save the draft automatically.
- Now, open Gmail on your PC browser, click on Drafts in the side panel, and open the draft.
- Then click on the files in the draft and they’ll be downloaded to your PC.

Method 4: Using Google Drive
Another Google Workspace application that you can share your photos with is Drive. Most Android devices come with Drive pre-installed, so you will most likely already have it on your phone. Here’s how you can share photos to Drive and then download them on your PC:
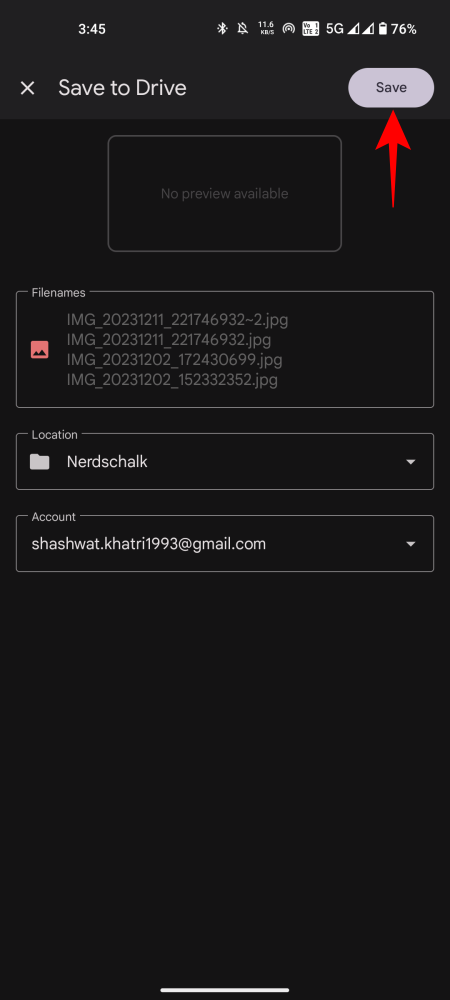
- Select your photo in Google Photos and tap on Share at the bottom. Then tap on Drive under “Share to Apps”.
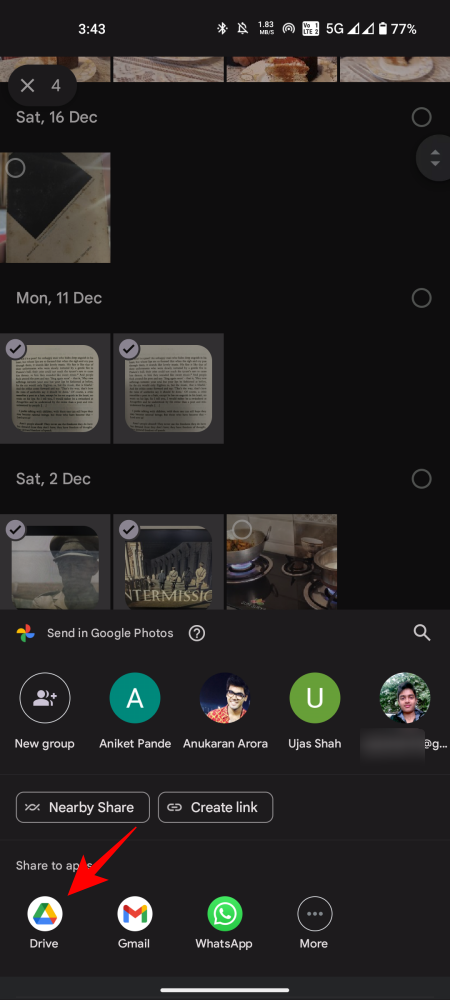
- On the next screen, you’ll get the option to change the Google Drive Account and select the folder location within Drive where you want to save it. Note the Google account that’s selected (if you have multiple). Then tap on Save. You’ll be notified when the file is uploaded to Drive.
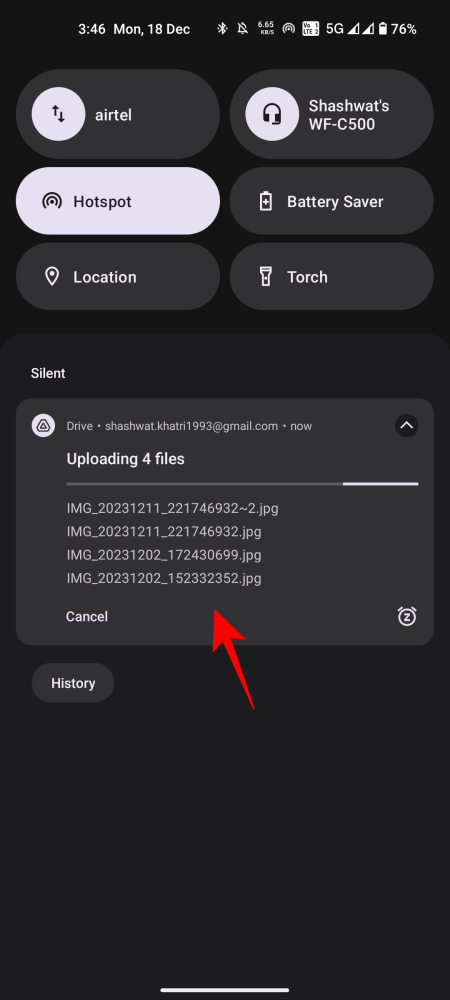
- Now, go to drive.google.com on your PC browser and make sure you have the same Google Drive account selected where you saved the file before. Your photo’s thumbnail will appear on your Drive’s main page. Now, simply right-click on the photo and select Download.

- Your photo will now be available on your PC.
Method 5: Download everything in Google Photos using Google Takeout
Just as many social media apps let you access and download your account data with a single click, so does Google too have a similar service to download your account data – Google Takeout. With it, all your backed-up content can be downloaded with ease. Here’s how you can use it to download your Google Photos data:
- Go to takeout.google.com and make sure you’re signed in to your Google account. Then, for the first step, click on Deselect all under “Select data to include”.

- Now scroll down and select Google Photos.

- This will select all your backed-up photos and videos by default. But you can further specify the folder(s) that you want to download. To do this, click on All photo albums included.

- Select the individual folders. Then click OK to confirm.

- There’s no option to select photos and videos individually, only the folders. If you don’t recall moving your photos to another folder, they’ll most probably be categorized by year. Once you’ve selected the right folders (or all of them), scroll down and click on Next step.

- The second step will let you choose the delivery method for all your Google Photos data. You can change the settings here if you prefer. But if you’re leaving everything as default (simpler that way), just click on Create export.

- You will get the export progress report on the next screen. Depending on the number and size of your exported photos and videos, this can take some time.

- Once the export is complete, a copy of your requested date will be made available in your email inbox (or your chosen application location).

- Now click on the Download buttons to download your photos.

And there you have it, your photos are now made available on your PC.
Though there are other ways and means to transfer data from Google Photos to PC, such as sharing them via messenger apps with yourself and later downloading them from the services’ website, it’s better to keep the files within the Google Workspace ecosystem. Not only does it keep things organized and simple, but it also ensures that your data never leaves the safety provided by the Google environment.
Once downloaded, it is up to you what you want to do with your Google Photos – let them stay backed up, or trash them for good to save on your allotted Account storage space.


One response to “How To Save Google Photos to Computer [5 Methods]”
Thanks for sharing such a helpful article