What to know
- To transform the elements of a landscape image, open the file in Photoshop, then select Filter > Neural Filters > Landscape Mixer.
- Choose from the available presets or add your own custom reference image and adjust the ‘Strength’ of the effect.
- Adjust the setting sliders to change the time of day and the seasons. Click OK to confirm changes.
- Export the landscape image from File > Export.
Once captured in a photograph, the landscape of a place becomes fixed in time. Or at least that’s how it used to be. Nowadays, image editing features have advanced to such an extent that you can add AI-generated elements with the click of a button, change the style of an image, and do so much more. So why should the landscape images be any different?
Photoshop’s Landscape Mixer Neural Fixer is one such AI-powered feature that can change the environment of a landscape to reflect whatever time of day and year you want it to be. So you can essentially cover verdant fields with snow, turn daylight to midnight, and grow lush vegetation in barren landscapes. Here’s everything you need to know to transform landscapes using Photoshop Landscape Mixer.
How to transform a landscape using Photoshop’s Landscape Mixer feature
The Landscape Mixer lets you apply readymade presets or use your own images to mix with your landscape images and transform them. Let’s see how to achieve this.
Requirements
Since Photoshop is a paid product, make sure you fulfill the following requirements first:
- Get a paid subscription (or the trial version) for Photoshop.
- Download and install Adobe’s Creative Cloud app.
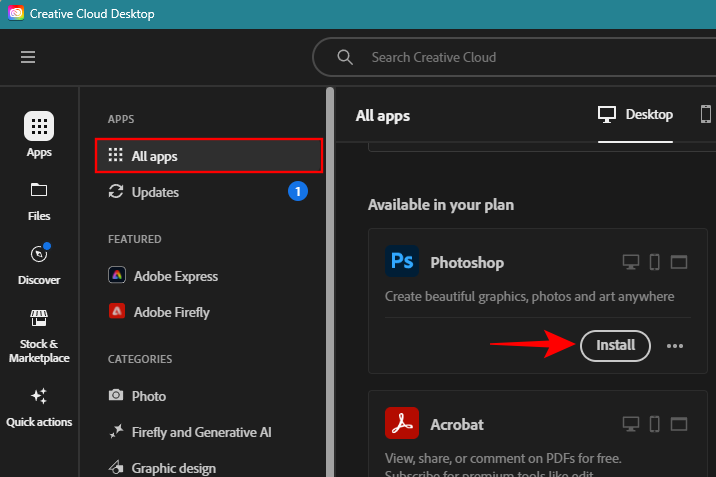
- Install Photoshop from Adobe Creative Cloud > All Apps > Photoshop > Install.
1. Open an image in Photoshop
Firstly, launch Photoshop and click on Open.

Select your image and click on Open to import it.

Alternatively, simply drag and drop the image into Photoshop.

2. Download and enable the Landscape Mixer Neural Filter
Next, click on Filters in the topmost toolbar.

Select Neural Filters.

On the right, click on Landscape Mixer and click on Download to get it.

Once downloaded, make sure to toggle it on to start using it.

3. Transform the time of day and season with Landscape Mixer Presets
Landscape Mixer provides 15 presets for you to transform your images with. Click on one to apply it to your image.

Wait for the image to be processed. Then review it with the default settings applied.

The automatic settings may or may not work best for your image. So use the ‘Strength’ slider to adjust how aggressively the filter is applied to your image.

Note: You can adjust these settings even if you don’t use any of the available presets.
Beneath it, you will find the ‘Day’ and ‘Night’ options to change the time of the day.

You can also adjust the ‘Sunset’ slider to give your landscape a late evening, dusky effect.

Thereafter, you have the season sliders – for spring, summer, autumn, and winter. Depending on which seasonal elements you want in your landscape, use the respective sliders to determine how much of that seasonal effect you want to see.

If your landscape has a subject that is being covered by the effect, turn on the Preserve subject and Harmonize subject options.

Once done, click on OK to confirm the changes and apply the filter to your landscape.

4. Transform the landscape by mixing it with another image
Besides using presets, you can also mix elements from your own images and transform a landscape photo. To do so, select Custom from the Landscape Mixer sidebar.

Then click on the folder icon next to ‘Select an image’.

Navigate to your file, select it, and click on Open.

As soon as the image is uploaded, its effect will be applied at full strength.

As before, adjust the sliders to your preference. Make sure to check ‘Preserve subject’ wherever you need to do so.
Finally, click on OK in the bottom right corner.

5. Export your image
Once you have transformed your landscape image, make any other changes if necessary. Then, to save your file, click on File.

Hover over Export and select Quick Export as PNG.

Select a location, give your file a name, and click Save.

Alternatively, if you want to save your file in a different format, select Export, then click on Export As.

Choose your format from the ‘Format’ dropdown menu.

Select your quality level.

Specify your image size.

Then, finally, click on Export.

6 examples of Photoshop landscape mixer (before and after pics)
Let’s see a few examples of what the Landscape Mixer filter can achieve with the different slider adjustments.
Example 1:
Before

After

Example 2:
Before

After

Caption:
Example 3:
Before

After

Example 4:
Before

After

Example 5:
Before

After

Example 6:
Before

After

Tips for using Photoshop Landscape Mixer
Photoshop’s Landscape Mixer neural filter is currently in its beta phase so you may find the results of some presets not entirely satisfactory. Of course, a lot depends on the strength of the effect as well as the landscape image itself. But there are certain things that you should keep in mind when using the effect settings.
Firstly, you don’t have to choose a preset if you don’t find one that suits your landscape. As long as you find a slider adjustment that transforms the time of day and the seasons and yields the results that you are looking for, choosing a reference image or a preset is not necessary.
Secondly, if the effect starts to cover up your subject or paint over it, make sure to select the ‘Preserve subject’ option. Since the subject is identified automatically, it is not guaranteed to work always. Nevertheless, when it gets it right, it does a decent enough job of preserving the subject.
At the same time, however, if preserving the subject makes it stick out like a sore thumb, you’re better off either turning it off, changing the slider settings, or choosing a different preset or reference image.
Finally, try to use your best judgment when using the different sliders to get the effect you’re looking for. That means combining different slider settings, knowing which one does what, and experimenting with them to find the sweet spot for your landscape image.
FAQ
Let’s take a look at a few commonly asked questions about transforming your landscape images with Photoshop Landscape Mixer.
How do I change the season in Photoshop?
To change the weather in your landscape image, apply the Landscape Mixer neural filter to your image and use the season sliders for Spring, Summer, Autumn, or Winter.
How do I prevent the Landscape Mixer filter from affecting the subject?
To prevent the Landscape Mixer filter from affecting the subject of your landscape image, check the box next to ‘Preserve subject’ and ‘Harmonize subject’ in the filter’s settings.
Photoshop’s Landscape Mixer Landscapes is an amazing tool to inject life in all its varied forms in a landscape image. Though still in its beta phase, you can get some spectacular results that can inspire feelings of awe and wonder in equal measure. We hope this guide helped you get started with transforming your landscape images with Photoshop. Until next time!