Adobe Photoshop is synonymous with professional image editing. Over the years, Photoshop has stayed head and shoulders above the rest by incorporating the best tools and features on its desktop app. 2023 saw Adobe add a new Generative Fill tool to Photoshop that uses generative AI to edit and augment your images.
The following guide will take you through the various applications of Generative Fill in Photoshop, how to use it, and some tips that will ensure that you make the most of the Generative Fill feature on Photoshop. Let’s begin!
What is Generative Fill in Photoshop?
Generative Fill is a new tool that uses advanced AI capabilities to edit and enhance images in Photoshop. Powered by Adobe’s proprietary Firefly AI model, Generative Fill – and its cousin Generative Expand – allow you to generate new backgrounds and objects, remove objects, as well as extend existing images.
With Generative Fill, you need only highlight the object or the background, type in your prompt in the prompt box, and use its generative AI capabilities for your intended purpose. Generative Fill supports over a hundred languages so your creativity can take flight without any barriers.
Images edited using the Generative Fill AI can also be used for commercial purposes, which is important and welcome news for creatives who want to monetize their creations.
How to use Generative Fill in Photoshop on desktop
Generative Fill is now available on Photoshop’s stable version so you don’t have to get Photoshop’s beta version in order to use it. Refer to the ‘Requirements’ section below to know more.
Requirements
To start using Generative Fill, you will need the latest Photoshop version (25.0) installed on your PC. But since Photoshop is a paid product, make sure you fulfill the following requirements first:
- Get a paid subscription (or the trial version) for Photoshop.
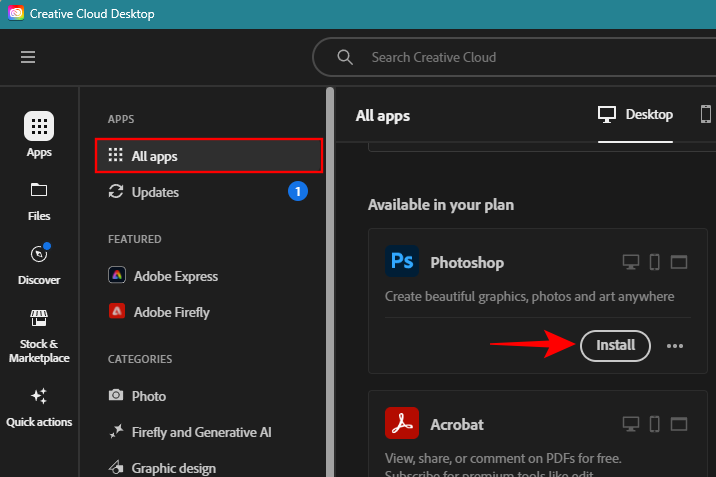
- Download and install Adobe’s Creative Cloud app.
- Install Photoshop from Adobe Creative Cloud > All Apps > Photoshop > Install.
Launch Photoshop on your PC and import the image that you would like to extend.
How to use Generative Fill in Photoshop to extend images using AI
- Launch Photoshop on your PC and import the image that you would like to extend.

- Select the Marquee tool from the toolbar on the left.

- Highlight the area where you’d like to extend your image.

- Press and hold the
Shiftkey to highlight another area.

- Click on the Generative Fill box.

- If this is your first time using Generative Fill, you’ll be asked to ‘Agree’ to Adobe’s user guidelines for Generative AI.

- In the prompt box, you can enter a description of what you would like to see, though it is not compulsory to do so. For our example, we are leaving the prompt box blank to see how Generative Fill fills in without any instructions.
Note: If you’re leaving the prompt box blank, make sure to overlap the selection with some pixels from the image. This will give the AI some context to work with. - Click on Generate.

- The AI will take a few seconds to expand the image.

- Once it’s done, you will see your highlighted areas fill up. Check out the different variations from the bottom.

- The variations will also be available in the ‘Properties’ section in the bottom right corner.

- If the generated options don’t suit your image, you can enter the prompt (or leave it blank) and generate new variations as many times as you wish.
How to use Generative Expand in Photoshop to expand images using AI
Generative Expand provides another, much easier way to extend and expand your images. It works similar to Generative Fill but requires fewer steps to generate. Here’s how to use it.
- Launch Photoshop on your PC and import the image that you would like to extend.
- With your image on the Photoshop canvas, click on the Crop tool in the toolbar.

- The handlebars will be displayed around your image.

- Make sure to select Generative Expand from the ‘Fill’ dropdown in the options bar at the top.

- Next, drag the handlebars outward and extend the canvas.

- In the pop-up taskbar, click on Generative Expand.

- Here, type a description of what you’d like to see. Then click on Generate.

- If you leave the prompt box empty, the image will be extended based on the context of the image.

- As before, you can further extend the canvas and expand the image as much as you like.
Another way to use ‘Generative Expand’ is to crop out the unnecessary elements from the image and then expand the canvas. Here’s how:
- Use the Crop tool to isolate the main subject from the image. Then click on Done.

- Then (with Generative Expand selected from the Fill dropdown as shown previously), expand the canvas outward.

- Now type your prompt (or leave it blank) and click Generate.

- This will allow you to plant the subject of your image in different environments.

Speaking of which, let’s see how you can generate new backgrounds for your subject with Generative Fill.
How to generate new backgrounds in Photoshop using AI
Generative Fill lets you isolate the subject and change the scene behind it. Here’s how to do so:
- Import the image into Photoshop and choose the Object Selection tool from the left.

- Now hover over your subject (it will be highlighted in purple) and click on it to select it.

- Alternatively, click on the Select subject option in the context toolbar to automatically detect your subject.

- Next, click on the ‘Invert Selection’ tool in the context toolbar.

- This will select your background in relation to the subject.

- Now click on Generative Fill.

- Enter a prompt for the background (or not) and click on Generate.

- Choose from one of the variations or click on ‘Generate’ again to get additional options.

- As before, you can also expand the canvas with Generative Fill or Generative Expand to further extend the image in all directions.

A suitable location for a ripping solo
How to generate new objects in Photoshop using AI
Generative Fill can add photo-realistic objects to your images with ease.
- To start, import your image into Photoshop and choose a selection tool from the toolbar (such as the Marquee tool or the Lasso tool).

- Then draw around the area where you want to insert a new object and click on Generative Fill.

- Enter the prompt and click on Generate.

- And just like that, the object will be generated and inserted into the image.

- Similarly, you can spruce up your image with multiple objects.

How to remove objects in Photoshop using AI
Just as new objects are inserted, existing objects can be removed from the image as well with Generative Fill. Here’s how to remove objects from an image in Photoshop using Generative Fill:
- Import your image into Photoshop, use a selection tool from the toolbar, and draw around the object that you would like to remove. Then click on Generative Fill.

- Leave the prompt box empty and click on Generate.

- Your selected object will be removed.

- Similarly, use the same steps and remove as many objects from the image as you like.

- Make sure to overlap the selection with the surrounding areas to ensure that the object doesn’t leave any unwanted artifacts.

Don’t worry if you include a little of the main subject. - As long as the object you want to remove is primarily within the selected area, Generative Fill will understand the contextual cues and know which elements to delete and which to preserve.

How to use Generative Fill in Photoshop on the web
Generative Fill is also available for Photoshop on the web.
- Visit creativecloud.adobe.com/cc/photoshop, make sure you are signed in, and then click on New File to begin.

- Then drag and drop your image or upload one from your computer.

- Once uploaded, choose what you want to do with the file. Or select ‘I’m not sure yet’ and click on Get started.

1. Add new objects
- Similar to Photoshop’s desktop app, choose a selection tool from the toolbar on the left.

- Then draw around the area where you want to insert a new object and click on Generative fill.

- Type in your prompt and click on Generate.

- Once the object is generated, choose from the available variations. Generate more variations by clicking on the + button.

2. Expand image
- Select the ‘Crop tool’ from the side toolbar.

- Expand the handlebars outward and click on Generative Expand.

- Enter a prompt to describe what you would like to see in the expanded image, or leave it blank to let the AI take contextual clues and generate the expanded sections itself. Then click on Generate.

- And Generative Fill will comply.

3. Remove objects
- To remove an object, use a selection tool from the toolbar and draw around the object you want to remove. Then click on Generative fill.

- Then, while keeping the prompt box empty, click on Generate.

- The object will be removed and the empty space will be filled in with a background generated by Generative fill AI.

Tips and tricks to use Generative Fill AI in Photoshop
Photoshop is unique in more ways than one and there are certain tips and tricks that will help you navigate through the maze of its options easily, especially when using Generative Fill. Some of these tips will be displayed within Photoshop itself. But it helps to know about them nevertheless.
1. About Prompts
When typing prompts in the generative fill prompt box, avoid using words like ‘create’, ‘add’, ‘change’, etc. Instead, dive straight in and type what you would like to see. The AI will automatically pick up on the words and generate the images accordingly. You also don’t have to use too many words while prompting. Keep it simple and make sure to lean on adjectives and nouns that describe what you want to see.
As mentioned in the guide above, you can leave the prompt box empty wherever necessary. Whether it is to see what the AI does with the contextual clues or to remove an object, sometimes it is better to not prompt the AI and let it do its thing without any intervention.
2. Selection tools
In most cases, you can use any selection tool, such as the Marquee tool or the Lasso tool, whichever best suits your purposes.
Note that when you’re drawing around an area or an object to remove it from your image (or to extend the image), make sure to include some elements from the surrounding pixels as well. This will give the AI some contextual clues as to what’s going on around the drawn area so it can deliver better results.
3. Languages
Adobe Generative Fill supports over 100 languages so you don’t always have to rely on English alone when prompting. If it makes sense to use your mother tongue or the language you’re most comfortable with, try prompting Generative Fill in that language. That said, do note that Adobe is using Microsoft Translator to do machine translation so the results may sometimes vary.
4. Commercial usage
Images created with Adobe’s Generative Fill can be used for commercial purposes, including marketing, product design, and advertising. As long as you’re not editing licensed images and passing them on as your own, you should have no problem using Generative Fill to create images from scratch and using them commercially.
FAQ
Let’s take a look at a few commonly asked queries about using Generative Fill in Adobe Photoshop.
What is the difference between Generative Fill and Generative Expand?
Both Generative Fill and Generative Expand use the same Adobe Firefly AI technology to generate content. The difference is only in how they carry out their function. Generative Fill uses selection tools to draw along the edges of the image to extend it while Generative Expand uses the Crop tool to expand the canvas and the image. Because it uses fewer steps to deliver the same result, Generative Expand is better when it comes to expanding images with AI.
How do I enable generative fill in Photoshop?
Generative Fill is available in Photoshop version 25.0 and above. It will pop up whenever you select a tool that lets you use generative fill, for instance, a selection tool like the Marquee or the Lasso tool that lets you add and remove objects, change backgrounds, etc. as well as when expanding images with the crop tool.
Why can’t I see generative fill in Photoshop?
If you don’t see Generative Fill in Photoshop, it’s likely the case that you’re using an outdated version of Photoshop. Make sure to update Photoshop from Help > Updates from the main toolbar at the top.
Can I use generative fill in Photoshop offline?
No, you cannot use Generative Fill offline. You have to be connected to the web for the feature to contact Adobe’s Firefly AI model and function properly.
Can you use images created with Photoshop’s Generative Fill commercially?
Yes, you can use images created with Photoshop’s Generative Fill commercially.
The Generative Fill feature is one of the best implementations of AI in a professional Adobe tool. Now that it’s out of its beta phase, you can use it to create commercially viable images in Photoshop, add AI-generated objects, expand the horizons of a picture, and edit existing elements. Soon, if Adobe’s projects come to fruition, Generative Fill will bring its AI magic to videos as well. So stay tuned for that.
We hope this guide helped you get started with Generative Fill on Photoshop. Until next time! Keep creating.