iPhones have tons of security features to help protect your data and privacy. This includes protection against intruders by implementing restrictions on the number of times an incorrect passcode can be entered on your iPhone. This helps protect your data in case you lose your iPhone or someone has access to it temporarily. When such an incident occurs and your iPhone’s passcode has been entered incorrectly multiple times, then you might see the “iPhone Is Disabled Connect to iTunes” error. Let’s find out more about the same and how you can fix it on your iPhone.
- When do you see the ‘iPhone is Disabled, Connect to iTunes’ error?
- Case 1: Fix ‘iPhone Is Disabled, Connect to iTunes’ Issue: If you remember your passcode
- Case 2: Fix ‘iPhone Is Disabled, Connect to iTunes’ Issue: If you changed your passcode recently
- Case 3: Fix ‘iPhone Is Disabled, Connect to iTunes’ Issue: If you don’t remember your passcode (5 ways)
- Is there any way to recover data when restoring your iPhone?
When do you see the ‘iPhone is Disabled, Connect to iTunes’ error?
This error is displayed when your iPhone’s passcode is entered incorrectly while your phone is locked. The error is usually followed by the phrase ‘try after N minutes’ where N is the number of minutes you have to wait before trying to enter the correct passcode again. However, when you see the ‘iPhone is Disabled, Connect to iTunes error’ then it means that an incorrect passcode has been used the maximum number of times permitted. In such cases, you can’t unlock your iPhone by entering the correct passcode. Your best course of action at this point is to restore your iPhone using iTunes. Here’s how much time you have to wait when you’ve entered your iPhone’s passcode incorrectly.
- Incorrect passcode entered 6 times in a row: Device disabled for 1 minute
- Incorrect passcode entered 7 times in a row: Device disabled for 5 minutes
- Incorrect passcode entered 8 times in a row: Device disabled for 15 minutes
- Incorrect passcode entered 9 times in a row: Device disabled for 60 minutes
- Incorrect passcode entered 10 times in a row: Device disabled indefinitely
Related: Turn Passcode off Greyed Out on iPhone? 7 Ways to Fix
Case 1: Fix ‘iPhone Is Disabled, Connect to iTunes’ Issue: If you remember your passcode
SHORT GUIDE
- Side button > Check how long you have to wait > Wait > Enter passcode after set duration has passed
If you’re lucky then it’s likely that your iPhone has been disabled temporarily. This can be the case if the passcode has been entered incorrectly 9 times or less on your device. In such cases, you will have the option to enter the correct passcode when the set time duration passes which should allow you to unlock your iPhone and reset the incorrect passcode timer.
Simply press the Side button on your iPhone and the lock screen will show you how long you have to wait before trying to enter your passcode again. You can then wait the set duration of time and enter the passcode correctly to unlock your iPhone.
Case 2: Fix ‘iPhone Is Disabled, Connect to iTunes’ Issue: If you changed your passcode recently
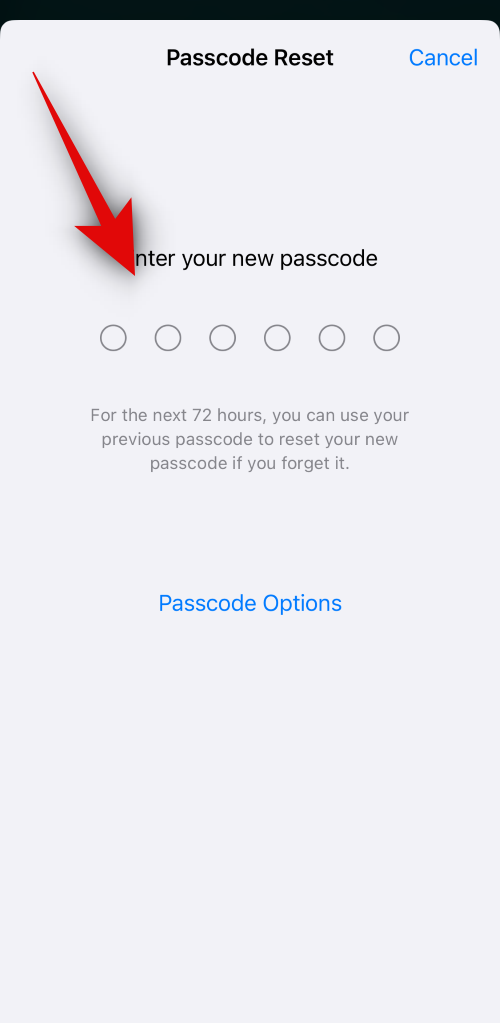
In recent updates to iOS, Apple has introduced a new feature where your phone will remember your old passcode for 72 hours past the time when it was first changed. This is a contingency plan, where you can use your old passcode to unlock your iPhone in case you end up forgetting your new passcode after recently changing it. So if you see the ‘iPhone is disabled’ error then you can use your old passcode to unlock your iPhone if you changed your passcode within the past 72 hours. Follow either guide below to help you do the same on your iPhone.
STEP-BY-STEP GUIDE
The guide below will help you unlock your iPhone using the old passcode easily if it was changed within the past 72 hours.
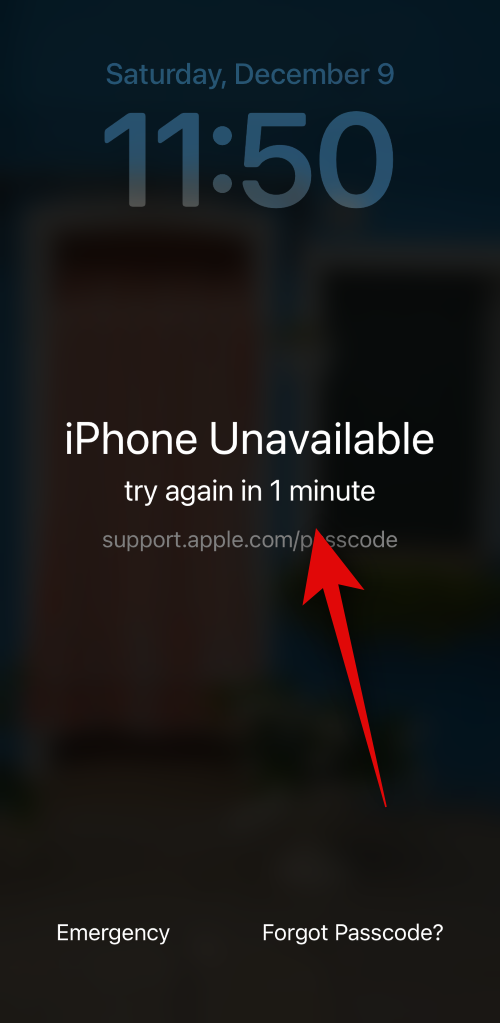
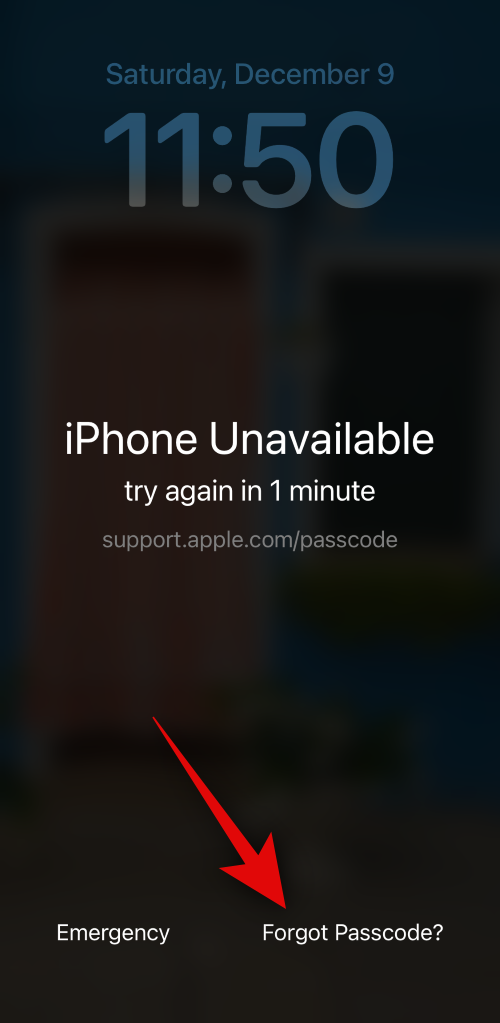
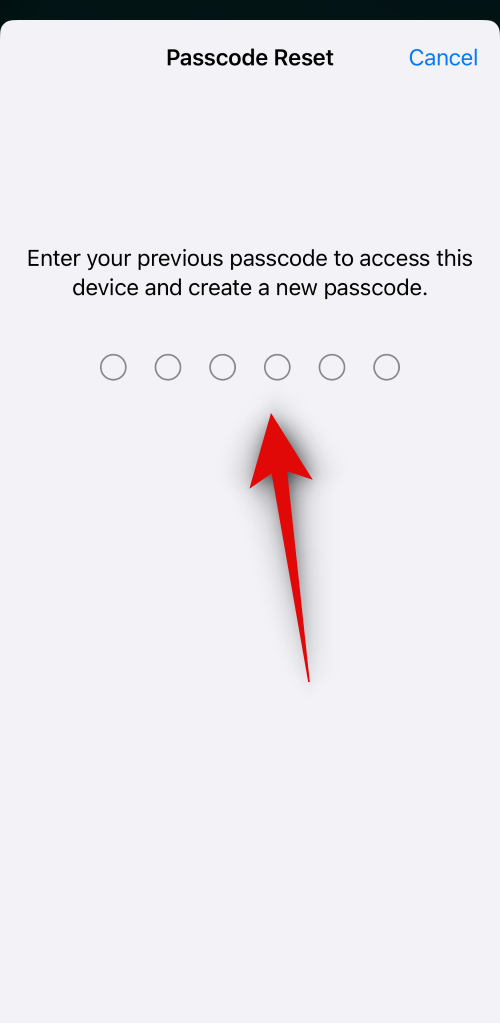
- Press the Side button and check your lock screen. Tap on Forgot Passcode? if the option is available in the bottom right corner. If not, then enter your passcode incorrectly until you see the security timeout screen stating ‘iPhone is disabled’. You should then be able to tap on Forgot Passcode? in the bottom right corner of your screen.
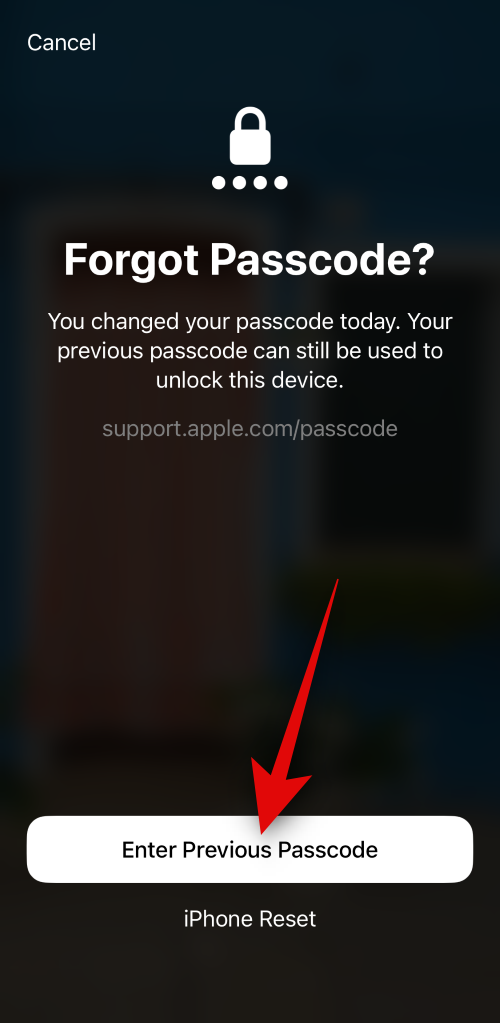
- Tap on Enter Previous Passcode. Now type in your previous passcode that you were using before the recent change.
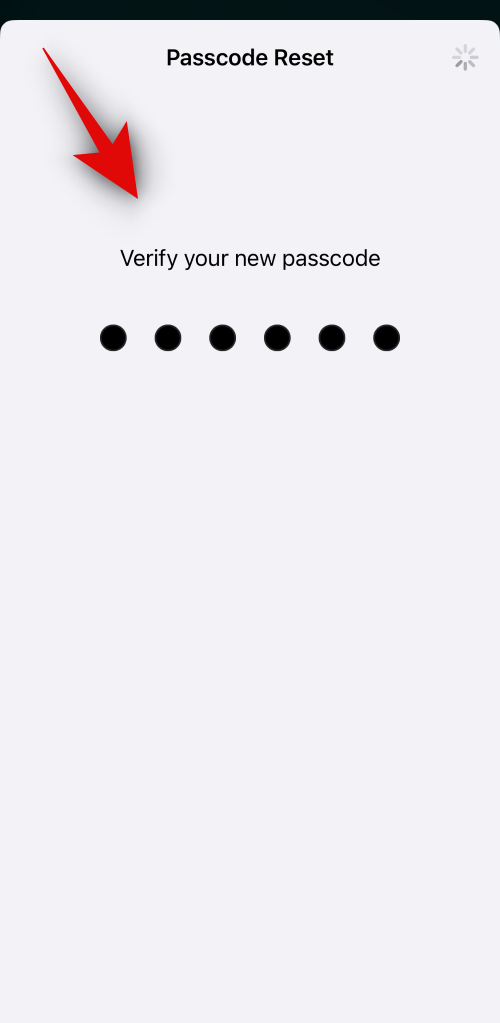
- You will now be asked to create a new passcode. Enter a new passcode and then confirm the same on the next screen.
And that’s it! Once your passcode has been reset you should be able to access your iPhone easily.
Case 3: Fix ‘iPhone Is Disabled, Connect to iTunes’ Issue: If you don’t remember your passcode (5 ways)
Here comes the hard part, in case you don’t remember your passcode and have entered your passcode incorrectly more than 10 times, then unfortunately you will have to reset and restore your iPhone to access the device again. This will unfortunately erase all data stored on your device. Unless you backed up your iPhone before you forgot your passcode or have iCloud backup enabled, then unfortunately there is no way to recover your data. There are many ways to erase and restore your iPhone in this scenario, however, we recommend doing so from the lock screen using the first method especially if you have an eSIM.
Method 1: Erase and restore the iPhone from your lock screen
With the recent iOS updates, you have the option to reset and restore your iPhone directly from your lock screen. This can come in handy especially if you have an eSIM as you get the option to retain your eSIM once you’ve reset your iPhone which takes away the hassle of setting up your eSIM again once your iPhone has been reset. Follow either guide below to help you erase and restore your iPhone from your lock screen.
STEP-BY-STEP GUIDE
Follow the step-by-step guide below to help you erase and restore your iPhone from the lock screen. Let’s get started!
- Press the Side button on your iPhone and you should get the iPhone Unavailable screen. You should now be able to view the Forgot Passcode? option in the bottom right corner of your screen. If not, enter your passcode incorrectly a few times until this option becomes available to you, and then tap on it.
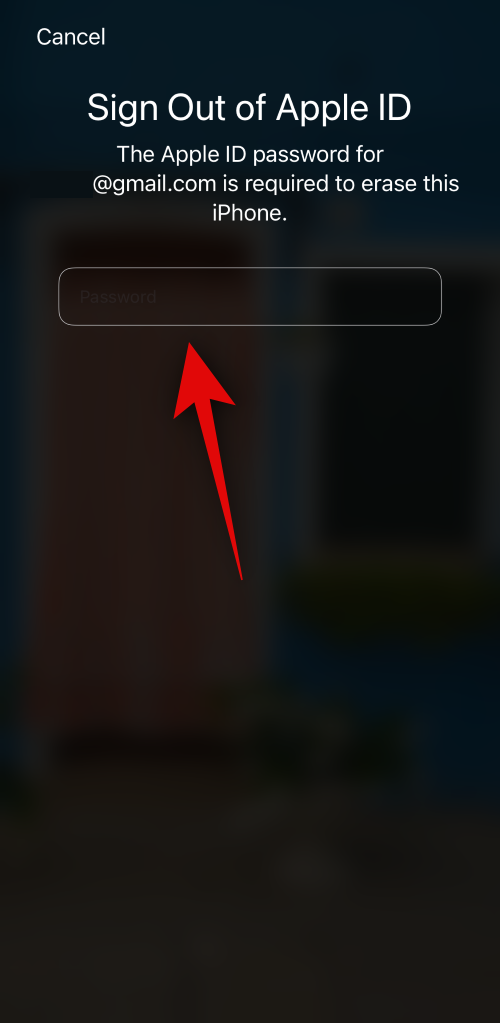
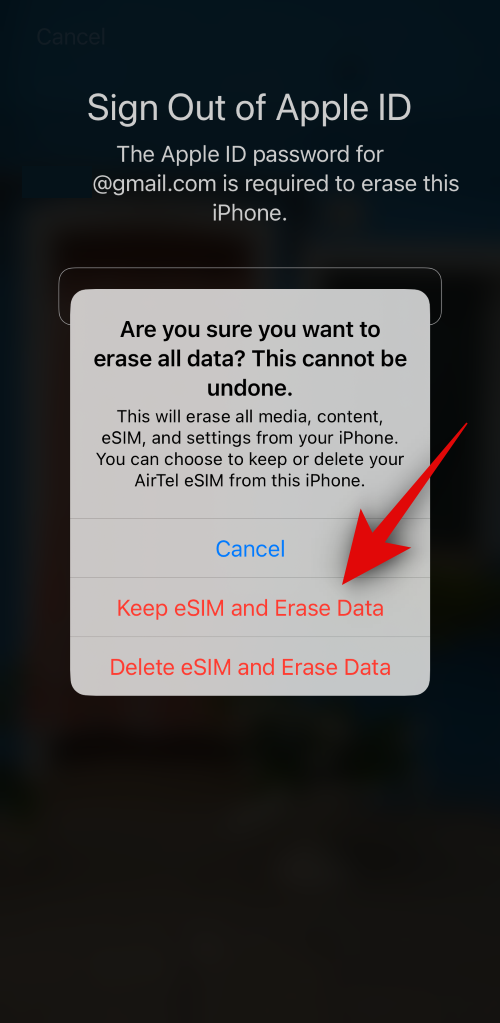
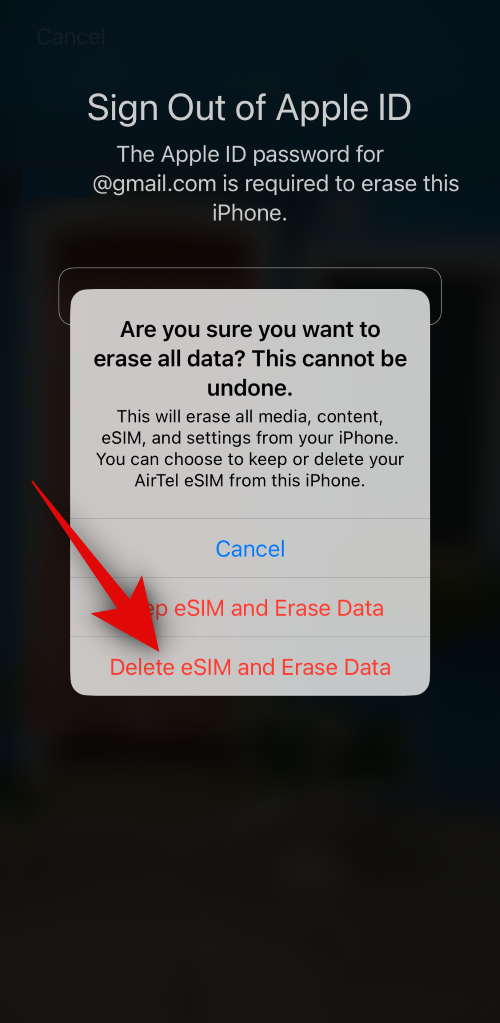
- Now tap on iPhone Reset. You will now be asked to enter your Apple ID password so the device can be reset. Enter your Apple ID password in the text box at the top.

- Next, tap on Keep eSIM and Erase Data to retain your eSIM after the reset. Tap on Delete eSIM and Erase Data if you don’t wish to retain your eSIM.
And that’s it! Your iPhone will now restart and reset all the data. You can then set up your iPhone as a new device once it has been reset and restore your data from an iTunes or iCloud backup if available.
Related: How to Recover Deleted Passwords on iPhone in iOS 17
Method 2: Restore iPhone using iTunes
If you have access to a PC then you can use iTunes to restore your iPhone. This option can come in handy if you’re facing bugs or are unable to reset your iPhone from the lock screen. Follow the steps below to help you restore your iPhone using iTunes. Let’s get started!
Part 1: Put your iPhone in recovery mode
You first need to put your iPhone in recovery mode to restore your iPhone using iTunes. The process can vary depending on the iPhone you own. Follow either guide below to help you put your iPhone in recovery mode. Let’s get started!
Note: If you plan on using iTunes on a Windows PC, then ensure iTunes is already launched and running on your PC before proceeding with the steps below.
STEP-BY-STEP GUIDE
Here’s how you can put your iPhone in recovery mode on your iPhone. Follow the steps below to help you along with the process.
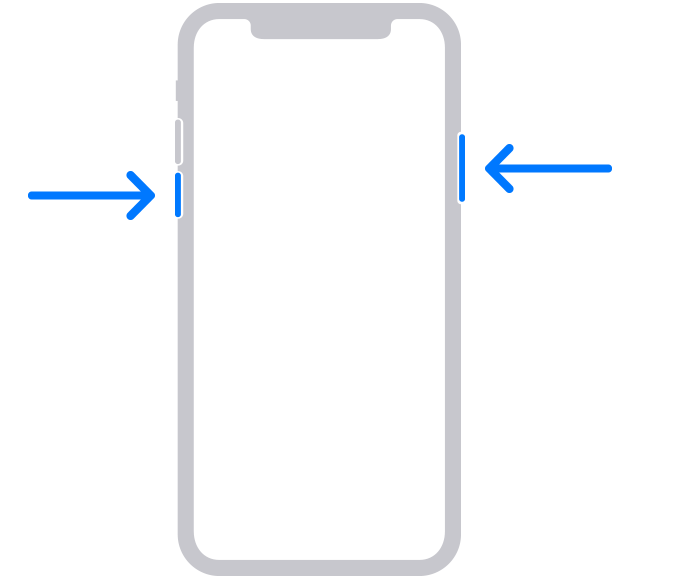
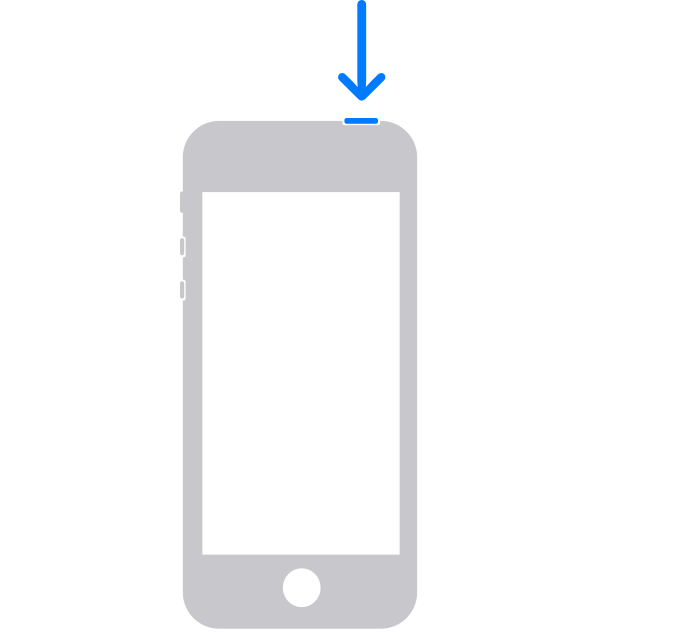
- You first need to turn off your iPhone. To do so on an iPhone 8 or later, press and hold the Side and Volume Down button till you see the power off slider. Then swipe right on the slider to turn off your iPhone.
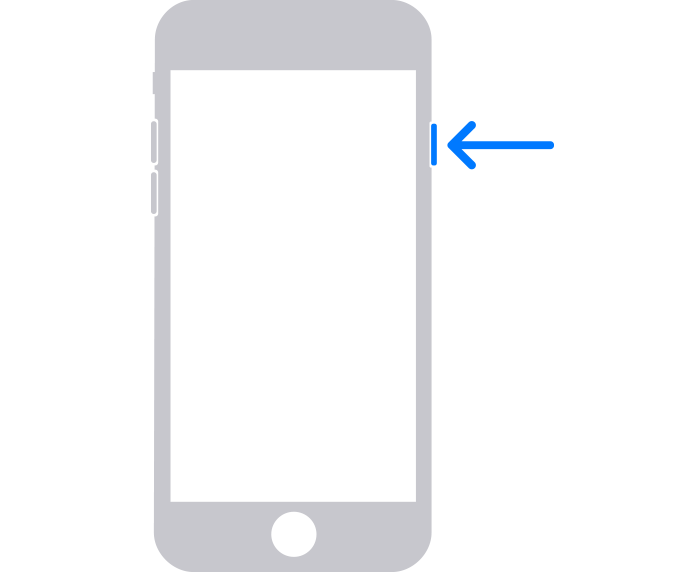
Source: Apple.com - If you have an iPhone 6 or higher then press and hold the Side button on your iPhone till the power off slider appears on your screen. Then swipe right on the slider to turn off your iPhone.
Source: Apple.com - If you have an 5s or earlier, then press and hold the top button till the power off slider appears on your screen. Then swipe right on your screen to turn off your iPhone.
Source: Apple.com - Once your iPhone is turned off, identify the button you should hold down in the next step when connecting your iPhone to your PC. Use the options below to find the correct button depending on your iPhone.
If you have an iPhone 8 or later: Hold down the side button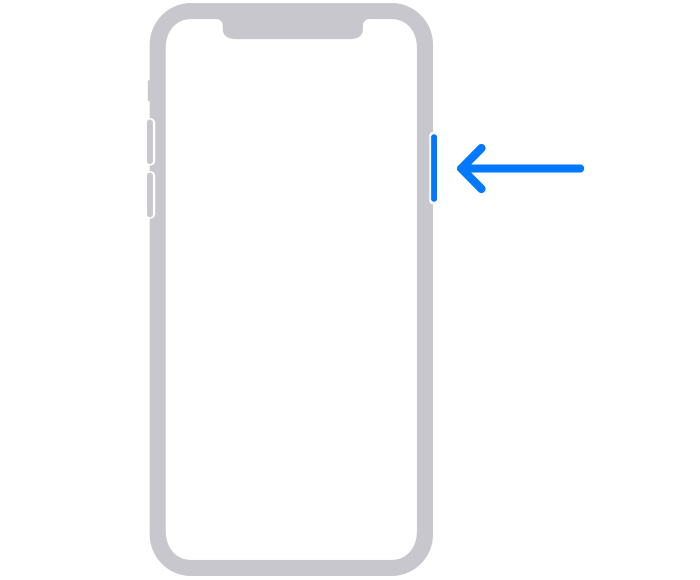
Source: Apple.com If you have an iPhone 7 or iPhone 7 Plus: Hold down the Volume Down button

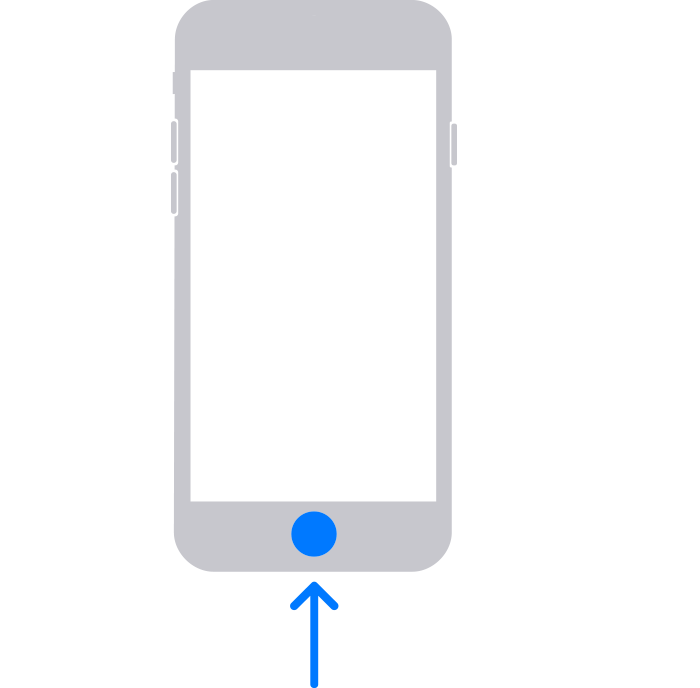
Source: Apple.com If you have an iPhone 6 or earlier: Hold down the Home button
Source: Apple.com - Once identified, hold down the relevant button on your iPhone and then connect it to your PC. Your iPhone should then enter recovery mode. If however, your iPhone restarts instead then you need to turn it off and try the steps above again. Once you enter the recovery mode, you can let go of the button and use the next part below to reset and restore your iPhone.
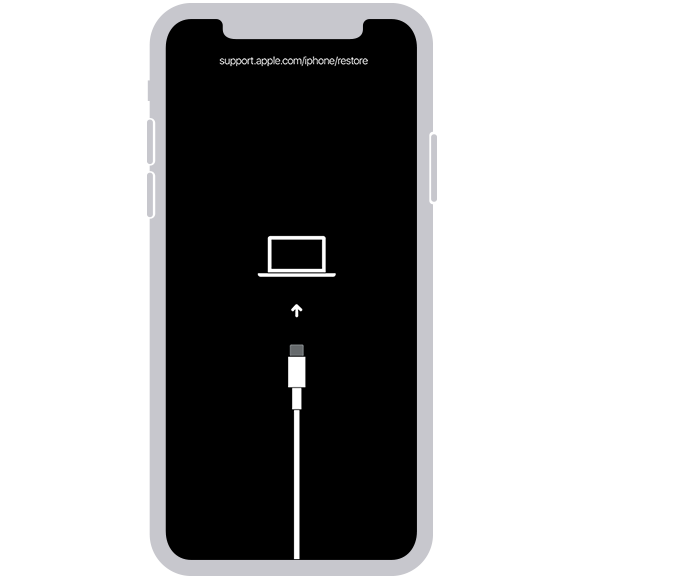
Source: Apple.com
And that’s how you can put your iPhone into recovery mode.
Part 2: Restore your iPhone using iTunes
Now that your iPhone is in recovery mode, we can now restore and reset it using iTunes. Follow either guide below to help you along with the process. Let’s get started!
STEP-BY-STEP GUIDE
Follow the steps below to help you restore your iPhone using iTunes on your PC.
- Open iTunes on your PC. If you’re using a Mac then open Finder and click on your iPhone in the left sidebar. On a Windows PC, click on your iPhone at the top or in the left sidebar in iTunes.
- iTunes will automatically detect that your iPhone is in recovery mode and offer you the option to restore it. Click on Restore to begin the process.
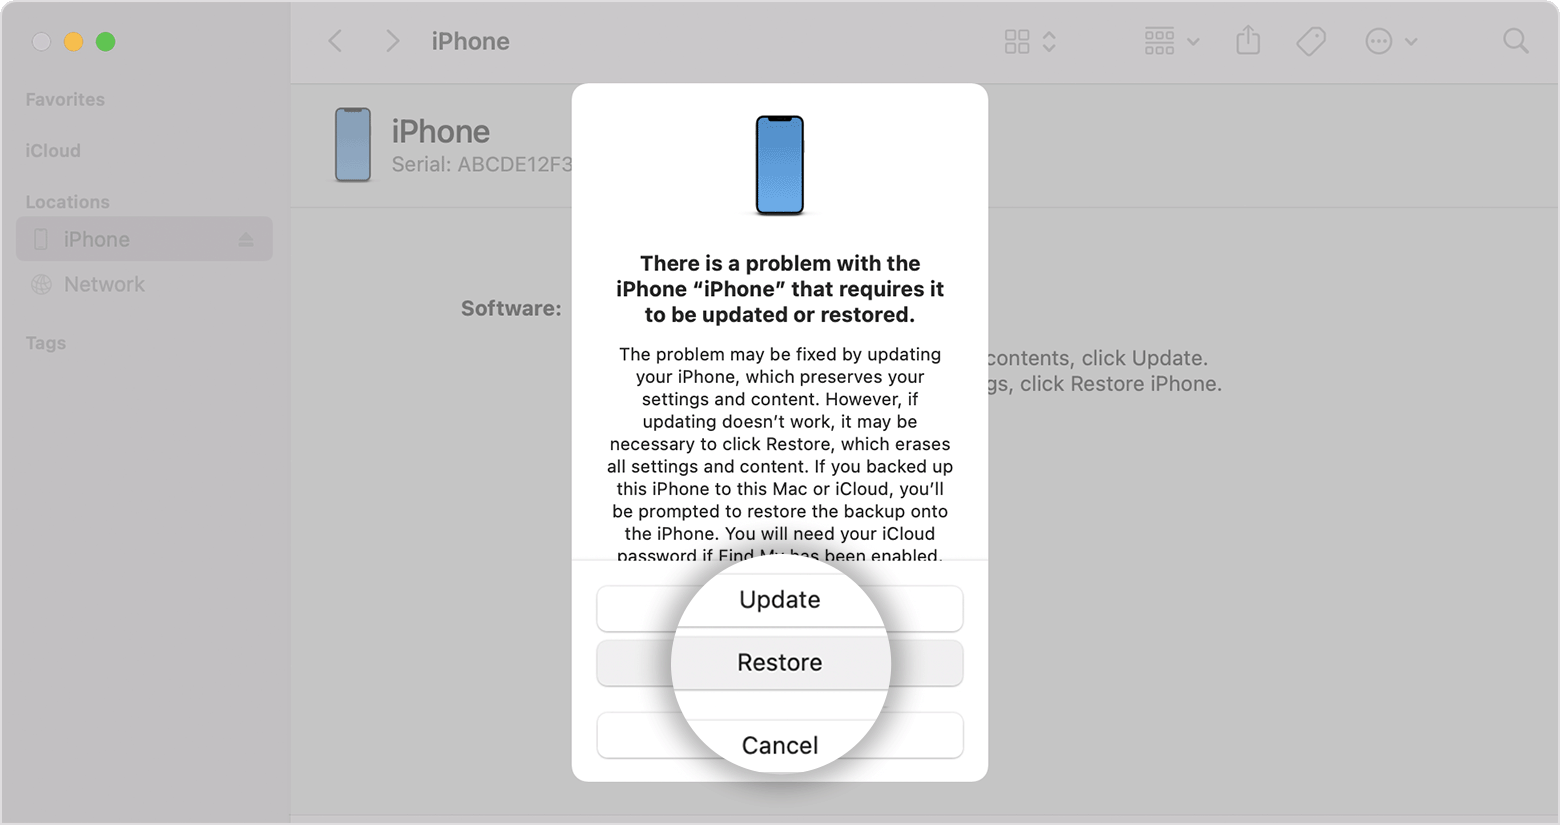
Source: Apple.com - Your iPhone will now download the latest version of iOS compatible with your iPhone and reset your iPhone using the same. Once the process completes, you can disconnect your iPhone and then set up your device as new.
And that’s it! You should now be able to set up your iPhone again and use a new passcode. You can then restore your iPhone’s data using an iTunes or iCloud backup if available.
Method 3: Erase and restore the iPhone using iCloud
If you don’t have access to iTunes and are unable to reset your device from the lock screen, then you can try erasing and restoring your iPhone using iCloud. Follow either guide below to help you along with the process.
REQUIRED
- A PC where you can access iCloud.com
- Your iPhone should be connected to the internet (Wi-Fi or cellular)
STEP-BY-STEP GUIDE
Here’s a step-by-step guide to help you erase and restore your iPhone using iCloud. Follow the steps below to help you along with the process.
- Open iCloud.com in your browser and log into your Apple ID.

- Once logged in, click on the Apps icon in the top right corner.

- Now click on Find My.

- Click and select your iPhone from the device list on your left.

- Click on Erase This Device.

- Click on Next to confirm your choice. You can then follow the on-screen instructions to erase your device.

And that’s it! Once you complete the process on your PC, your iPhone’s data will be automatically erased. The iPhone will then restart a couple of times to complete this process and you can then set it up as a new device. You can then use your Apple ID password to set up your device as new and set up a new passcode.
Method 4: Erase and restore the iPhone using Find My
You can also use Find My from another Apple device you own or can access, to erase and reset your device. Follow either guide below to help you along with the process
Note: We don’t recommend signing into an Apple device you don’t own as it can compromise your privacy unless you can reset the Apple device once you have signed out of it.
STEP-BY-STEP GUIDE
Here’s a step-by-step guide to help you erase and restore an iPhone using Find My. This can help you get rid of the ‘iPhone is Disabled, Connect to iTunes’ error. You can then use your Apple ID to set up the device as new and use a new passcode. Let’s get started!
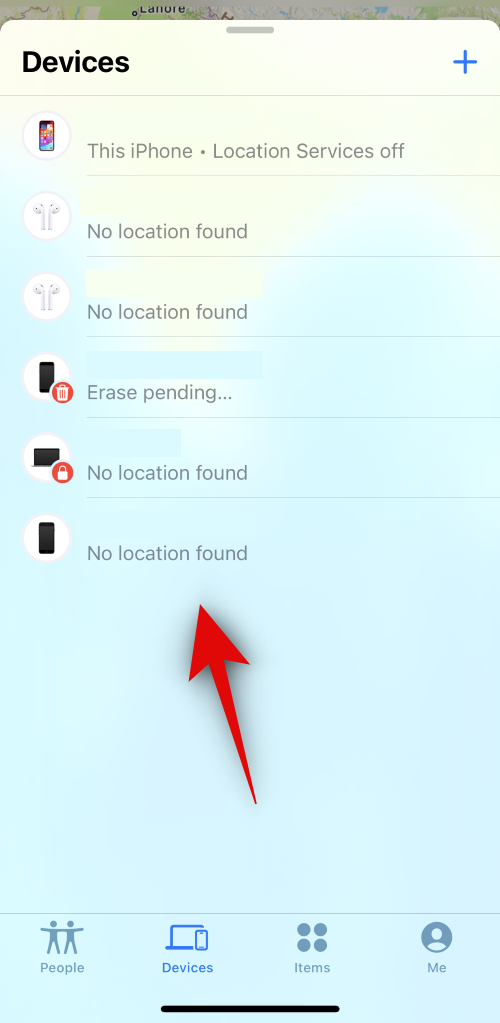
- Ensure you’re already signed in with your Apple ID on the device you’re using and then open the Find My app. Tap on Devices at the bottom.


- Now select your iPhone from the list above, scroll down, and tap on Erase This Device.
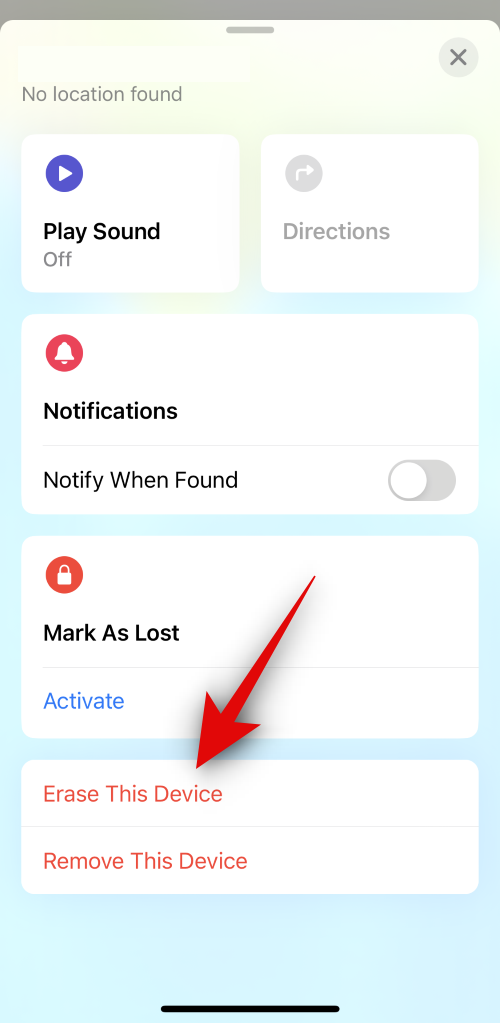
- Tap on Continue. You can now follow the on-screen instructions to erase and reset your iPhone.
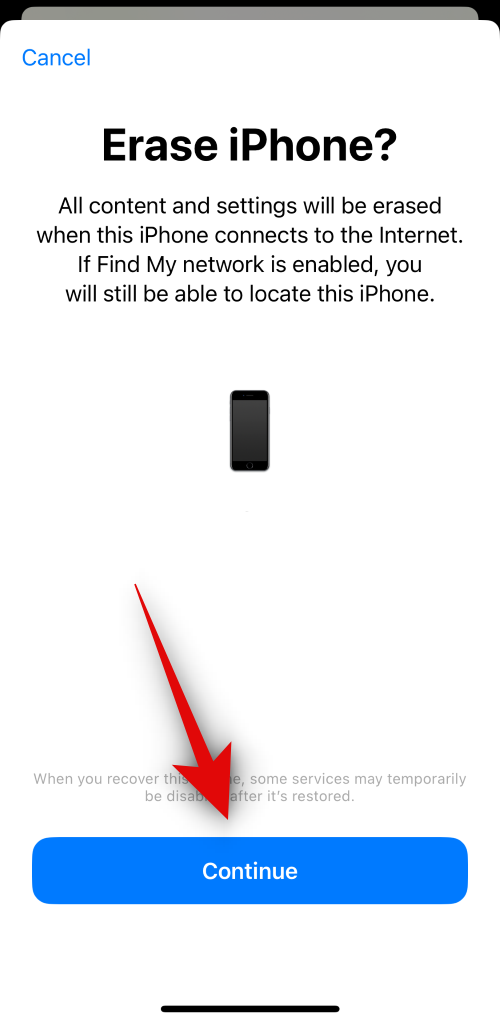
And that’s it! You can now set up your device as new and create a new passcode once your device has been reset. You will be required to log in with your Apple ID during the process.
Method 5: If you have an iPhone running iOS 8.0 to iOS 10.0.1
If you’re running an older iPhone that has iOS 8.0 to iOS 10.0.1 installed, then you can use a lock screen bug to bypass the lock screen. This can help you access your data and then back it up before restoring your iPhone using one of the methods above. Follow the guide below to help you along with the process.
REQUIREMENTS
- Siri enabled on your iPhone
STEP-BY-STEP GUIDE
Here’s a step-by-step guide to help you easily bypass the lock screen on iOS 8.0 to iOS 10.0.1.
- Invoke Siri on your device and then ask Siri about the current time. Tap on the clock once Siri replies.
- Now tap on the + icon in the top right corner of your screen. You will now be able to add a new click. Type on any city’s name in the search bar at the top.
- Double-tap and select the text you typed earlier. Now tap Select All.
- Once selected, tap on Share from the pop-up menu. Tap on Messages from the available options.
- Type any random word beside To: and then tap Return on the keyboard. Next, tap on + once available.
- Select Create New Contact and then tap on Add Photo.
- Next, tap on Choose Photo. You will now be taken to the Photos app, at this point, simply press the Home button to go back to the home screen.
- You can now back up any data that you need using AirDrop, Email, or Cloud Storage. If needed you can use the steps above to unlock the device again to back up all the necessary data.
You can now simply use the iTunes method above to reset your iPhone and set it up as new again. Once done, you can then use the backed-up data to restore your iPhone.
Is there any way to recover data when restoring your iPhone?
Unfortunately, if you’re locked out of your iPhone and need to reset it, then there’s no way to recover your data. However, if you have an older iTunes backup, you can use it to restore your data once your device is reset. Additionally, if you have iCloud backups enabled, you can leave your device connected to a Wi-Fi network for a day to ensure everything has been backed up. You can then proceed with the device reset the next day and then restore your data by signing into iCloud.
We hope this post helped you easily get rid of the “iPhone is Disabled, Connect to iTunes error”. If you face any issues or have more questions, feel free to drop us a comment below.
Related: Forgot your iPhone passcode? Reset your iOS device without a PC or mac!


