

Whatsapp is one of the most popular cross-platform messaging services currently available across iOS, Android, Blackberry & Symbian S60 platforms. Unlike the popular Blackberry Messenger a.k.a which works exclusively across Blackberry devices, Whatsapp is cross compatible across all the platforms that it supports, and users can message each other irrespective of the device being used.
Since WhatsApp Messenger uses the same internet data plan that you use for email and web browsing, there is no cost to message and stay in touch with your friends. In addition to basic messaging WhatsApp Messenger users can send each other unlimited images, video and audio media messages.
But in case you don’t have a data plan on your mobile or want to chat with long texts, then you would definitely wish that you could use it on your laptop or PC. While there is no official WhatsApp application available for Windows PCs, you can still use it by applying a workaround. Lets have a look at how to do that and get chatting with your friends in minutes right from your Windows PC or laptop.
How to Whatsapp on PC
- We would be using an a free Android emulator called BlueStacks on your PC to download and use Whatsapp services. Download BlueStacks to your PC,and install it like a regular Windows application, by double clicking the exe file. Let the installer take its time to download runtime packages and install fully.
- Once BlueStacks has been completely installed, it will automatically launch and you should see the home screen, like in the screenshot below. BlueStacks runs like any other Windows app, and you can Alt-Tab between your other open windows and BlueStacks with ease

- Now go ahead and search for Whatsapp by clicking on the blue colored Search button on the Top right. Once you see it in the search results, just click the Install button next to it to start download and installation in BlueStacks.

- Once BlueStacks has downloaded and installed Whatsapp, you should get a notification in your Windows system tray that Whatsapp has been installed. You’re running an Android emulator inside Windows, remember?
- Now click the Home button in the BlueStacks window, to go the home screen. You should now see the Whatsapp icon there, just like you would on your Android device home screen. Double click the icon to launch Whatsapp and you should be greeted with the familiar welcome screen.

- Click the Agree and continue button to proceed. On the next screen, select your country from the dropdown list. The country code will get automatically populated by Whatsapp. In the Phone Number field, enter an active phone number that you have access to. If you want to use the same number as the one you are using on your phone, you would need to uninstall Whatsapp from your phone before proceeding. Reason being that Whatsapp only allows one account per phone number.

- If you are using a phone number which has already been registered with Whatapp in the past, it will automatically pick up your avatar image and default Whatsapp name. Add your name and click Next on the Top right of the screen

- That’s it. You now have Whatsapp installed successfully on your Windows machine. But we are far from done yet. To be able to chat with all your friends over Whatsapp on your PC, you still need to add all your phone contacts to BlueStacks. Even if you have your Android contacts synced with Outlook on Windows, BlueStacks cannot read them. So we’re going to have to employ a slightly more circuitous route to get your contacts into BlueStacks. To do so, go back to your Android device and install a free app called MC Backup from the Play Store. Launch it on your phone, and tap the Green Backup Button on the main screen. The app will immediately start backing up all your phone contacts. Once it is done, just tap the Send button and enter your own email address in the email window that opens. You can then open your email on your PC and download the vcf file with all your phone contacts that the app would have sent to you.
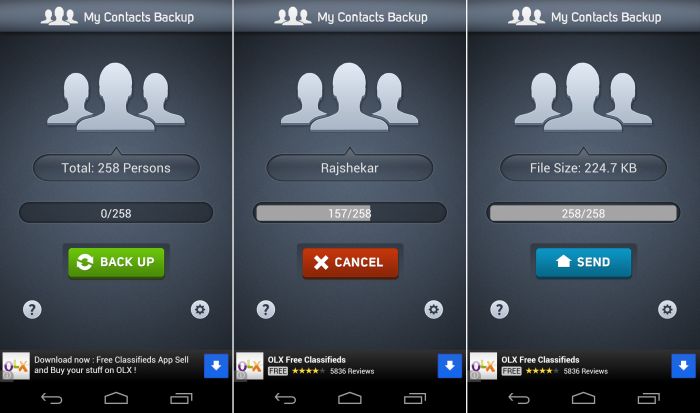
- That’s half the job done, with your Android contacts having been sent to your PC over email. Download the MCBackup.vcf file that you would have received in your mail, and save it to your desktop.
- Next, on your desktop browser, go to the Dropbox website, go ahead and create a free Dropbox account, if you don’t already have one. If you do, just sign into the web interface of Dropbox, and upload the MCBackup.vcf file that you saved to your Windows desktop in Step 9.
- Now go back to BlueStacks and click on the Search button. Search for Dropbox, and install it in the same way you did Whatsapp.
- Once installed, launch Dropbox from the BlueStacks home screen, and click Start on the welcome screen of Dropbox

- Enter your Dropbox login credentials and sign in to Dropbox. Click Next on the screen that follows, and Skip on the next screen. You should now see your main Dropbox account dashboard, along with the MCBackup.vcf file that you just uploaded to the web version of Dropbox. Just click on it once to download it to BlueStacks.

- Once BlueStacks finishes downloading the contacts file, it will present you with an option box. Just click on Contacts and then click on the email address under which you want to save those contacts.

- BlueStacks will now start importing all your contacts from the vcf file.

- That’s it. Now click the Home button in BlueStacks to go to the homescreen, and launch Whatsapp. Click on the Pencil icon on the top right, and you should see all of your Whatsapp contacts listed. Click on any one and start chatting, just the way you would on your phone.


You have now installed Whatsapp successfully on your Windows PC, and can comfortably handle long chats through your PC or laptop keyboard. Keep in mind though, that this workaround will not let you transfer images or videos like you can on your phone or tablet. But that’s a minor inconvenience compared to being able to successfully use Whatsapp Chat on your PC.
Go ahead and try this out step by step, and you should be up and running with Whatsapp on your PC in about 30 minutes. Share this guide with your friends too, and if you or your buddies have any comments, we’d love to hear them in comments below.
Note: We’ve removed the old method which included the use of paid software YouWave.


631 responses to “Whatsapp for PC Installation Guide”
whatsapp cant be installed
ma betkafik 3a khat l beit???:P:P:P
whatsapp cant be installed
ma betkafik 3a khat l beit???:P:P:P
whatsapp cant be installed
ma betkafik 3a khat l beit???:P:P:P
no internet, and whats app says it need mobile network to run
yes, this solution not working, mobile network needed…n
no internet, and whats app says it need mobile network to run
yes, this solution not working, mobile network needed…n
no internet, and whats app says it need mobile network to run
yes, this solution not working, mobile network needed…
yes, this solution not working, mobile network needed…
Not work together one phone number. if PC ready, in phone is connection failed and you must delete and
reinstal WhatsApp in mobile
Not work together one phone number. if PC ready, in phone is connection failed and you must delete and
reinstal WhatsApp in mobile
Not work together one phone number. if PC ready, in phone is connection failed and you must delete and
reinstal WhatsApp in mobile
working fine on windows 7 64 bit even whattsapp
But how to download It on PC!
how its possible in win7 teach me
can u pls send me the link to the download site?
working fine on windows 7 64 bit even whattsapp
But how to download It on PC!
how its possible in win7 teach me
can u pls send me the link to the download site?
working fine on windows 7 64 bit even whattsapp
But how to download It on PC!
how its possible in win7 teach me
can u pls send me the link to the download site?
very easy and useful..works great on windows 7 64 bit..
very easy and useful..works great on windows 7 64 bit..
very easy and useful..works great on windows 7 64 bit..
how do you configure
how do you configure
how do you configure
works alright but big effort and i now have to re register my phone when i want to used it on the device again
works alright but big effort and i now have to re register my phone when i want to used it on the device again
works alright but big effort and i now have to re register my phone when i want to used it on the device again
I installed the Android developers kit with free Android platform (I used 2.2), set up a virtual Android device, installed WhatsApp, ran it and waited for the voice call verification which all worked fine. Added contacts who use WhatsApp (including my own Android phone… different phone number of course) and tried it out. All works fine other than the typing speed on the Android emulated device is rather slooowwwwww.
I installed the Android developers kit with free Android platform (I used 2.2), set up a virtual Android device, installed WhatsApp, ran it and waited for the voice call verification which all worked fine. Added contacts who use WhatsApp (including my own Android phone… different phone number of course) and tried it out. All works fine other than the typing speed on the Android emulated device is rather slooowwwwww.
I installed the Android developers kit with free Android platform (I used 2.2), set up a virtual Android device, installed WhatsApp, ran it and waited for the voice call verification which all worked fine. Added contacts who use WhatsApp (including my own Android phone… different phone number of course) and tried it out. All works fine other than the typing speed on the Android emulated device is rather slooowwwwww.
very easy, fast and useful. works on windows 7 64 bit..Thanks!!
very easy, fast and useful. works on windows 7 64 bit..Thanks!!
very easy, fast and useful. works on windows 7 64 bit..Thanks!!
Theres another guide over here.. this one gives the links to everything http://www.whatsappforpc.wordpress.com
Theres another guide over here.. this one gives the links to everything http://www.whatsappforpc.wordpress.com
Theres another guide over here.. this one gives the links to everything http://www.whatsappforpc.wordpress.com
How to upload photos on whatsup from pc???/
i have downloaded youwave but its trial version
how can i get full version please give me the code
1. Go to
http://youwave.com/store/
2. Click on either “Pay with PayPal” or “Checkout with Google”
3. Fill out the form
Alternatively, as the author says, Google is your friend.
How to upload photos on whatsup from pc???/
i have downloaded youwave but its trial version
how can i get full version please give me the code
1. Go to
http://youwave.com/store/
2. Click on either “Pay with PayPal” or “Checkout with Google”
3. Fill out the form
Alternatively, as the author says, Google is your friend.
How to upload photos on whatsup from pc???/
i have downloaded youwave but its trial version
how can i get full version please give me the code
1. Go to
http://youwave.com/store/
2. Click on either “Pay with PayPal” or “Checkout with Google”
3. Fill out the form
Alternatively, as the author says, Google is your friend.
i have downloaded youwave but its trial version
how can i get full version please give me the code
1. Go to
http://youwave.com/store/
2. Click on either “Pay with PayPal” or “Checkout with Google”
3. Fill out the form
Alternatively, as the author says, Google is your friend.
Oh my word thanks guz. Thank
Oh my word thanks guz. Thank
Oh my word thanks guz. Thank
mine keeps telling android pc is not ready and then tells to check the Ethernet setting by clicking on menu but i do no settings come for me to do that. does it work on windows xp?
Mine does exactly the same! Did you manage to get it to work though?
mine keeps telling android pc is not ready and then tells to check the Ethernet setting by clicking on menu but i do no settings come for me to do that. does it work on windows xp?
Mine does exactly the same! Did you manage to get it to work though?
mine keeps telling android pc is not ready and then tells to check the Ethernet setting by clicking on menu but i do no settings come for me to do that. does it work on windows xp?
Mine does exactly the same! Did you manage to get it to work though?
You recently connected, please wait for 1320 minutes before trying again. how am i gonna do this?
Lol! It should be 5 minutes. Try redoing everything.
You recently connected, please wait for 1320 minutes before trying again. how am i gonna do this?
Lol! It should be 5 minutes. Try redoing everything.
You recently connected, please wait for 1320 minutes before trying again. how am i gonna do this?
Lol! It should be 5 minutes. Try redoing everything.
can i downlord whatsapp in qmobile
can i downlord whatsapp in qmobile
can i downlord whatsapp in qmobile
this is fake
Works great! I have it installed and running. Tip: when you run the YouWave installer, right-click and Run as Administrator, this solved all my problems regarding YouWave.
Be patient my friend and follow the instructions carefully. It’s simple, easy and very enjoyable. You can post a specific problem you are having and people will help you. Please be grateful & don’t condemn it. ENJOY!!!