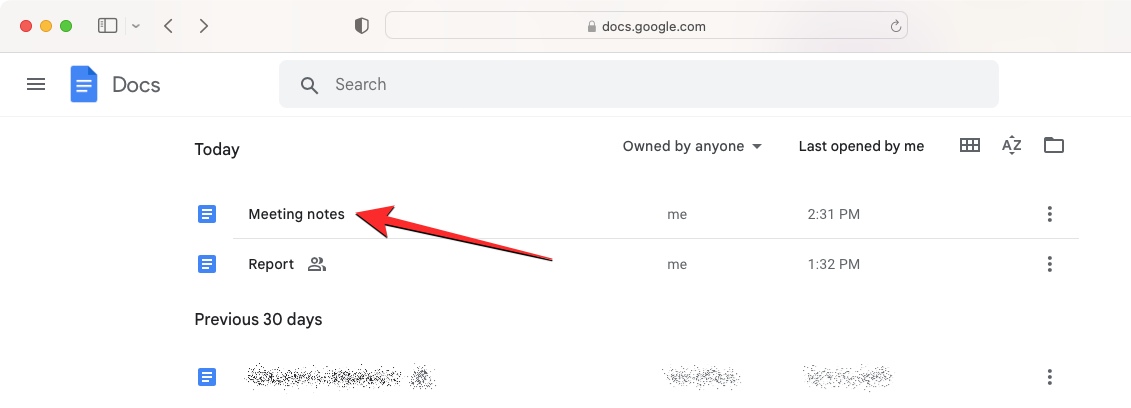
What to know
- To enable Voice typing on Google Docs on PC, click on Tools > Voice Typing. Then click on the Microphone icon to start dictating.
- You can also use the Dictation feature on your device to voice type on Google Docs. On a Mac, go to System Preferences > Keyboard > Dictation tab > turn Dictation On > Enable Dictation. Then press the shortcut key to activate dictation (Ctrl key twice is the default).
- On Windows, simply press Win+H to activate voice typing.
- On iOS, set up dictation from Settings > General > Keyboard > Enable Dictation and Auto-Punctuation. Then, in Google Docs, select the microphone icon in the keyboard and start voice typing.
- On Android, set up voice typing from Settings > System > Language & input > On-screen keyboard > Gboard > Voice typing > Use voice typing. Then, in Google Docs, select the microphone icon in Gboard and start voice typing.
Typing with your voice on Google Docs can be a huge convenience, especially if you have a lot to type. It can also help physically challenged users who might find it difficult to type in general. Google Docs, like most services, offers the ability to voice type easily. So if you’re looking to learn about voice typing in Google Docs, then here’s all you need to know about it.
How to use voice type in Google Docs (2 ways)
You can choose to enroll in the beta program or use the Dictation feature offered by your device to voice type in Docs. Follow either of the sections below, depending on the method you prefer.
Method 1: Use the native voice type feature
Here’s how you can use the native voice typing feature in Google Docs. Follow the steps below to help you along with the process.
Step 1: Enable Microphone
Let’s first ensure that your microphone is enabled and working with Google Chrome. Use the relevant section below, depending on your current device, to help you along with the process.
On Windows 11 PC
- Open the Settings app by pressing Windows + i. Now click Privacy & security in the left sidebar.
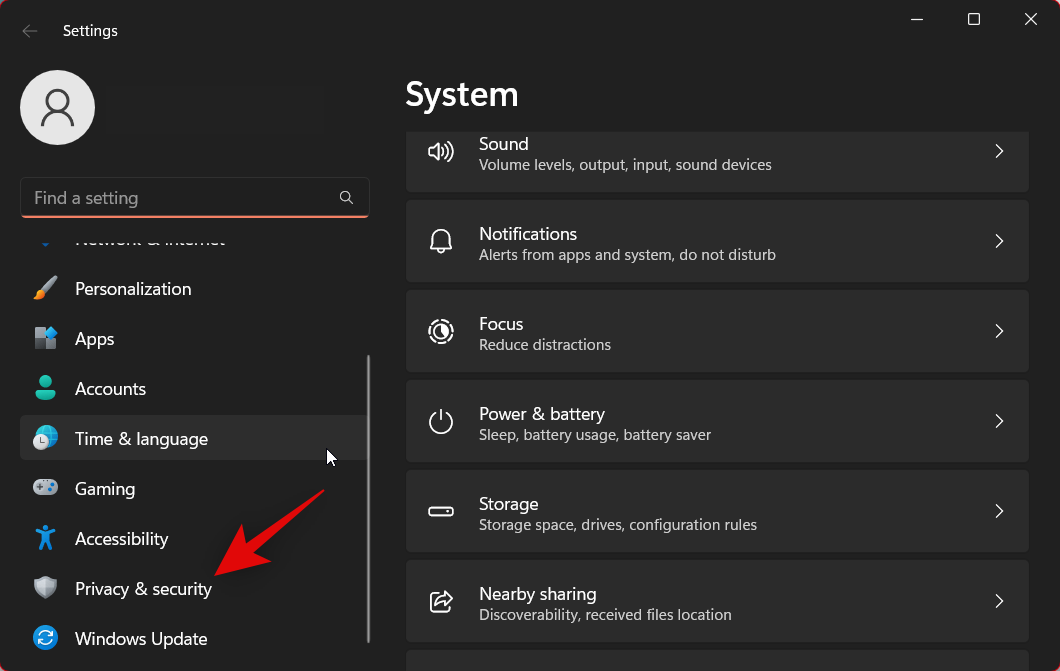
- Scroll down and click Microphone.
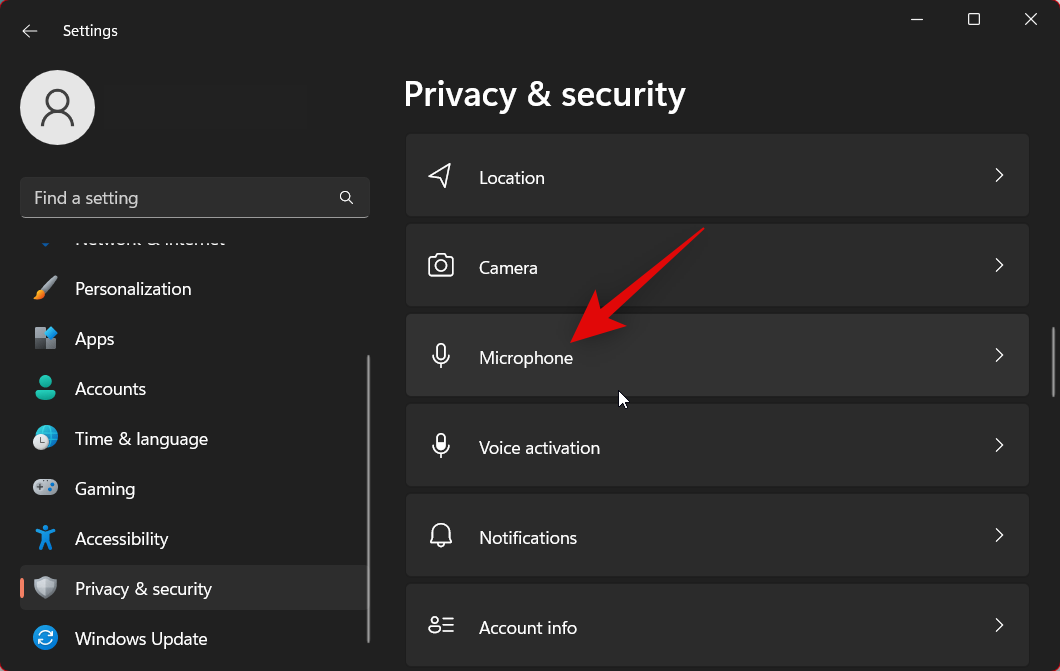
- Click and enable the toggle for Microphone access at the top.
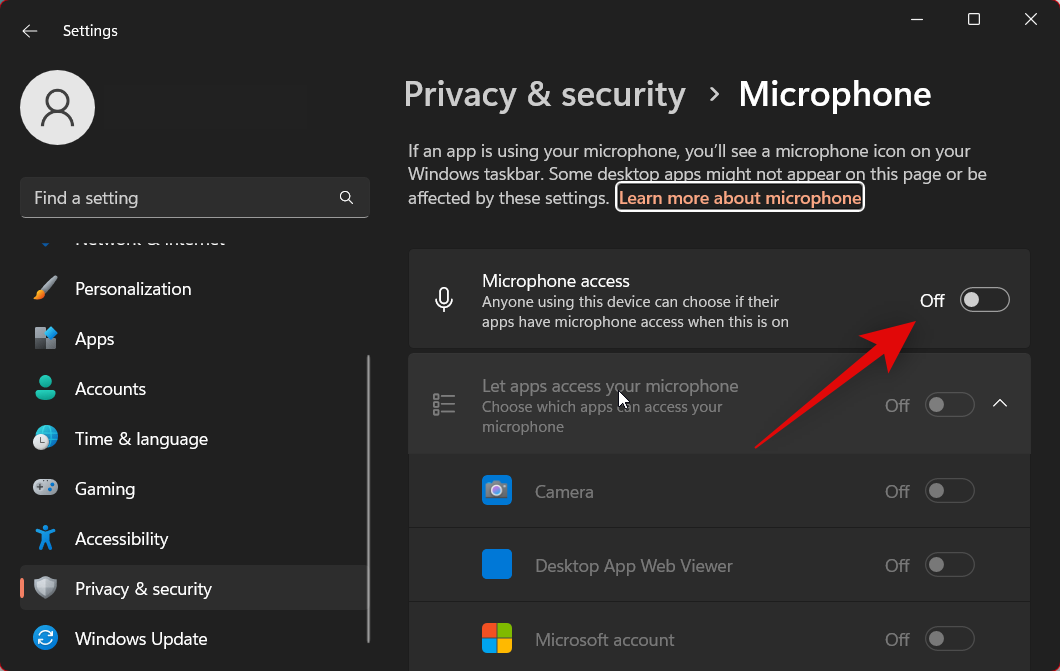
- Now enable the toggle for Google Chrome from the list on your screen.
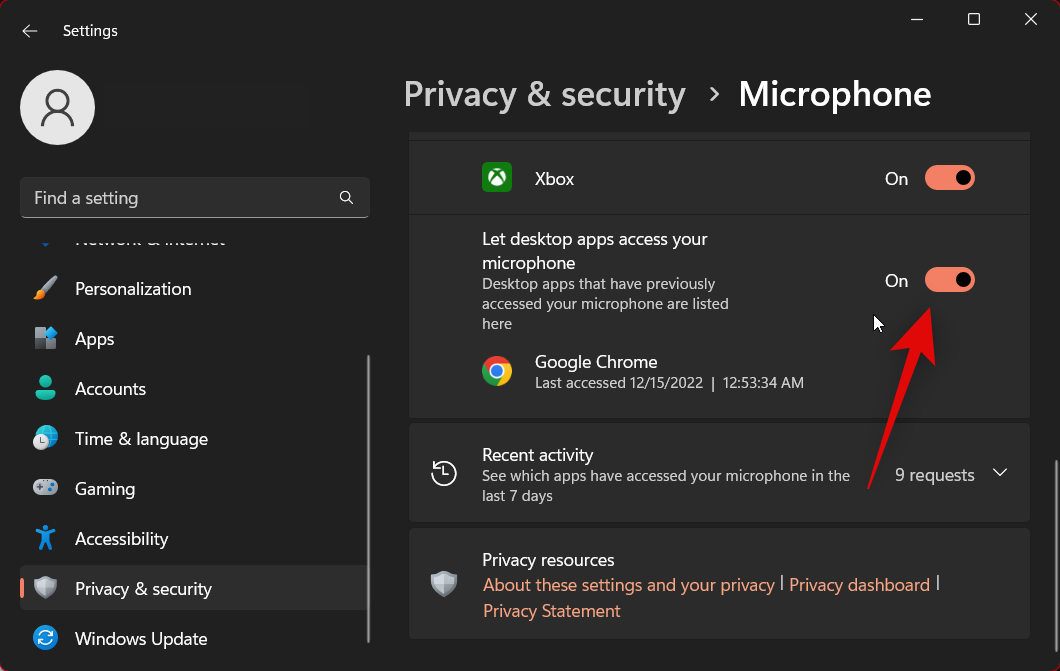
- If this is your first time using Chrome, then it will be missing from this list for now. You can click Allow when you trigger voice typing for the first time in Chrome when the browser asks for permission as you follow the steps below.

And that’s it! You will now have enabled microphone permissions for Chrome on your PC.
On Mac
Like on Windows, the Google Chrome application requires access to your microphone in order to let you type using the name Voice typing feature on Google Docs.
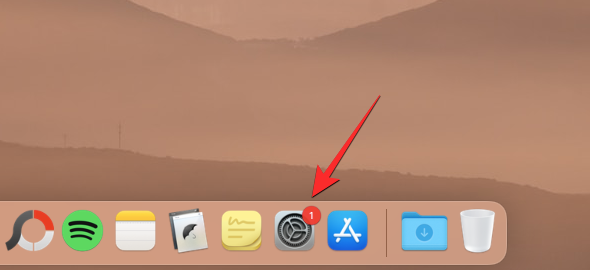
- To give Google Chrome access to your Mac’s microphone unit, open System Preferences on your Mac from the Menu bar, Launchpad, Dock, or Spotlight.
- When the System Preferences window loads up, click on Security & Privacy.

- Inside the Security & Privacy window, click on the Privacy tab at the top right corner.
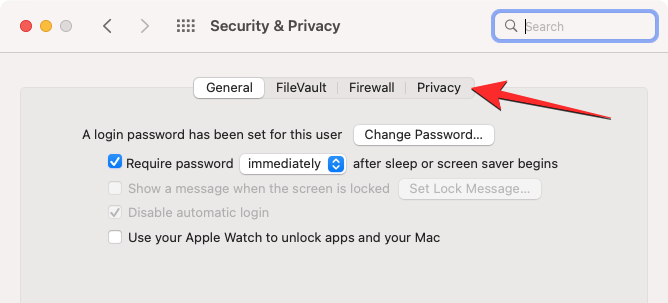
- When the Privacy tab opens, select Microphone from the left sidebar.

- Inside the “Allow the apps below to access your microphone” section, check the Google Chrome box.
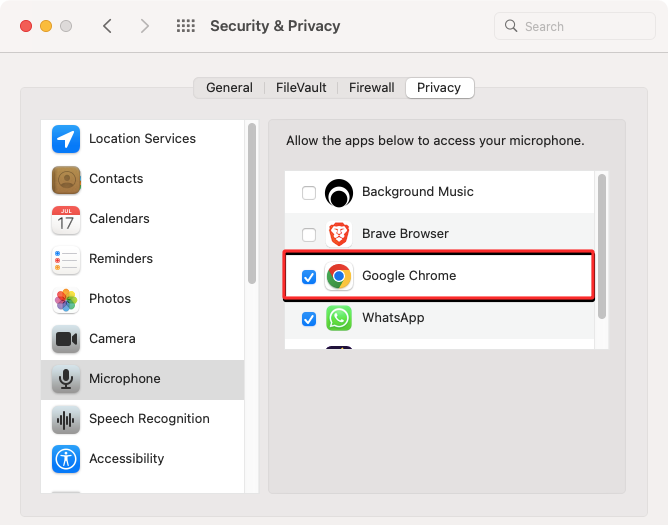
This will immediately give the Google Chrome app on your Mac access to your device’s microphone.
Step 2: Use Voice Typing
Now that we have enabled microphone permissions, we can now use voice typing in Google Docs. Follow the steps below to help you along with the process.
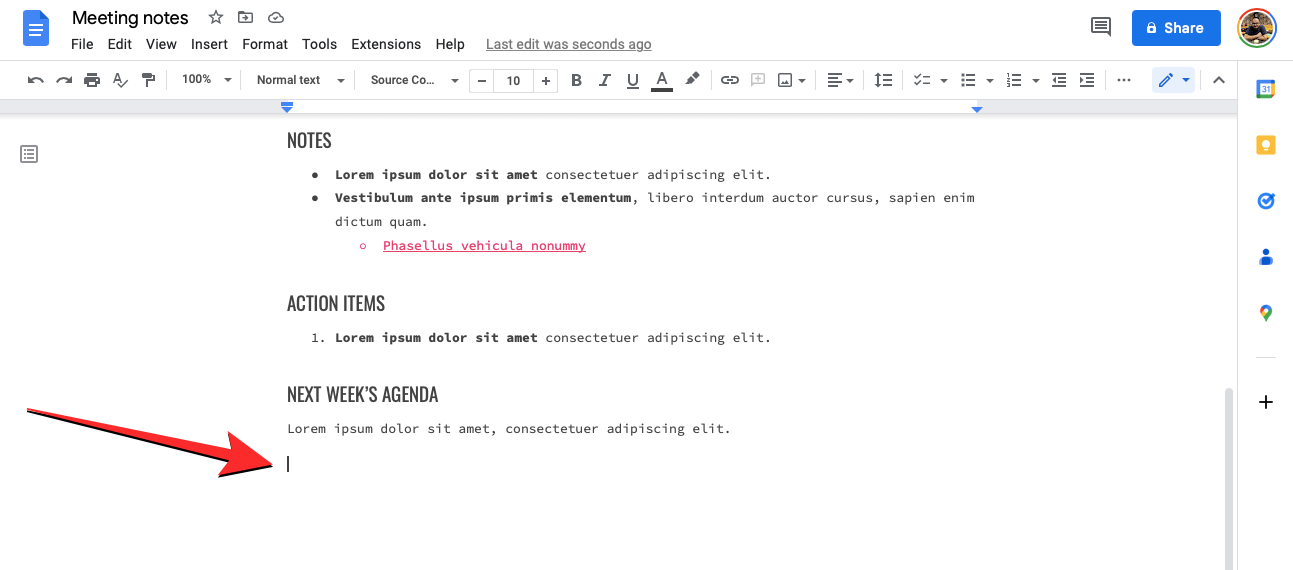
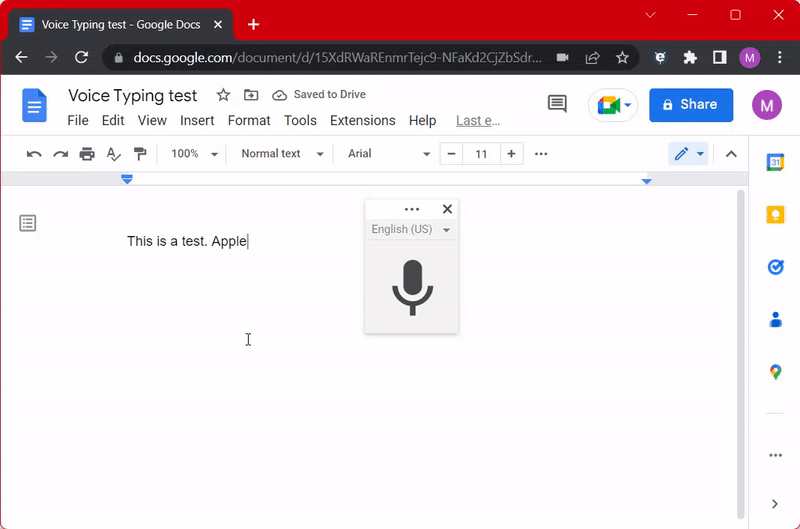
- Open Google Docs in Chrome and choose a Blank document to start with.
- Click Tools in the menu bar at the top.

- Select Voice typing.
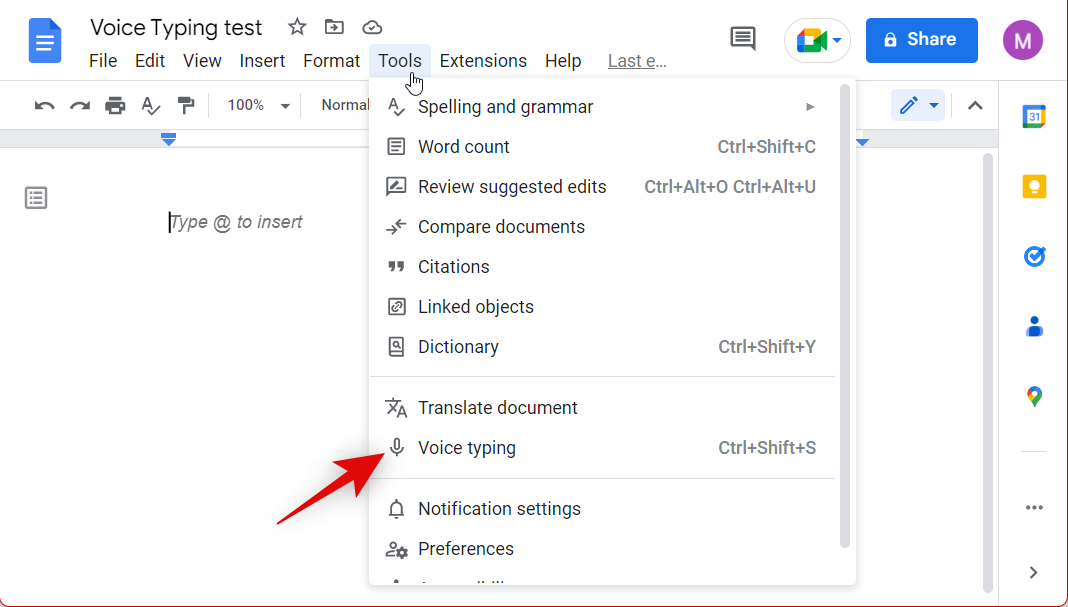
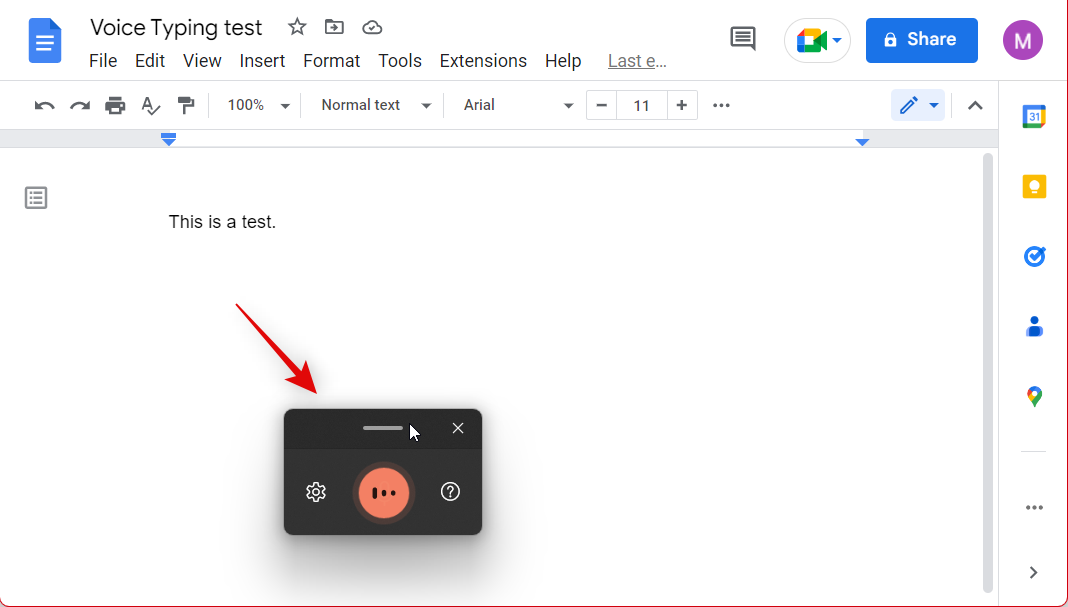
- You can also use the Ctrl + Shift + S keyboard shortcut to activate voice typing.

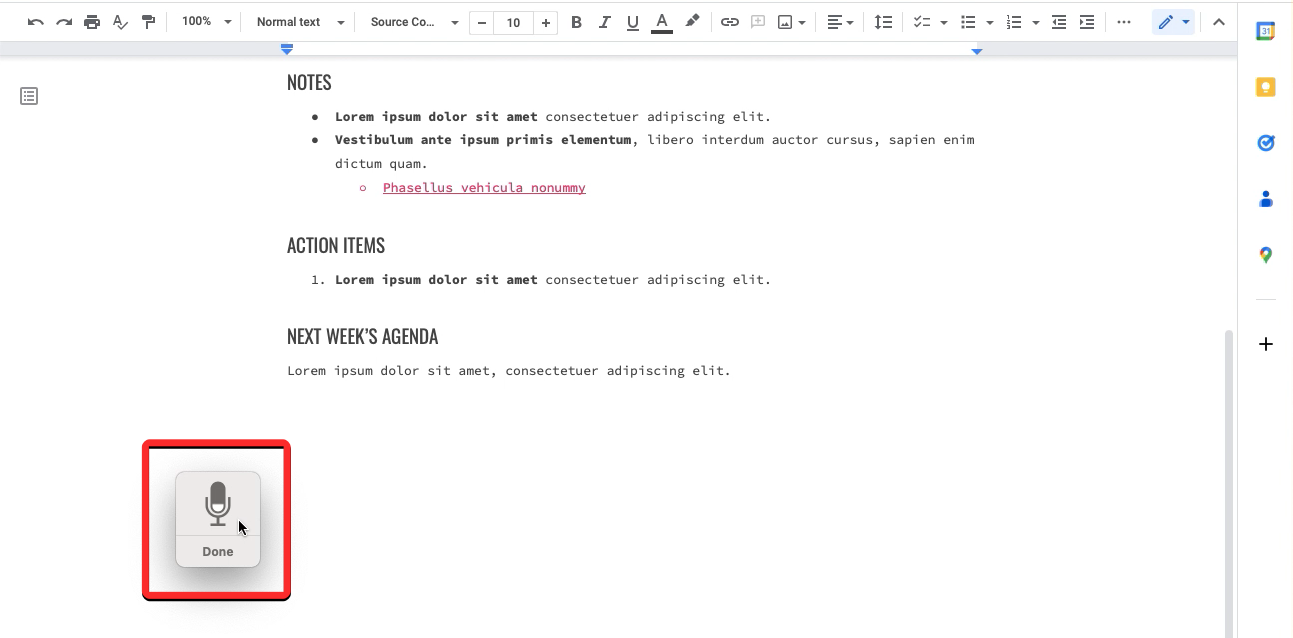
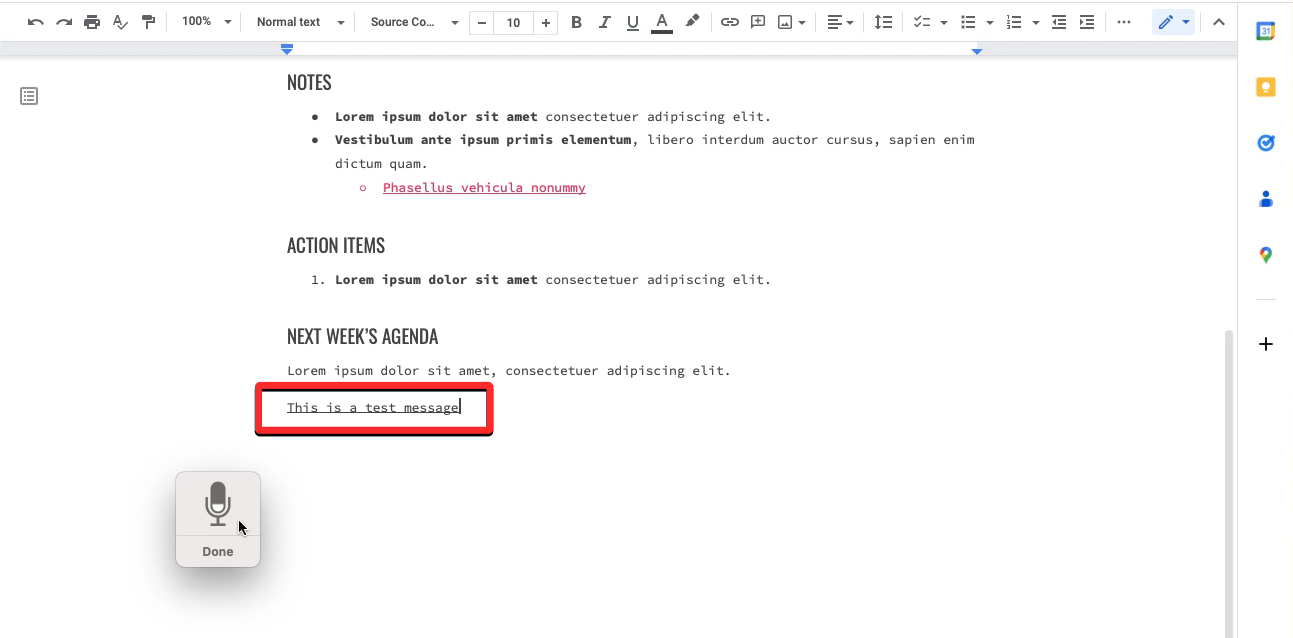
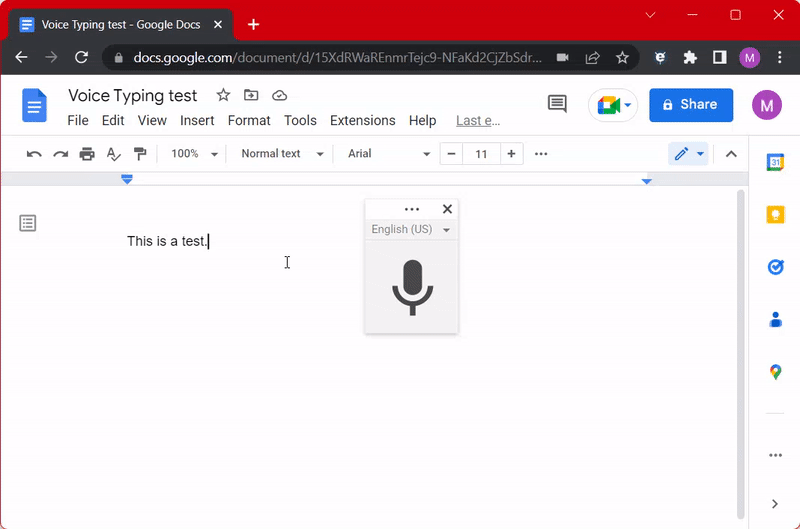
- A microphone in a box should now appear near your cursor. Click the icon and speak the text you wish to type in Docs.
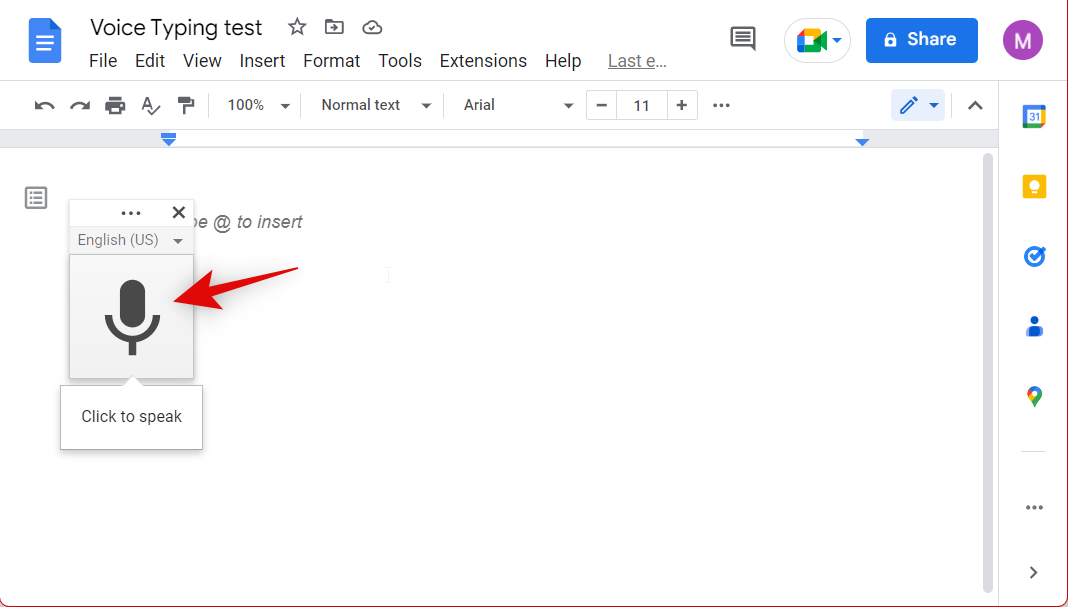
- You can now click the microphone icon again or use the keyboard shortcut when you wish to stop.

And that’s how you can use voice typing in Google Docs.
Related: How to Create, Save and Send Emails From Google Docs
Method 2: Use the Dictation feature on your device
You can also choose to use the native dictation feature offered by your device to voice type in Google Docs. Dictation is offered by most modern-day devices as an accessibility feature, and it was recently added to Windows 11 as well. Use the dedicated sections below to help you use dictation on any device.
On Mac
macOS has a native Dictation feature that lets you dictate text of any length instead of using a keyboard. The tool can be used on any app running on your Mac, including Safari, thus allowing you to dictate text on Google Docs as well. Before you can start using this feature, you must be wary of the requirements that are necessary to get it to work while using Google Docs on a Mac.
Requirements
- An active internet connection (for Macs with non-Apple silicon)
- For best results, use Safari to open Google Docs. Dictation doesn’t work efficiently on other web browsers like Google Chrome or Firefox.
- You’re using dictation in a language that’s supported by Apple:
- English
- Arabic
- Catalan
- Chinese (Cantonese)
- Chinese (Mandarin)
- Chinese (Shanghainese)
- Croatian
- Czech
- Danish
- Dutch
- Finnish
- French
- German
- Greek
- Hebrew
- Hindi
- Hungarian
- Indonesian
- Italian
- Japanese
- Korean
- Malay
- Norwegian Bokmãl
- Polish
- Portuguese
- Romanian
- Russian
- Slovak
- Spanish
- Swedish
- Thai
- Turkish
- Ukrainian
- Vietnamese
Step 1: Set up Dictation
Before you can start using your voice to enter text on Google Docs, you first need to enable Dictation on macOS. Here’s how to do so:
- Open System Preferences on your Mac from the Menu bar, Launchpad, Dock, or Spotlight.
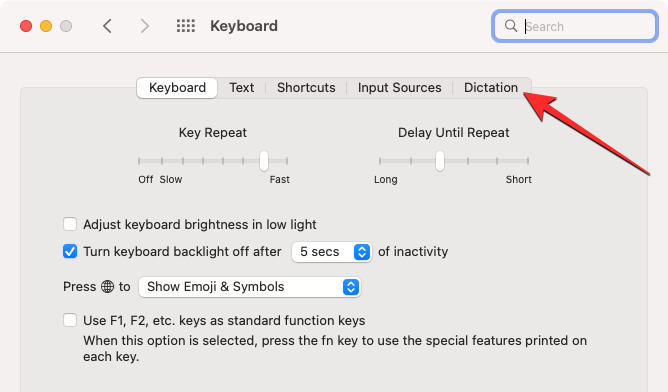
- When the System Preferences window loads up, click on Keyboard.
- Inside the Keyboard window, click on the Dictation tab at the top.
- On this screen, click On adjacent to “Dictation”.
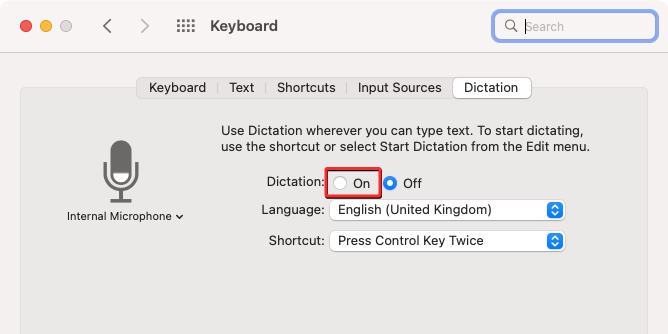
- You’ll now see a prompt appear inside the Keyboard window asking you to confirm your action. To continue, click on Enable Dictation.
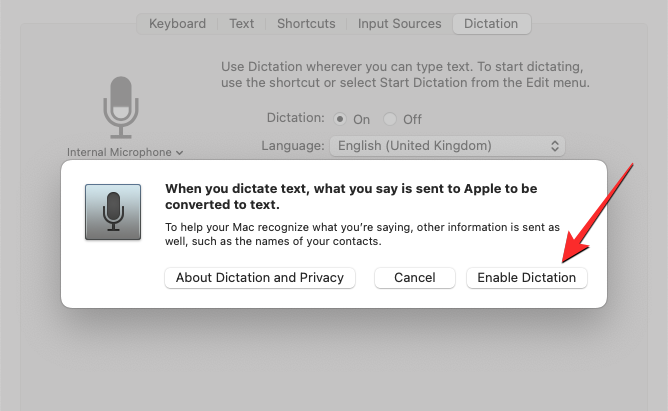
This will enable Dictation on your Mac.
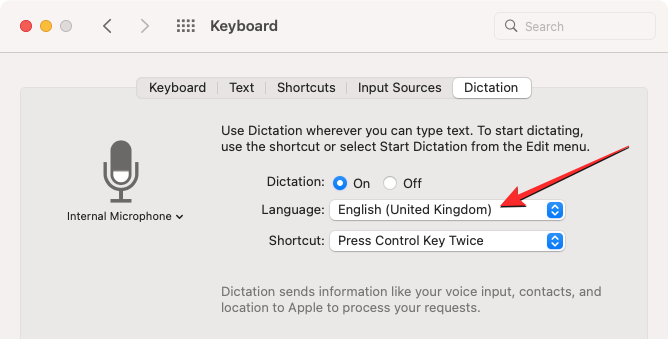
If you wish to dictate your text in English, you can skip to the next step.
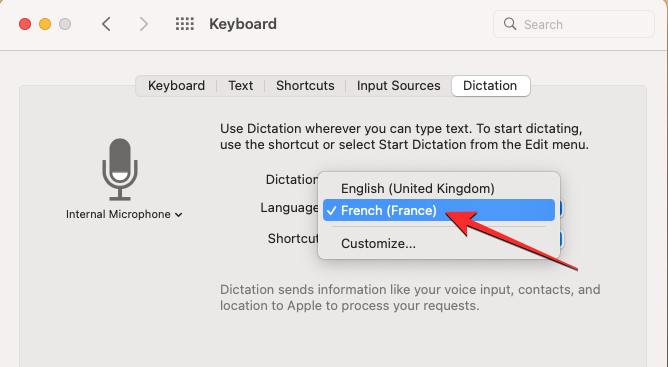
- To dictate in a language other than English, configure the language you want to primarily use for dictation by clicking on the Language dropdown menu.
- Now, select Add Language from this menu.
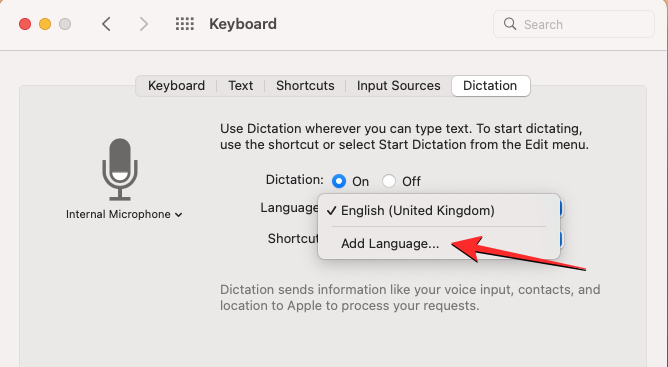
- Now, from the “Select languages” box, check the box adjacent to the language you want to use for dictation. Once you’ve selected the required languages, click on Ok.
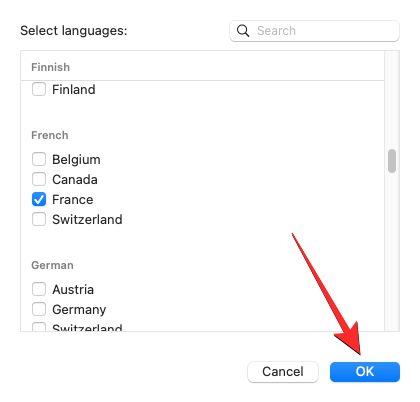
- You can now select the language that you added from the Language dropdown menu.
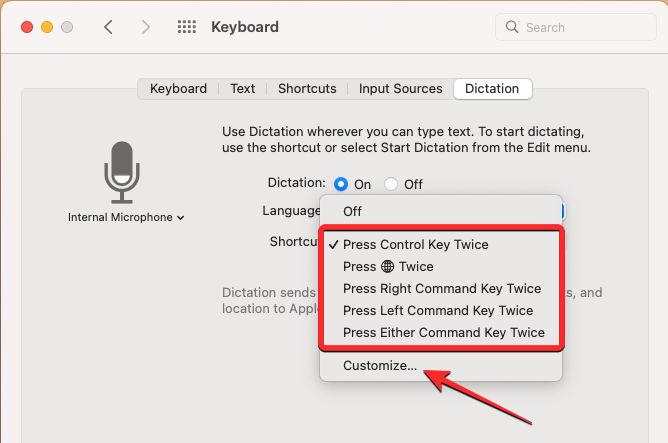
The next step is to choose a shortcut that you can use to activate Dictation on the Mac from any screen. By default, you can activate dictation by pressing the Control key on your keyboard twice.
- To change the activation key for dictation, click on the Shortcut dropdown menu.
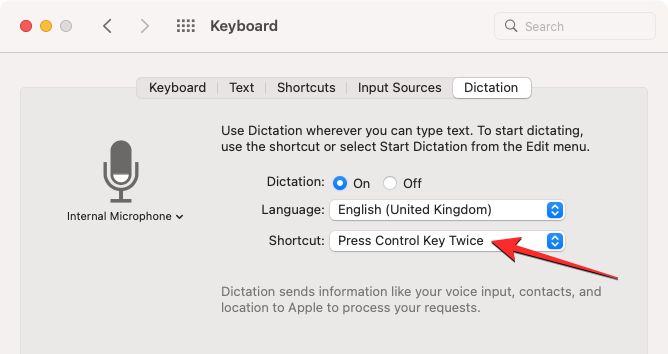
- Now, select a desired shortcut from the available options. Additionally, you can click on Customize to choose the desired key for activating dictation.
That’s it. You can now start using dictation to enter text on your Mac.
Step 2: Use Dictation in Google Docs
- To enter text using your voice on Google Docs, launch the Safari app on your Mac and open the Google Docs homepage.

- Inside Google Docs, sign into your Google account and then open the document where you wish to enter text using your voice.
- When the document opens, locate and click on the insertion point where you want to start dictation.
- Once you do that, press the Control key (or the key you previously configured) on your keyboard twice. When you do that, you’ll hear a tone to indicate that your Mac is ready for dictation. At the same time, you’ll also see a floating microphone bubble appear somewhere on the screen.
- You can now start dictating text using your voice and your Mac should be able to pick up the words you speak and add them to the Google Docs document.
- The words you type will be highlighted with an underline. To enter punctuation, typographical, mathematical, or other signs, you just need to say the sign name and it will be entered as text inside the document. Similarly, you can also make formatting changes or capitalize letters, and words using their relevant commands. You can view the full set of dictation commands on this Apple Support page.
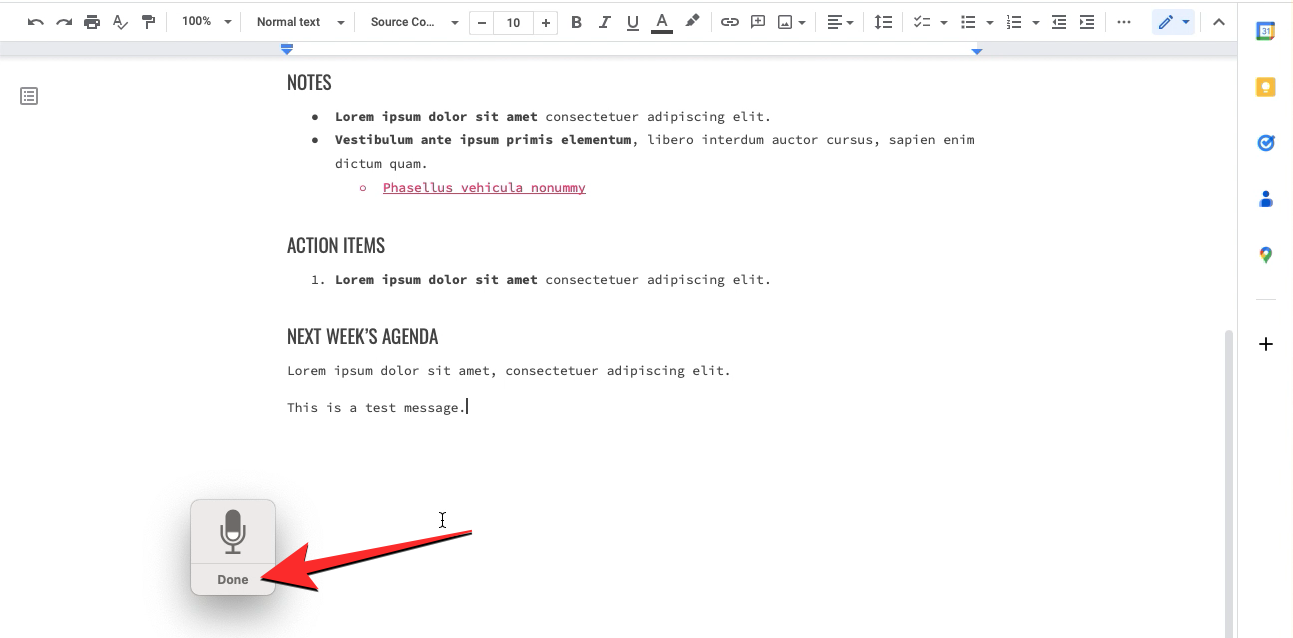
- Once you’ve finished typing, you can deactivate dictation by pressing the Control key (or your chosen shortcut key) twice again or pressing the Return (Enter) key on your keyboard. You can also stop dictation by clicking on Done inside the floating microphone bubble on the screen.
Dictation will now be disabled until you re-activate it using its dedicated shortcut.
On Windows
Here’s how you can use voice typing in Windows 11. Use the requirements section to get familiar with its needs and the subsequent steps to set up and use voice typing on Windows 11.
Requirements
- A network connection
- A Supported languages
- English (US, Australia, Canada, India, United Kingdom)
- French (France and Canada)
- Italian
- Portugeese (Brazil, and Portugal)
- Spanish
- Chinese (Simplified, Traditional Hong Kong SAR, and Traditional Taiwan)
- Bulgarian
- Croatian
- Czech
- Danish
- Dutch (Netherlands)
- Estonian
- Finnish
- German
- Gujarati
- Hindi
- Hungarian
- Irish
- Japanese
- Latvian
- Lithuanian
- Maltese
- Marathi
- Norwegian
- Polish
- Romanian
- Russian
- Slovak
- Slovenian
- Spanish (Mexico and Spain)
- Swedish
- Tamil
- Telugu
- Thai
- Turkish
- Vietnamese
- A microphone
You can now use the steps below to set up and use dictation on your Windows 11 PC.
Guide
Use the following steps to use voice typing on your Windows 11 PC.
- Click and place your cursor on the concerned document in Google Docs on your PC.
- Now press Windows + H to start voice typing. You can also click the Microphone icon on the touch keyboard to start voice typing.

- Windows 11 will now start listening for words and automatically type them down as they get recognized.
- To stop typing, you can use the Stop listening command. You can also click the Microphone icon in the voice typing launcher at the bottom of your screen.

- If using the touch or virtual keyboard, you can use the Microphone key beside the spacebar.
Customize your voice typing experience
Let’s now customize your voice typing experience in Windows 11. Use the steps below to help you along.
- Press Windows + H to bring up the voice typing launcher. Ensure your cursor is not placed in a text box on your PC. Now click the Gear (
) icon.
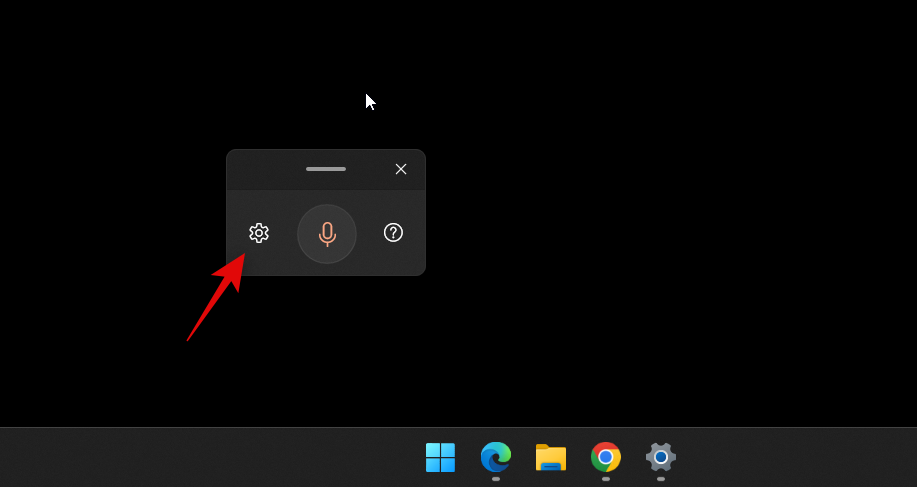
- Click and enable the toggle for the following based on your preferences and how you wish to use voice typing on your PC.
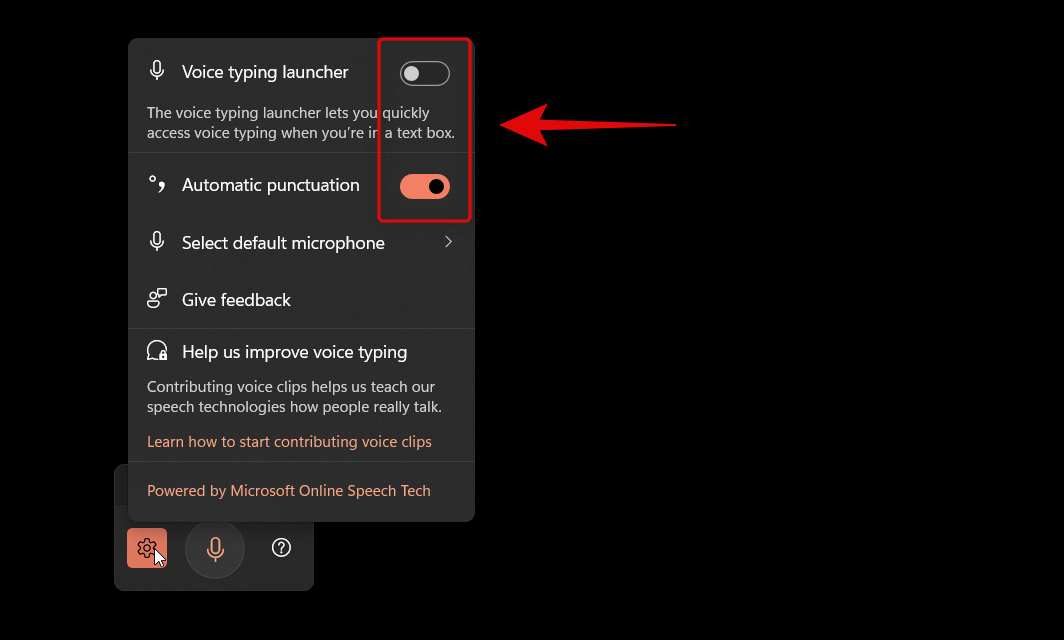
Voice typing launcher: Enabling this toggle will bring up the voice typing launcher instantly whenever you place your cursor in a text box on your PC.
Automatic punctuation: This is an exclusive feature in Windows 11 that automatically punctuates your sentences based on your tone and voice.
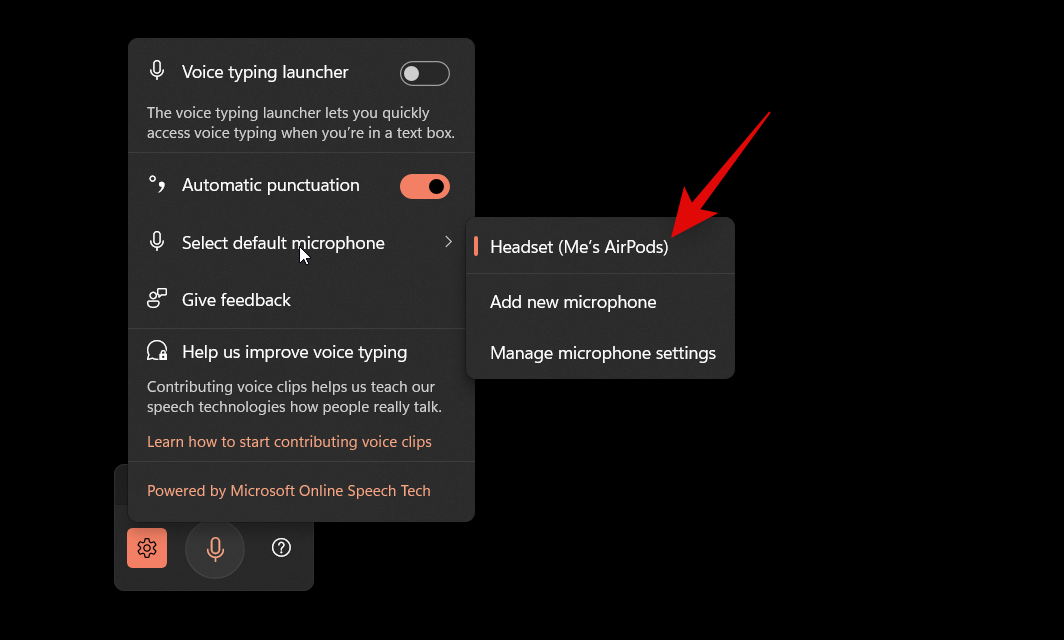
- Click Select default microphone and select the preferred microphone you wish to use with voice typing. We recommend using a headset with noise cancellation for the best results.
You will now have customized voice typing options to your liking in Windows 11.
Voice Commands for voice typing on Windows 11
Here’s a complete list of voice typing commands you can now use when voice typing in Google Docs on your Windows 11 PC. This is the official documentation from Microsoft, and you should be able to view all voice commands currently supported in Windows 11.
On iOS (iPhone)
You can also voice type on your iOS devices using the native dictation feature. This can be used to our advantage in the Google Docs app to voice type in any document.
Requirements
- Google Docs app | Download Link
- An internet connection (For iPhone 6 and earlier)
Step 1: Set up Dictation
Let’s first set up dictation on your iOS device. Follow the steps below to help you along the way.
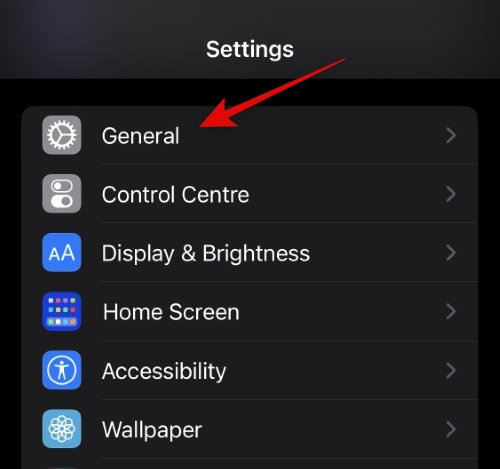
- Open the Settings app and tap General.
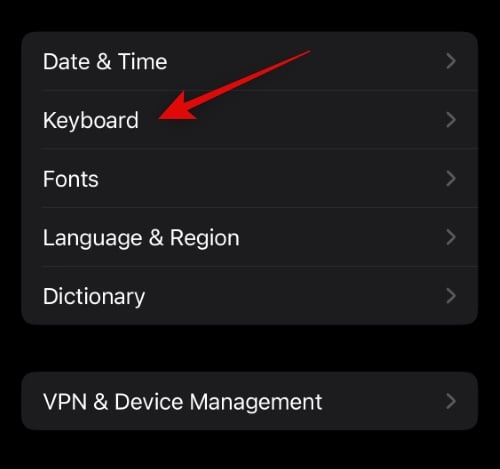
- Now tap Keyboard.
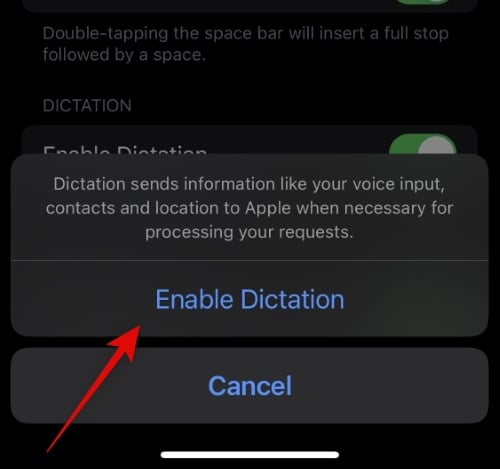
- Scroll to the bottom and tap the toggle for Enable Dictation to turn it on.
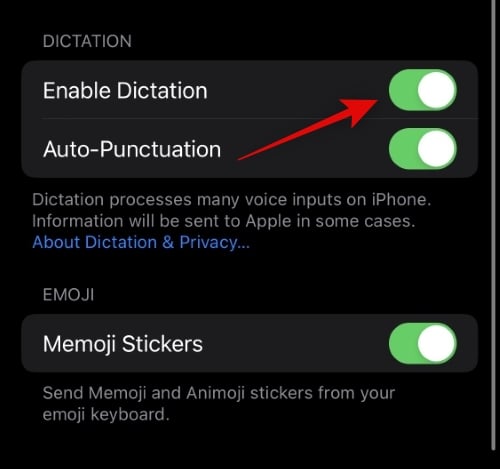
- Tap Enable Dictation to confirm your choice.
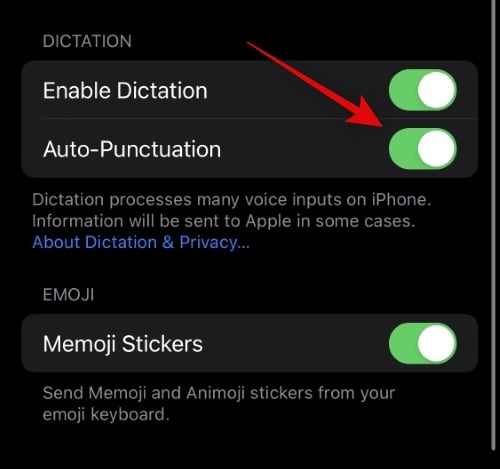
- Now tap and enable the toggle for Auto-Punctuation, if you wish to automatically punctuate your text.
And that’s it! Dictation will now be enabled on your iOS device.
Step 2: Use Dictation in Google Docs
Here’s how you can use dictation in Google Docs once it has been enabled on your iOS device. Follow the steps below to help you along with the process.
- Open the Google Docs app and open the document where you wish to voice type. Tap the + icon if you wish to create a new document.

- Tap the Edit icon in the bottom right corner. This won’t be necessary, if you’re creating a new document.

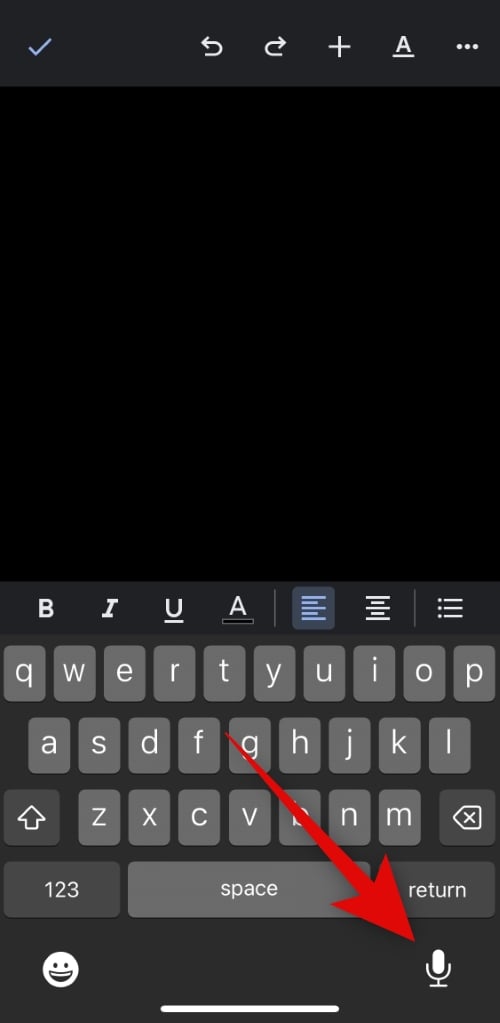
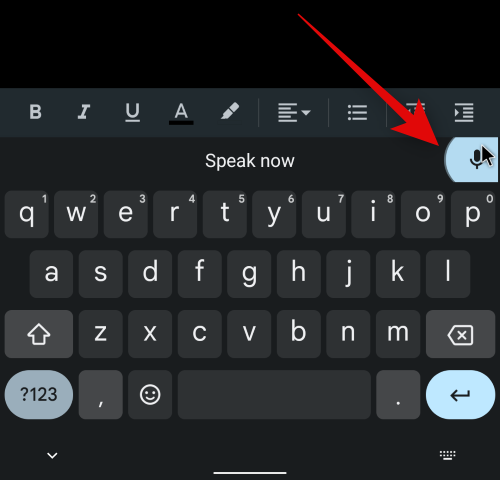
- Now place your cursor where you wish to type by tapping on your screen. This will bring up the keyboard. Tap the Microphone icon (
 ) in your keyboard to trigger dictation.
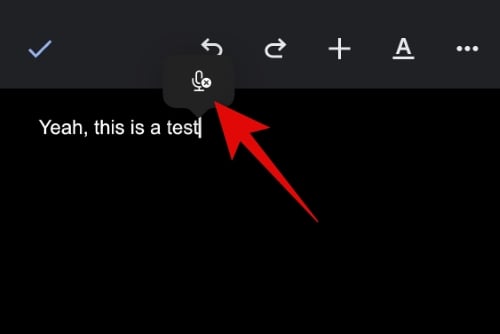
- You can now speak and voice type as usual in Google Docs. You can continue editing the text using the keyboard while dictating the text simultaneously. Tap the Microphone icon () again to stop using dictation on your device.
- You can also tap the
 icon near your cursor to stop dictation.
And that’s how you can use dictation in Google Docs on your iOS device.
Voice Commands for Dictation on iOS devices
Here are some common voice commands you can use with dictation on iOS devices.
- Quote and end quote: Use these commands to add quotes to your sentences as you type.
- New paragraph: Use this command to start a new paragraph instantly.
- New line: This command will jump the cursor to a new line in your document.
- Cap: This will capitalize the next word you dictate.
- Caps on or Caps off: These commands will help you toggle caps lock for your keyboard.
- Smiley: This command will insert 🙂
- Frowny: This command will insert 🙁
- Winky: This command will insert 😉
- [Emoji Name followed by ] emoji: You can also speak emoji names followed by emoji to insert emojis when using dictation. For example, saying happy emoji will automatically insert the happy emoji.
On Android
Google also has a comprehensive dictation feature on most Android devices that allows you to type using voice commands. Dictation is offered using Gboard, which is already a pre-installed keyboard on most Android devices. If, however, you do not have the app, you can use the link in the requirements section below to download and install it on your device.
Requirements
- Android 7.0 or higher
- Gboard app | Download Link
- Supported language
- Google Assistant (Pixel devices only)
- Google Docs app | Download Link
Step 1: Set up Dictation
Download and install Gboard on your device using the link above or the one below. Once the app is installed, launch and set it up on your device based on your preferences.
- Gboard | Download Link
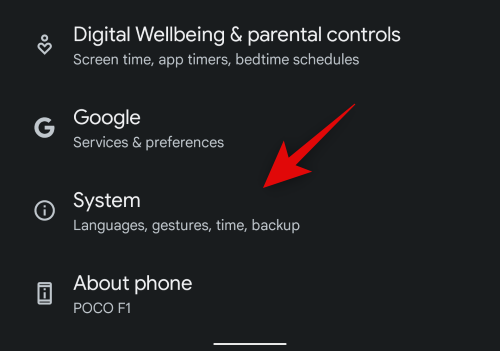
- Open the Settings app once you’re done.
- Tap System.
- Now tap Languages & Input at the top.
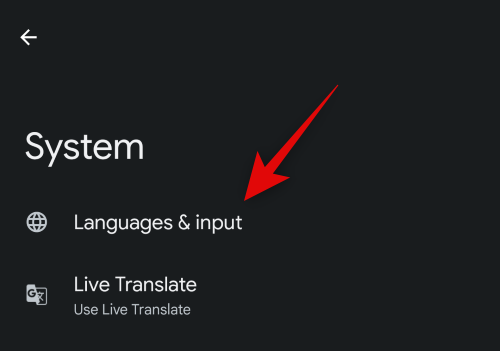
- Tap On-screen Keyboard. Select Gboard from the list of apps on your screen.
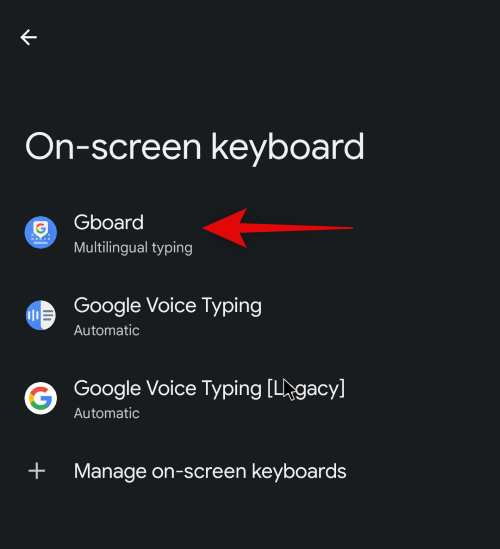
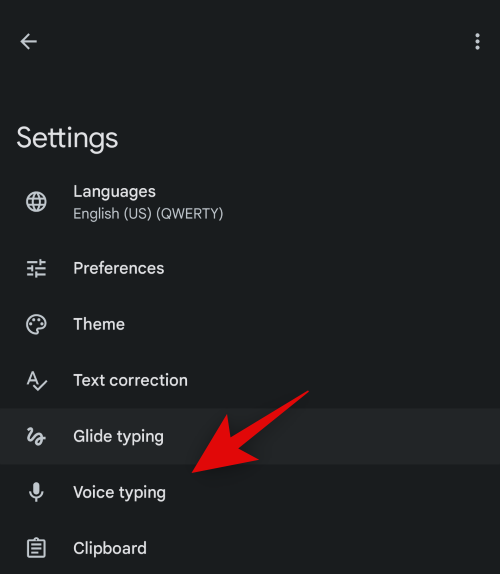
- Tap and select Voice typing.
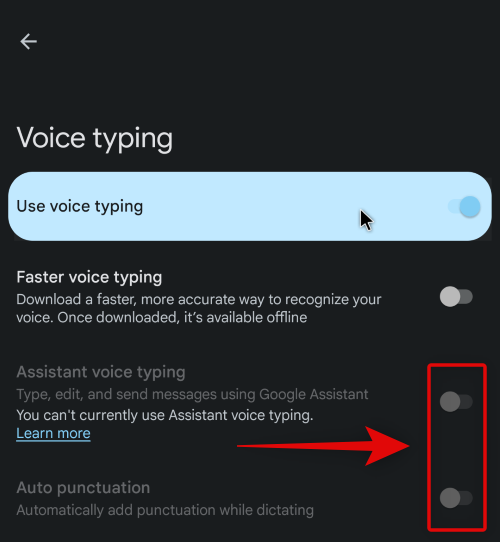
- Turn on the toggle for Use voice typing at the top.
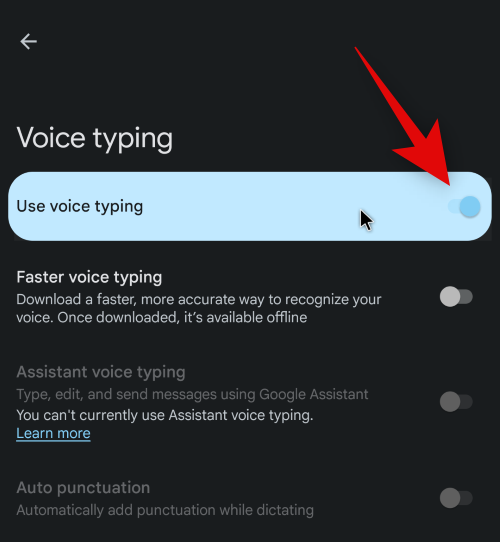
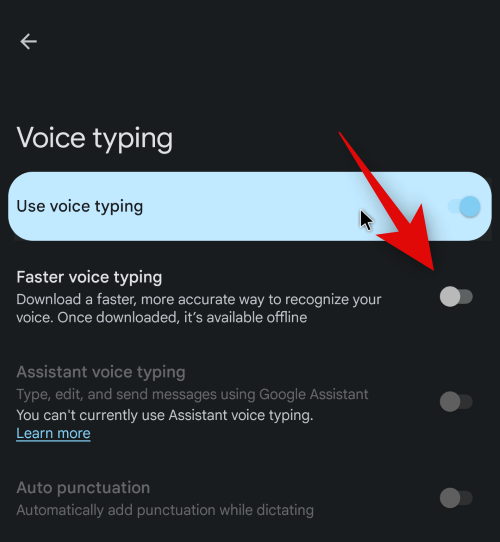
- We recommend you turn on the toggle for Faster voice typing as well, but this is completely optional.
- If you have a Pixel device, we recommend you turn on the toggle for Assistant voice typing as well. This will allow you to use Google Assistant, which is comparatively more accurate and also offers the ability to use Auto punctuation.
And that’s it! You will now have set up dictation on your Android device. Use the next step to use it when creating documents in Google Docs.
Step 2: Use Dictation in Google Docs
Here’s how you can use dictation in Google Docs on your Android device.
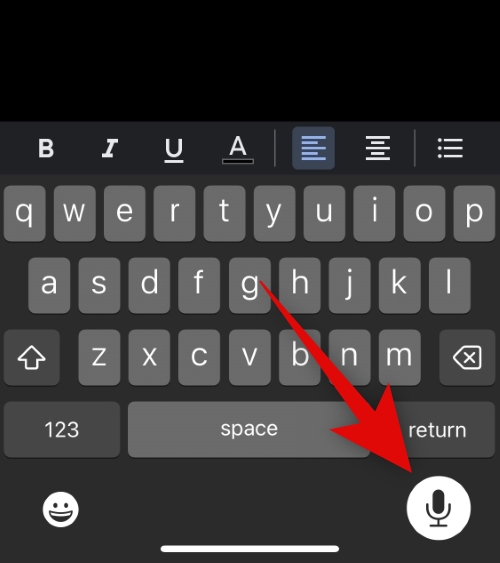
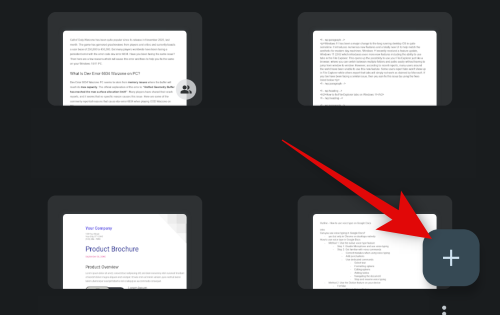
- Open the Google Docs app and navigate to the document where you wish to voice type. Tap the + icon in the bottom right corner if you wish to create a new document.
- Your keyboard will automatically pop up when you edit your document. If you opened an existing document, tap the Edit icon in the bottom right corner of your screen to edit the document.

- Tap and hold the Microphone icon at the top of your keyboard.
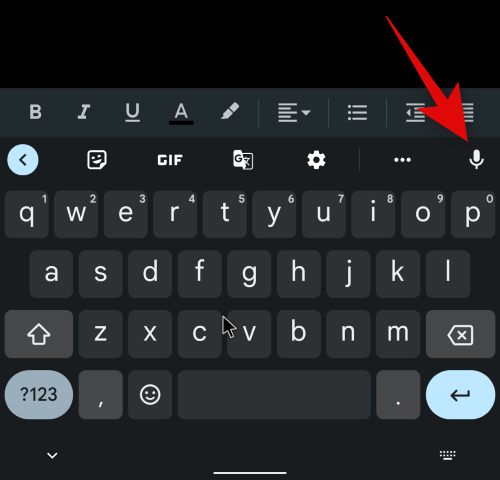
- A microphone icon will show up on your keyboard, which means you can now speak and type with your voice as needed.
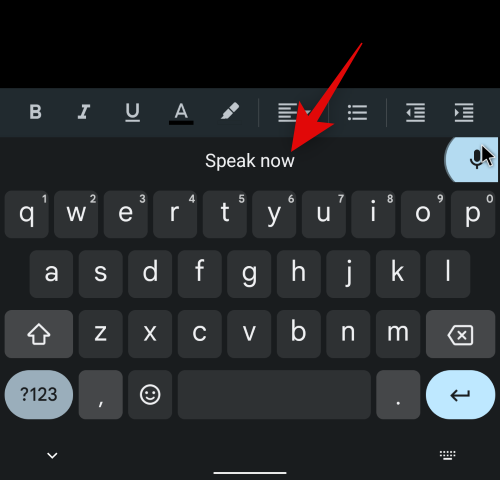
- If you make a mistake, use the backspace icon to delete text as needed. Tap the Microphone icon once you’re done typing the necessary text.
And that’s how you can use dictation in Google Docs on Android devices.
Adding Punctuation when using Dictation on Android devices
If you have a Pixel device, you can use the Auto punctuation feature to punctuate text when using dictation automatically. However, if you have a different Android device, then you can use the following commands to add punctuation when typing using your voice.
- Question mark
- New line
- New paragraph
- Period
- Comma
- Exclamation point
Can you replace incorrect words or phrases with voice commands on Android devices?
Unfortunately, there is no dedicated voice command to correct your mistakes when using an Android device. You can instead double tap to select the word and then speak a new word to replace the selected word or phrase.
Voice commands list
You can now use the sections below to use voice commands when voice typing in Google Docs. These commands will help you control and edit the text you type while streamlining your workflow. Let’s get started.
Navigating the document
Use these commands to navigate the text in your document using voice commands. Navigation commands can be divided into three parts, and you can mix and match these commands to navigate your document easily.
| First Part | Second Part | Third Part |
| Go-to or Move-to | End of or start of | Paragraph
Column Line row Table Document |
| Go-to or Move-to | Next or previous | Character
Column Footnote Formatting change Heading [heading number] Image Line Link List List item Misspelling Paragraph Row Table Word Page |
| Go or Move | Forward or backward | [number of] Characters
[number of] Words |
| Go or Move | Up or down | [number of] lines
[number of] paragraphs |
Correct mistakes when using voice typing
You can correct your immediate mistakes in mainly two ways; you can use voice commands to delete the last words/phrases or choose to manually correct your mistakes using the mouse.
- To delete the last word simply use the Delete last word command.

- To delete a particular phrase or a word, use the Delete [word or phrase] command. Replace [word or phrase] with the word or phrase you wish to delete from the typed text.
Note: If you use just the command Delete, the word before your cursor will be deleted. - To manually correct your mistakes, place the cursor where your mistake is. You can then use Del or Backspace to correct your mistakes as needed.
- Once corrected, you can place your cursor at the initial position and continue voice typing as usual.
And that’s how you can correct your mistakes when using voice typing in Google Docs.
Add punctuations
You can use the following voice commands to add the respective punctuations when voice typing in Google Docs.
- Comma
- Period
- Question mark
- Exclamation Point
- New line
- New paragraph
Although Google Docs supports tons of languages, punctuation voice commands aren’t supported in every language.
Use dedicated commands
You can also use the following dedicated commands to further edit, format, and create your content in Google Docs with voice typing. These voice commands are only available for use in the English language. This means that these commands will only be available if your Google account’s language is set to English and if your current document’s language is English as well.
Select text
You can use the following select commands to select the text in your document when voice typing in Google Docs.
- Select none
- Unselect or Deselect
- Select last [number of] words
- Select last word
- Select next [number of] words
- Select next word
- Select word
- Select last [number of] paragraphs
- Select last paragraph
- Select next [number of] paragraphs
- Select next paragraph
- Select paragraph
- Select last [number of] lines
- Select last line
- Select next [number of] lines
- Select next line
- Select line
- Select last [number of] characters
- Select last character
- Select next [number of] characters
- Select next character
- Select list items at current level
- Select list item
- Select all matching text
- Select all
- Select [word or phrase]
Formatting options
You can also use the following voice commands to format your text using voice typing in Google Docs.
Format your text
The following voice commands can help you format and edit your text using voice typing.
- Apple heading [heading number]
- Apply normal text
- Apply subtitle
- Bold
- Italicize
- Italics
- Underline
- Apply title
- Strikethrough
- Subscript
- Superscript
- Title case
- Lowercase
- Uppercase
Color and highlight text
You can use the following voice commands to change the appearance of your text in Google Docs.
- Text color [name of the color]
- Highlight
- Highlight [name of the color]
- Background color [name of the color]
- Remove highlight
- Remove background color
- Remove text color
Here are a few tips that will help you better use these voice commands in Google Docs.
- You can use exact color names or variations of them depending on the shade of color you wish to use with the commands above. You can use the following color names and then combine them with words like light and dark followed by numbers from one to three to change the shade of color used.
- Red
- Red berry
- Orange
- Yellow
- Cyan
- Blue
- Cornflower blue
- Purple
- Magenta
- Black
- White
- Grey
- However, do keep in mind that the light and dark variations do not work with black and white.
- You also get to use numbers one to four instead of three when applying shades of grey using the commands above.
Change and adjust your text size
You can use the following commands to adjust and change your font size using voice commands in Google Docs.
- Decrease font size
- Increase font size
- Font size [size number from 6 to 400]
- Make bigger
- Make smaller
Format your paragraphs
Use the following commands to format your paragraphs using voice commands.
- Decrease indent
- Increase indent
- Line spacing [Value of spacing from 1 to 100]
- Line spacing double
- Line spacing single
Change text alignment
The commands below will help you change the alignment of the selected text in your document.
- Align center or center align
- Align justified
- Align left or left align
- Align right or right align
Add and edit columns
Use the following voice commands to add and apply columns in Google Docs.
- Apply 1 column
- Apply 2 columns
- Apply 3 columns
- Column options
- Insert column break
Manage and add lists
The commands below will help you add and create lists in your documents.
- Create bulleted list
- Create numbered list
- Insert bullet
- Insert number
Remove formatting
There might be times when you wish to revert the formatting applied to your text. You can use the following commands to do so in Google Docs.
- Clear formatting
- Remove formatting
- Remove bold
- Remove italics
- Remove strikethrough
- Remove underline
Editing options
You can use these voice commands mentioned below to edit your text easily when voice typing.
- Copy
- Cut
- Paste
- Insert link [followed by the URL you wish to link]
- Copy link
- Delete link
- Insert table of contents
- Delete table of contents
- Update table of contents
- Insert comment [followed by the comment you wish to add]
- Insert bookmark
- Insert equation
- Insert footer
- Insert footnote
- Insert header
- Insert horizontal line
- Insert page break
Adding tables
Google Docs also allows you to add and create tables in your documents. You can use these voice commands to do the same when voice typing.
- Insert table
- Insert table [number or rows between 1 and 20] by [number of columns between 1 and 20]
- Insert row
- Insert column
- Insert new column
- Insert new column on the left
- Insert new row
- Insert new row above
- Insert new row below
- Delete column
- Delete row
- Delete table
- Remove column
- Remove row
- Remove table
- Exit table
Additionally, you can also use the Scroll Up and Scroll Down commands to scroll and navigate your document as needed.
Stop and resume voice typing
You can stop and resume voice typing in Docs using the following commands. These commands will help you multi-task easily without having to constantly reach for your mouse again and again.
- Stop listening: This command will help you stop voice typing whenever needed.
- Resume: This command will place the cursor at the end of the current paragraph and resume voice typing.
- Resume [followed by word or phrase]: This command will place the cursor at the end of the spoken word or phrase and resume voice typing.
FAQs
Here are a few commonly asked questions about using voice typing in Google Docs that should help you get up to date with the latest information. Let’s get started.
Which languages are supported for Voice commands in Google Docs natively?
Unfortunately, dedicated voice commands in Google Docs can currently be only used in English. Additionally, these commands can’t be used in Slides, and both your account and document language should be set to English to use them.
Which languages and accents are supported by voice typing?
Google Docs supports the most commonly used languages that you might have used to interact with Google Products. This includes all variations of English, Chinese, Spanish, Portuguese, Italian, and more. You can find a full list of supported languages for voice typing in Google Docs at this link.
We hope this post helped you easily voice type in Google Docs. If you face any issues or have any more questions, feel free to reach out using the comments below.