iOS 14 has brought along the much-needed support for customizable widgets to your home screen. The new version allows you to change sizes and rearrange widget placement at your will which allows you to create unique home screen setups. While widgets are a great way to get all your information at a glance, you don’t necessarily need them every time on your screen. They can end up taking huge amounts of real estate on your screen which could otherwise be used for other important information. Wouldn’t it be great if you could schedule your widgets in iOS 14?
Can you schedule widgets by default on iOS?
No, iOS 14 does not allow you to schedule widgets right out of the box. For now, you can only customize the size and placement of a widget by default. If you wish to replace a widget or add a new one, then you will need to edit your home screen as you would normally.
The lack of the schedule feature can thankfully be bypassed using Widgetsmith, a third-party iOS app with support for scheduling and different widget looks. Widgtsmith also manages to offer you different looks for each widget which you can then use to your advantage to create a unique home screen setup. Let’s see how you can schedule a widget on iOS 14.
Related: iOS 14 Home Screen Ideas: Best Setups and How To Edit Your Home Screen
How to schedule Widgets with Widgetsmith?
Scheduling a widget in Widgetsmith is a pretty easy process though it might look intimidating at first. Let’s see how you can schedule a widget.
Things you will need
- An iOS 14 device
- Widgetsmith app | Download Link
- A widget on your home screen which can be replaced by the scheduled widget when the time comes
Procedure
Once Widgetsmith is installed on your iOS device, tap and launch the app.
We will first need to create a widget with a schedule before it can be added to the home screen. You will have sample widgets by default for each category on the main page, small, medium, and large. Select the Widget size you wish to use and tap on ‘Add X Widget’ at the bottom where X is the size of the widget chosen by you.

A default will widget will now be added to the size list. Tap on it to customize it.

Tap on ‘Add a Timed Widget’ at the bottom.

You will now be shown a clock from 12 am to 12 pm. Here you can adjust the schedule of your widget. Simply tap and drag on the time period and your schedule will be set to the desired time.

If you wish to increase the duration of your schedule then you can drag one end of the highlighted clock if you need to increase its visibility duration.

Once you are done, tap on ‘Tap to rename’ at the top.

Now enter your desired name for the widget you just created.

Tap on ‘Save’ on your right to save the changes.

Now head back to your home screen and the widget should replace your regular same sized widget at the scheduled time.

Note: For scheduled widgets to work, you will need to have the same sized widget on your screen. For example, I have scheduled to view my calendar during the day in medium size. I also have a medium-sized clock on my home screen. This clock will be automatically replaced at the calendar’s scheduled time as shown below.
Related: How to Change Featured Photo on iOS 14
Can you create multiple timed widgets?
Yes, you can create as many timed/scheduled widgets using Widgetsmith as you like. There is no restriction and the only restriction that you will face is regarding the replacement of widgets on schedule. Scheduled widgets show up similarly to stacks and replace the same sized widget on your home screen in the same schedule.
As long as your scheduled widget is not conflicting with a scheduled widget of the same size, you are good to go. You can also use this to your advantage and have two instances of the same widget appear in different sizes on your screen at their predetermined schedules.
Related: How to Get Spotify Widget on iOS 14
How to schedule a widget to appear multiple times a day?
You don’t need to set a single time for the visibility of your scheduled widget. You can use this to your advantage and have the same widget that you need to appear automatically on your screen at the desired time of day multiple times.
This can be handy for students or teachers that can schedule their calendar according to class timings and have them appear on the screen whenever a class is about to start. Let’s take a look at how you can schedule a widget to appear on the screen multiple times in a day.
Procedure
Launch Widgetsmith and tap on ‘Add X Widget’ where X is the size of the timed widget you wish to create.

Now tap on the widget created by Widgetsmith.

Tap on ‘Add a Timed Widget’.

Now set your first schedule as you normally would.

Once you are done, tap on the ‘+’ icon.

Another duration window will be added to the clock. Set your desired schedule for the second time.

Tap on ‘+’ again and repeat the process for all the instances when you want your widget to appear on the screen.

Now tap and select ‘Tap to Rename’ right at the top.

Enter the desired name for your widget, and tap on ‘Save’ to the right once you are done.

And that’s it, your widget should now be scheduled for use multiple times a day.
How to edit my widget’s look?
Open Widgetsmith and simply tap on the Widget that you wish to edit.

Now tap on the preview in the middle of your screen.

Note: If you are trying to edit a timed widget, then tap on the widget preview inside the schedule clock.
You can now select the look, font color, background color, and much more for your widget. Make the desired selections, and once you are done, tap on the back icon in the top left corner.

Tap on ‘Save’ in the top right corner.

And that’s it, the look for your widget should now be changed.
My widgets are greyed out; What should I do?
This is a common occurrence in first use scenarios where iOS 14 fails to update the custom widget with the latest information. If you are facing this issue then here are a couple of things that you can try.
Note: The best-known fix that works is to restart your device. This will restart all the services that are required to update the widget on your home screen. However, if you do not wish to restart your device, then you can try one of the temporary fixes below.
Remove and re-select the widget.
This method involves removing the widget space from your home screen altogether and then re-adding it to your home screen. This is known to fix the issue in many cases.
Procedure
Tap and hold/Force touch on the widget and select ‘Remove Widget’.

Tap on ‘Remove’ again.

Now tap and hold/ force touch on your home screen to enter the editing mode and tap on the ‘+’ in the top right corner of the screen.

Now tap on ‘Widgetsmith’.

Select the size you wish to add to your home screen and tap on ‘Add Widget’.

The widget should now be updated with the latest information on your home screen.
Select the widget
If you have multiple widgets setup for the same size, then chances are that you have not selected the correct widget on your home screen. Follow the guide below which will help you select the widget on your home screen.
Procedure
Tap and hold/ Force touch on the greyed-out widget and tap on ‘Edit Widget’
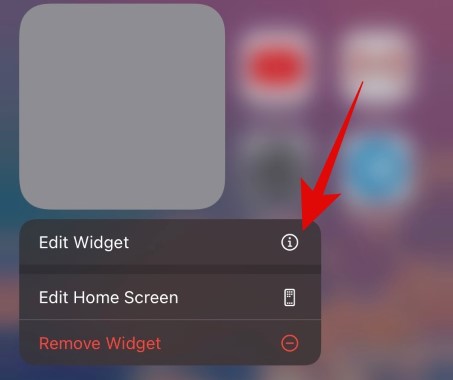
Here you will get the ability to choose between the different widgets that have been created by you. Tap on ‘Choose’ to get started.

Note: If a widget has already been chosen by default and yet is unable to update itself with the latest information, then its custom name will be available instead of ‘Choose’.
You will now be shown a list of all the available custom widgets for the particular size that have been created by you. Tap and select the widget you wish to view on your home screen.

You should now be taken to the home screen automatically where you will be able to view the new widget in its predetermined location.

We hope this guide helped you learn everything you needed to know about scheduling widgets on iOS 14. If you have any more questions for us, feel free to reach out to us using the comments section below.
RELATED:







I hoped to use this to represent the Bell schedule while my kid is doing virtual school, but as far as I can tell, you can only tell it to change on the hour, so it isn’t really as helpful as I imagined. The teacher example given isn’t really doable either. I am going to try some calendar apps to see if their widgets work better for that.