What to know
- To play upscaled PS2 games on Windows 11 using PCSX2, you need to download PS2 BIOS first and then download and install PCSX2.
- Next, set up your controller and configure the PCSX2 settings for emulation and graphics.
- Next, add your PS2 game ISO file and go on to adjust PCSX2 settings to see changes in real time.
- Find the detailed step-by-step guides with screenshots below.
Most games turn junk quickly. But there’s also a decent number of them that remain timeless no matter what! Fortunately, the titles of old don’t have to be locked away in your memories. If you have the ISO files of PS titles, you can play them right now on your Windows 11 PC.
Although there is a wide variety of PlayStation games (for every generation), the following will guide you through setting up and playing PS2 titles at the best settings on your Windows 11 PC using the PCSX2 emulator. Let’s begin.
How to play upscaled PS2 games using PCSX2
Die-hard gamers know that graphics are not the be-all and end-all. But even they, when offered the chance, would prefer playing games upscaled and at high settings. The only thing that can make an old game better, besides being able to play on a whim, is better graphics. It’s also a great way to introduce (and re-introduce) your friends to games of yore that they otherwise would not have paid attention to.
Here’s everything you need to do to start playing your PS2 titles on Windows 11.
Step 1: Download PS2 BIOS
Before anything else, you will have to get the PS2 BIOS to boot games. You can get your hands on it with a simple Google search. Or click on the link given below to get to the download page.
PS2 BIOS | Download Link
Scroll down on the page and click on Download.

Then, under ‘PS2 Bios for Windows 11’, click on Download 64-bit.

Once downloaded, right-click on the file and select Extract all.

Select Extract.

Within the extracted folder, you’ll find a few files.

Keep this folder handy as we’ll need it in the next step.
Step 2: Download and install PCSX2
Next, click the link below to access the PCSX2 download page.
- PCSX 2 | Download link
On the download page, you can choose between the Latest Stable build, which comes infrequently but is thoroughly tested, and the Nightly release, which provides the latest features but can sometimes be buggy.
For our guide, we’re using the stable build. Click on Latest Stable.

And select 32-bit installer.

Before installing PCSX2, make sure that all downloaded files and folders are in a location where you’d like to store them permanently, such as the D: drive.
Next, double-click on the PCSX2 installer file to start the setup.

Select Normal installation and click on Next.

Click Next.

Select Install.

Finally, run PCSX2.

This will open PCSX2’s first time configuration window. Click Next.

Select the GS drop-down menu.

And select the last option (ending with – SSE4), which is ideal for current-gen chips.

Leave everything else as it is, and click Next.

Here, we’ll have to add the BIOS files from the folder extracted earlier. Click on Open in Explorer.

This will open the folder where the BIOS files need to be pasted. Navigate to the extracted folder and copy the .BIN files here. You can simply copy all files here.

And then paste it inside PCSX2 bios folder (within the Documents folder).

Return to PCSX2 and click on Refresh list.

You’ll see a few different BIOS files here. Select one.

Click on Finish.

PCSX2 will now load up. You need to set up and configure a few things before you can start gaming.
Step 3: Set up your controller
Although you can play PS2 games using the keyboard, you would ideally want to go with a Dualshock controller or an Xbox controller. Connect your controller to your PC.
Option 1: DualShock wired and Xbox controllers
Xbox controllers are the easiest to set up on Windows 11. You can either connect them via Bluetooth or using the USB wire and they’ll be recognized instantly.
DualShock controllers, too, are easily recognized if you’re connecting them using the USB cable.
To check if your connected controllers are working, press Start, type game controllers and select ‘Set up USB game controllers’.

Select a controller and select Properties.

Press a button or move the analog. If you see the input registered, your controller is good to go.

Option 2: DualShock wireless
If you mean to connect your DualShock controller wirelessly, you will need a separate utility such as DS4 Windows.
- DS4Windows | Download Link
Follow the link above and click on Download.

You will get a ZIP file. Once downloaded, go to its location, select it, and click on Extract All.

Click on Extract.

Open the extracted DS4Windows folder.

Run the DS4Windows.exe file.

For the first time, you’ll be asked to choose where you want your profiles and settings to be saved. Pick Appdata.

You will also see a driver installation window. Click on Step 1: Install Driver.

If you don’t see this window, click on the Settings tab on the DS4Windows window.

Then select Controller/Driver Setup.

You should get the same driver installation window. As before, select Step 1 and follow the on-screen instructions to install the drivers.

Once complete, close this window and connect your PS4 controller via USB or Bluetooth. As soon as it is recognized, you will see it appear in the DS4Windows window.

And that’s it! Minimize DS4Windows.
Now open the Game Controller setup window again. DS4Windows will make Windows think that your DualShock controller (wirelessly connected) is an Xbox controller, which is why you might see your controller recognized as the XBOX 360 for Windows.

Click on Properties to test it.

Press any button. If you see any movement of values, your DualShock controller is in play.

Once your controller is working, regardless of how it is connected, return to the PCSX2 window. Then click on Config in the menu bar.

Hover over Controllers and click on Plugins.

Under the ‘General’ tab, double-click on your controller.

Check if the controller is working by pressing the buttons.

If you want to change the controls, select the Pad 1 tab.

It should automatically have recognized and mapped the input buttons for the controller. But if you start playing a game and need to change controls and set them up yourself, you can always come back here, and click on Quick Setup.

Then click on each button here and then press the corresponding button on the controller. So, for example, click on L1.

And then press the Top Left shoulder button on the controller. You should get a Successful message when a button is mapped.
Go about the whole set of options and then click on OK to confirm.

Step 4: Configure PCSX2 settings
There are a couple of settings that you need to configure to upscale your game and improve its graphics.
4.1 – Emulation Settings
Click on Config.

Select Emulation settings.

Here you’ll find a variety of emulation settings that are greyed out, because they’re all set to a ‘Safe’ preset, mentioned at the bottom, which makes it simpler to set it all up. The default ‘Safe’ preset will work well on most machines.

But if you have an underpowered CPU, or a game with unusual requirements, you can choose a higher preset to apply more aggressive hacks to play and upscale games, though they are often crash-prone.

For most games compatible with PCSX2, the ‘Safe’ preset is the safest bet.
Click on GS Window on the left. Then check Default to fullscreen mode on open on the right to make sure all games open in fullscreen automatically.

You can also double-click inside the game window at any time to switch between full-screen and window mode.
You can also play games widescreen without experiencing any tears. To do so, make sure the Aspect Ratio is set to Widescreen (16:9) from the drop-down menu.

Finally, click on OK.

4.2 – Video/Graphics
Next, click on Config.
Hover over Video.

And select Plugin options.

As you’d imagine, you’ll be returning to this settings page often to tinker with the options and get the best out of the game in terms of its look and feel. Let’s start with the different options.
For most machines, the default Renderer OpenGL (Hardware) will work just fine.

However, it’s good to note that certain games may have emulation glitches that can get worse with hardware rendering. If this happens to be the case, or if your machine is slightly underpowered or old, select ‘Direct3D 11′ from the drop-down menu.

In most cases, it is recommended that you begin with OpenGL, and if you encounter any problems, choose software rendering. Then switch up to hardware rendering to check if there are any issues with the game.
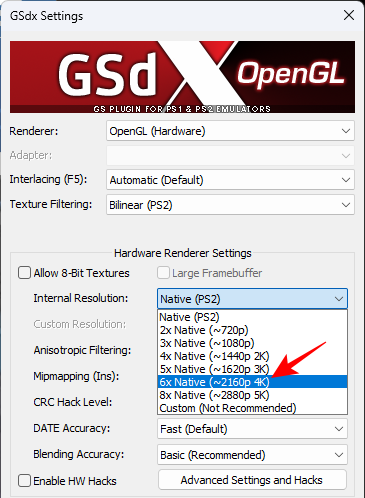
Next, adjust the ‘Internal Resolution’ which, by default is set to Native (PS2). This is a definite no-no if you’re looking to scale up and play at ultra-high resolutions like 4K.

Click on the drop-down menu to choose a higher resolution.
As before, you can return to these settings and tweak them as you feel right. The changes can be made while the game is running as well, so you can get the feedback in real-time.
Next, click on the drop-down for Anisotropic filtering.

Select a level other than Off.

Do the same for Mipmapping.

Go with Basic (Fast) if you had selected OpenGL renderer earlier.

If you chose Direct3D 11 earlier, choose ‘Full (Slow)’.
Do the same for the CRC Hack Level option as well – Partial (OpenGL) or Full (Direct3D).

Then set ‘Blending Accuracy’ to Medium.

Keep everything else as it is, and click on OK.

Step 5: Add your PS2 game ISO file
Now, for the final thing, click on CDVD at the top.

Hover over ISO Selector and choose Browse.

Navigate to your game ISO file, select it, and click Open.

Note: You can get the ISO files for most PS2 games quite easily on the web. A quick Google search should yield a number of results for the title that you want to play.
Then, click on System.

And select Boot ISO (Fast).

Your game will now begin.
Step 6: Adjust PCSX2 settings to see changes in real-time
At any point during the game, if you encounter any issues with the game, return to the Video configuration option and change the settings one by one. Alternatively, if you feel you can eke out better graphics, up the anisotropic filtering and internal resolution to see the difference.
Here’s what Max Payne 2 looks like when played on default video settings.

And when played after upscaling and anisotropic filtering.

Often, even slightly better graphics and smoother gameplay can make or break the gaming experience, especially when you’re returning to games you remember playing in the past.
FAQ
Let’s take a look at a few commonly asked questions about playing PS2 games on Windows 11.
How much VRAM is needed for PCSX2?
4GB of VRAM is quite sufficient to run PCSX2, though it also depends on the graphics card itself as well as your CPU. Depending on the game and your graphical settings, you can even get by with 2GB of VRAM.
Where can I get PS2 games online?
There are a number of sites where you can download the ISO files of PS2 games for free. A simple Google search should get you the results.
Is PCSX2 more CPU or GPU-intensive?
PCSX2 tends to be more CPU intensive for the most part. However, to operate at higher resolutions and advanced anisotropic filtering, it can get GPU intensive too.
How to upscale a PS2 game in PCSX2?
Upscaling a PS2 game will require you to increase the resolution and turn up the video settings in PCSX2.
Even after all these years, PS2 remains one of the best console generations for gaming, not least because of its fantastic titles. Now, thanks to PCSX2 you can play your favorite PS2 games on Windows 11 at higher resolutions and the best graphics that the game can provide. We hope this guide helped you get back into your gaming element once again. Until next time!


One response to “How to Play PS2 Games Upscaled Using PCSX2 on Windows 11”
Jshdjj