Google’s free-for-all — granted you have a Google account — text editor, Google Docs, is one of the most widely used tools out there. Not only it is a free application, but it also gives you a plethora of nifty goodies to play around with. With most of the world working from home, Google Docs has garnered more fanfare than ever and is likely to maintain its trajectory for the foreseeable future.
If you’re one of the millions of users who use Google Docs to jot down pretty much everything, you are likely to find yourself in a messy situation. With so many files flying about, keeping track of all the important files becomes pretty difficult. Thankfully almighty Google already has a contingency plan in place.
Today, we’ll take a look at one of the simplest ways of organizing your Google Docs account — tell you how to create and use folders in Google Docs.
Related: How to Flip Images in Google Docs on Mobile and PC
Why do you need a Google Docs folder?
A folder, in general, is where you store similar types of files, primarily to make it easier for your future self to find the important stuff. Your Google Docs account can become a home to half-written articles and grocery lists if you are not careful.
If precautions aren’t taken, it could take you forever to find the files you require in times of need. Adding folders and putting your important files in the right folders can make life a lot more straightforward, as you won’t need to look through hundreds of documents to find the one.
Google automatically adds your Google Docs files to your Google Drive. So, if you have the option of accessing your Google Docs files through Drive as well.
Related: How to do Reverse Image Search on Facebook
How to create a folder in Google Docs
Now that you know how important folders are, let’s check out how you could create one while working on a document in Google Docs.
Web client
Considering you’re already logged into Google Docs and are working on a document, look for the little folder icon — ’Move’ — at the top of your screen.
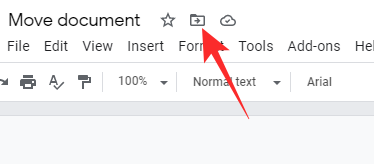
You’ll find the icon tucked in between the favorite icon and document status button. Click on it and hit the new folder button at the bottom-left corner of the window.

On the next page, give the folder an appropriate name and hit the ‘ok’ button right next to the text field.

Your folder would be created and stored in your Google Drive account. After the folder’s created, click on ‘Move here’ to move the file you’re working on to that folder.

Mobile
The Google Docs mobile app is also fully capable of creating a folder and moving your files to it. After you launch the app and open the file you’re working on, hit the vertical ellipsis button at the top-right corner.

Now, go to ‘Move.’

Then, tap on the new folder icon at the top-right corner.

Assign a name for the folder and tap on ‘Create.’

After the folder is created, tap on ‘Move’ at the bottom-right corner to move your current file to the folder.

How to Create a folder in Google Drive
Creating a folder is pretty straightforward in Google Drive and requires no technical expertise. When you create a folder in Google Drive, you automatically make it available for use in Google Docs as well. That way, you won’t need to create a folder from scratch whenever you wish to move your documents — it’ll already be ready to use.
Web client
First, go to Drive.Google.com. Acknowledging you’re already logged in, you’ll be taken to your Google Drive dashboard. On the left-hand-side panel, you’ll find the ‘New’ icon.

Click on it and it’ll open up a list. At the top, you’ll find the ‘Folder’ option.

Click on it. Name your folder and click on ‘Create.’

Now, go back to Docs.Google.com and open a file you want to move. Hit the move button at the top of the screen and select the folder you recently created. Click on ‘Move here’ to transfer the file to the folder.

Alternatively, you could also manually select some documents from your Drive and move them to the newly created folder.
Mobile
Launch the Google Drive app on your smartphone. Once logged in, tap on the ‘+’ icon at the bottom-right corner.

Then, tap on ‘Folder’ under the ‘Create new’ banner.

Pick a name for the folder and hit ‘Create.’

The folder you just created would now be available when you try to move a docs file.
How to fetch a file from a folder in Google Docs
As we’ve seen, creating a folder is not too difficult a job in Google Docs. Now, let’s check out how you could fetch the files from a folder you created.
Web client
Fire up your browser and go to Docs.Google.com and log in with your Google credentials. At the top of the screen, you’ll find a few Google Docs templates. Below the templates, on the right, you’ll find a folder icon.

Click on it to go to your Google Drive directory. Here, you’ll find all the folders inside your Google Drive account. Click on the folder you want to go to. If the folder contains a Google Docs file, it’ll show up at the top. Single-click to select the file and then hit ‘Open’ to run the file in the editor.

Mobile
If you’re logged into your Google account on your mobile, launching the app would take you to the Google Docs dashboard. At the top, you’ll find the search bar. On the right of the bar — left of your Google account thumbnail — you’ll get the folder button. Tap on it.

Instead of taking you to your Drive directory, it’ll give you the option to either open Google Drive or your device storage. Since we’re looking to access the folders you created, tap on ‘Google Drive.’

Now, tap on the folder you want to explore. When you locate the file, tap on it to select and then hit ‘Open’ to take the file to the Docs editor.

How to move a file to a folder in Google Docs
We have touched on the topic briefly before. Here, we’ll cover the same, extensively.
Web client
Go to Docs.Google.com, login, and open the document you want to move. Locate the ‘Move’ icon at the top of the screen.
Click on it and it’ll show you the folders you have available. Be aware that Google Docs doesn’t have separate storage and uses your Google Drive account to store files. So, the folders you have created in Google Drive would show up when you hit the ‘Move’ button. Select the folder you want to move the file to and, finally, click on ‘Move here.’
The file would be moved immediately. If you want to relocate the file, click on ‘Move’ again and follow the same steps.
Mobile
Launch the Google Docs mobile app and open the file you want to move. Hit the vertical ellipsis icon at the top-right corner of your screen.
When the list expands, tap on ‘Move.’
Doing so will give you access to the folders in your Drive. Tap on the folder you want to move the file to and hit ‘Move’ to finalize.
Follow the same steps to move the file to a different folder.
How to move a file out of a folder in Google Docs
Don’t feel the need to organize some of the files? You can safely move a document out of a folder with a couple of clicks and taps.
Web Client
Head over to Docs.Google.com and log in. Open the file you want to move out of a folder. Now, click on the ‘Move’ button at the top left of your screen.
It will show you the current location of the file. To move it out of the folder, simply hit the back button, on the left of the name of the folder.

It’ll take the file out of the folder and put it back in ‘My Drive.’ Tap on ‘Move here’ to confirm.

Mobile
Launch the Google Docs mobile app and open the file you want to relocate. Tap on the vertical ellipsis at the top-right corner of the Docs window.
Now, tap on ‘Move.’
It’ll open the folder it currently belongs to. Tap on the back button at the top and let it take you to the main drive directory.

After you reach ‘My Drive,’ tap on ‘Move’ to push the file out of its previous folder.

Irrespective of whether you created the folder in Google Docs or Drive itself, you cannot share it directly from Docs. You’ll have to use Google Drive to do so.
Web client
Go to Drive.Google.com and log in. Click on the folder you want to share with others. At the top, where the name of the folder is shown, you’ll see a down arrow. Click on it to expand the menu. Alternatively, you could also right-click on the folder — from the Google Drive dashboard itself — to access the menu.
Now, click on ‘Share.’

You could either share the folder with specific people or generate a link by clicking on ‘Change to anyone with the link.’

Next, you can either make them an editor or just a viewer. Click on ‘Done’ after finalizing.

Mobile
Launch Google Drive on your mobile. Now, go to the folder you want to share. Then, tap on the vertical ellipsis at the top-right corner to expand the menu. Tap on ‘Share.’

Tap on the link icon under the ‘Who has access’ banner. Tap on ‘Not shared.’

Now, go to ‘Link settings’ and tap on ‘Restricted’ to share the file with anyone who has the link.

You could also change the access level of the people who get the link. Share the link with your peers to collaborate easily.

Remember that any file you add to the folder would automatically be shared with the ones who have access.
RELATED
- How to Alphabetize in Microsoft Word: Everything You Need To Know
- How to Alphabetize in Google Docs on PC and Mobile App in 2021
- Using Google Docs Word Count on PC and Phone: Everything You Need To Know
- How To Draw on Google Docs: Step-by-step Guide
- Google Docs: How To Subscript and Superscript Both at the Same Time
- How To Use Comments and Actions in Google Docs