
In addition to letting you edit text tables, and graphs inside a document, Google Docs can add and edit images. If part of the editing process involves, flipping an image inside Google Docs, the following post will explain all the ways you can mirror an image inside a document both vertically and horizontally across multiple devices.
How to flip an image on Google Docs [2 methods]
There are several ways you can flip images inside Google Docs.
Method 1: Using Google Docs on the web
If you’re using Google Docs on the web on your Mac or Windows computer, you can flip an image you added to the Docs file directly from the editor screen.
- Open a document inside Google Docs where you want to flip an image.
- If the image you want to flip is already present inside the document, you will need to cut or copy it onto your clipboard. Now, click on the image you want to flip, right-click on it, and select Cut or Copy. If you’re creating a copy of the image, then you may have to delete the original image after its copy has been flipped. Alternatively, you can cut or copy the image using its relevant keyboard shortcuts: Ctrl (Command) + C (to copy) or Ctrl (Command) + V (to cut).

- Once the image is cut or copied, place the cursor on an empty part of your document.

- Now, go to Insert > Drawing from the toolbar at the top of the Google Docs window and select New.

- This will show a new Drawing popup window on your screen. Inside this window, right-click on the empty portion and click on Paste. Alternatively, you can also paste the image using the Ctrl (Command) + P keyboard shortcut.

- The image that you copied earlier will now be pasted inside the Drawing tool. This image will be laid out like the original image.

- If there already wasn’t an image inside the file, you can add one from your computer by clicking the Image icon from the top of the Drawing tool and then selecting the image you want to insert.

- To flip this image, click on the Actions menu option inside the Drawing window and select Rotate. Now, depending on how you want the image to be laid out, choose either Flip horizontally or Flip Vertically.

- Your image will now be flipped the way you chose to. After successful flipping, you can add this image to your document by clicking on Save and Close at the top right of the Drawing tool window.

The above method is the only way you can flip your images horizontally inside Google Docs. All the other ways listed here will only let you flip an image vertically or rotate it.
Method 2: Using the Snapseed app on Android/iOS
If you generally create and edit documents with the Google Docs app on your phone, then we hate to break it to you; the Google Docs app on your phone doesn’t let you flip an image from within the app. This is because there’s no such tool available in the Google Docs app on Android or iOS. Don’t fret, though, as Google offers its own Snapseed app to flip images locally on your phone which you can then add to your document on Docs.
- Before you can flip an image, download the Snapseed app on your Android or iPhone.
- Once installed, open the Snapseed app on your phone and tap on the + icon on the app’s main screen.

- If this is the first time you’re using Snapseed, you will be asked to give storage permissions for your phone to the app. Tap on Allow when prompted.
- Once that’s done, tap on the + icon again and select the image from your phone’s storage.

- When the image loads up, tap on the Tools tab at the bottom.

- From here, select Rotate.

- On the next screen, tap on the Flip icon (denoted by two inward-facing arrowheads).

- When you tap on the flip icon, you should see the selected image flipped horizontally. If you want the image to be flipped vertically instead, tap on the Rotate icon twice.

- If you’re satisfied with the flip results, tap on the tick mark at the bottom right corner.

- You can now save the image on your phone by selecting Export at the bottom.

- When a popup menu appears, select Save to save it on your phone.

- Now that you have flipped the image using Snapseed, you can add the flipped image to your document inside Google Docs. Open the Google Docs app on your phone and select the file you want to add the flipped image to.
- When the document is open, tap on the + icon at the top.

- Here, select Image.

- Next, select From photos.

- Now, select the flipped image from your phone’s gallery. The image will now be added to the document inside the Google Docs app on your phone.

Alternatives to flipping images on Google Docs [2 methods]
There are also other ways you can use to flip an image inside Google Docs. Both these methods can be executed within the Google Docs web app and don’t require any third-party app or service.
Note: The two ways explained below are for flipping an image vertically. You cannot use the steps below to mirror your images horizontally which is to flip the image left to right.
Method 1: Using Image Options
- To flip an image vertically from a document inside Google Docs, click on the image and then click on the 3-dots icon that appears adjacent to the image. Now, select Size & rotation from the menu.

- You should see the Image options sidebar on the right. Here, click the Rotate by 90 degrees icon twice under “Rotate”.
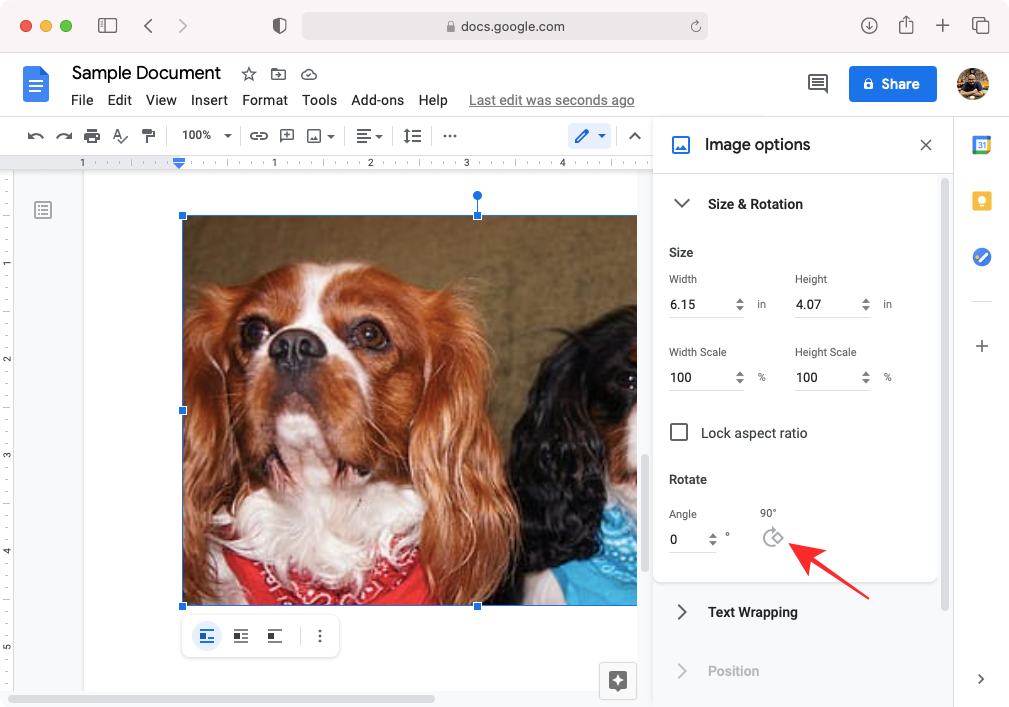
- This should flip the image vertically within the document.

Method 2: Using Rotation control
You can also flip an image manually inside Google Docs using the Rotation control option.
- Select the image you want to flip inside Google Docs by clicking on it.
- When you select an image, you should see 8 blue square dots on its corners and edges and one circular blue dot at the top.
- To rotate the image manually, click and drag the circular blue dot towards the left or right to change its angle.

- You can flip the image by manually rotating the image.

How to flip images back to the original layout
Yes. You can flip an image back to its original layout on Google Docs. While you can always flip the image back to its previous layout by manually flipping it using any of the methods above, the more accurate way to do it is by resetting the image to an older version.
- Click on the image you want to flip back to the original layout and then select Edit under the selected image.

This should load up the Drawing tool you used from the first method. - Inside the Drawing tool, click on the image and then go to Actions > See version history.

- You should now see all the versions of the image you edited. Here, select an older version from the right-hand side of the Drawing tool.
- If you want to revert the image to the selected version, click on the 3-dots icon adjacent to the version time and date and then select Restore this version.

- You will be asked to confirm the process which you can do by clicking Restore on the dialog box that appears.
- When the original image is restored, click on Save and Close at the top right corner to apply the changes.

FAQs
Can someone you share the file with flip an image?
Yes, but it depends on whether or not you’ve given them ‘Editor’ privileges. That’s because only those users you gave editing access to your shared file can flip an image or do other editions to your document on Google Docs.
While there’s no particular way to allow someone else to edit your images, you can make someone you trust the ‘Editor’ of the shared file and they will have access to flipping an image or make other changes to the selected document on Google Docs.
Can you prevent someone from flipping your image back to the original?
If you don’t wish that others you shared a file with flip the image inside the document, then you can prevent them from making changes to the image by stripping them of their ‘Editor’ privileges. You have to keep in mind that doing so will also prevent the particular user from making any other changes to the document on Google Docs.
- To stop someone from editing your file without taking its viewing rights away from them, open the share settings of the shared file by clicking on Share at the top right corner.
- Next, click on the Editor dropdown menu and select Viewer or Commenter to make sure the person cannot make any changes to your document.

That’s all you need to know about flipping images on Google Docs.
RELATED
- How to Alphabetize in Microsoft Word: Everything You Need To Know
- How to Alphabetize in Google Docs on PC and Mobile App
- Using Google Docs Word Count on PC and Phone: Everything You Need To Know
- How To Draw on Google Docs: Step-by-step Guide
- Google Docs: How To Subscript and Superscript Both at the Same Time
- How To Use Comments and Actions in Google Docs