For a long time, Android lacked the ability to show passwords of saved WiFi networks on phones. This meant that if you ever forgot the credentials to log into your WiFi when setting up a new device, you’d be forced to reset your modem or consult your network provider to reconfigure the network.
This changed recently when Google released Android 10 and brought a much-anticipated feature that was missing on the mobile OS – viewing WiFi passwords. However, prior to Android 10, there were still some neat tricks to view saved WiFi passwords, some of which required root access for the device that you’re using.
How to view WiFi password on Android 10
On Android 10, it’s easier than ever to view and share the credentials of your WiFi network. You can generate a QR code to allow users to scan and gain access to your WiFi without needing to download a third-party app. The inbuilt setting also shows your password for easily entering it on a phone on which you cannot scan the code.
Step 1: Open Settings.
Step 2: Select Network and Internet.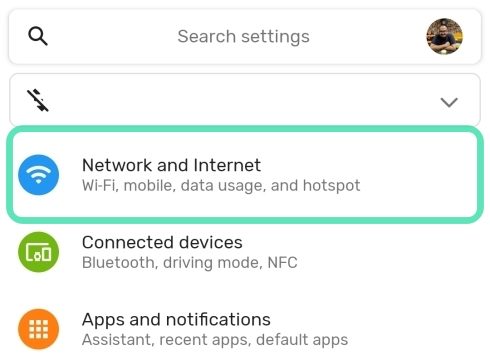
Step 3: Tap on the WiFi section.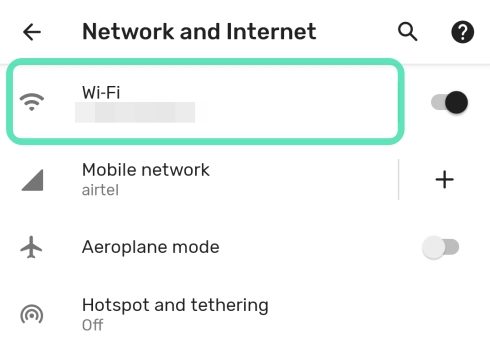
Step 4: Hit the cogwheel icon adjacent to the WiFi network you’re connected to.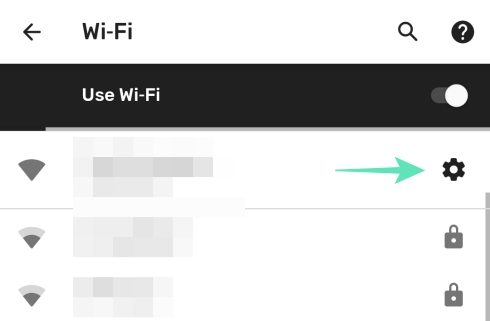
Step 5: Tap on the Share button with a tiny QR code logo.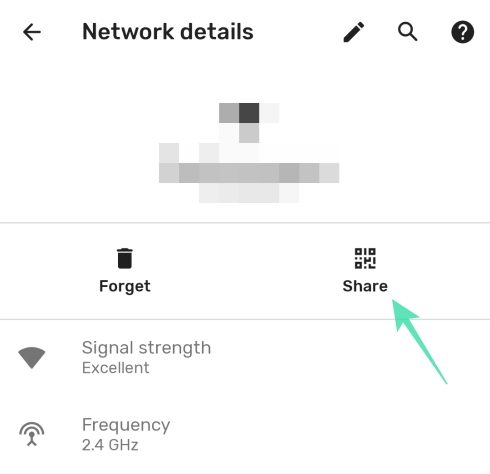
Step 6: Enter your PIN, pattern, password or fingerprint.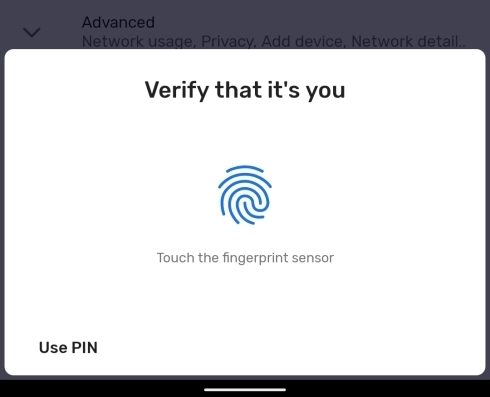
The next window will show you a QR code specific to the WiFi network you selected. Scanning this code through another smartphone will connect that device to the network. 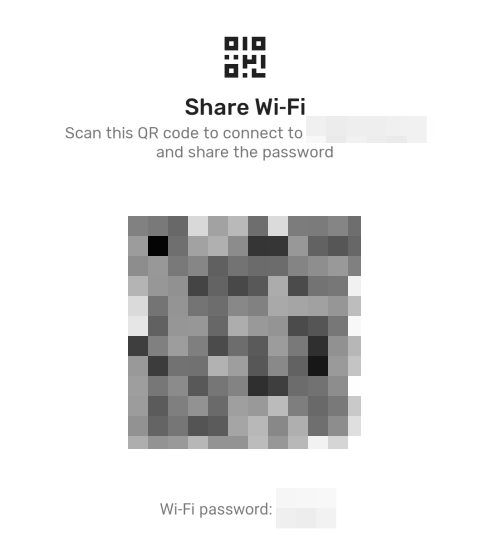
In the previous section, we learned the method of sharing WiFi passwords through QR Codes on Android 10. Sadly, users who are on Android 9 or below, won’t be able to use the feature to connect to the WiFi network. Fortunately, there’s a pretty good workaround for that, as well.
You’d still need to go to ‘Network Connections’ in ‘Settings’ and access the QR Code — the method we discussed in the previous section.

Now, our next objective is to extract the password string from the QR Code. To do so, first you’ll have to take screenshot of the QR Code — containing your WiFi password — and save it in your gallery. Now, go to ZXING Decoder’s official page. The website specializes in extracting text strings from QR Codes and should be able to decode your screenshot with ease.
No login required; just add your image and hit ‘Submit.’

The WiFi name and password would be shown on the next screen.

How to view WiFi password on Android 9 or older
While finding WiFi passwords on older Android phones won’t be as easy as it would be on Android 10, you can still do it within minutes. You will need root access to be able to find and share the WiFi password on Android 9 Pie, Android 8.0 Oreo, and older devices.
Using Solid Explorer File Manager (requires Root)
Note: This method requires your device to be rooted. You can root your Android device from our complete guides for several Android devices.
Step 1: Download and install Solid Explorer File Manager from Google Play.
Step 2: Open Solid Explorer.
Step 3: Tap the hamburger icon at the top left.
Step 4: From the slide-in menu, tap on Root under the Storages section.
Solid Explorer will prompt you to allow root access.
Step 5: Tap on Grant.
Step 6: Select the folder named data.
Step 7: Tap on the misc folder.
Step 8: Select the folder named wifi.
Step 9: Locate the file – wpa_supplicant.conf and tap on it.
Step 10: When asked, open the file using Solid Explorer’s own SE Text Editor.
Step 11: Navigate to the Network block (a line with a code “network={“).
Step 12: Under this block, find a line that starts with “psk=“.
The password for the WiFi network will be mentioned after the equal “=” mark.
Using Termux (requires Root)
Similar to the method mentioned above, this method also needs root access to your Android to work. Here’s how you find WiFi passwords on Android 9 and older devices with root.
Step 1: Download and install Termux from Google Play.
- Termux is a popular terminal emulator on Android with a rating of 4.4 (out of 5) and over 5 million downloads.
Step 2: Open Termux.
Step 3: When the application loads up, enter the following command:
$ pkg install termux-tools
Step 4: In this step, you will grant Termux root privileges by typing the command down below:
$ su
Step 5: Tap on Grant.
Step 6: Enter this command to locate the device’s WiFi configuration file:
# cat /data/misc/wifi/wpa_supplicant.conf
Step 7: Navigate to the Network block (a line with a code “network={“).
Step 8: Under this block, find a line starting with “psk=”.
The password for the WiFi network will be mentioned after the equal “=” mark.
Using ADB (requires Root)
This method requires your device to be rooted. You can root your Android device from our complete guides for several Android devices.
Step 1: Enable USB debugging on your Android device.
Step 2: Setup ADB on your PC with Google Platform tools for Mac and Windows.
- On Windows: Right-click inside the folder extracted folder that is created from the platform-tools zip file. Choose the terminal window as an option from the menu.
- On Mac: After unzipping the zip file, open Terminal on your Mac and drag the platform-tools folder inside this window.
Step 3: Connect your Android device to the PC with the USB cable it came with.
Step 4: Enter the following command to check whether the ads tool has recognized your device on PC.
$ adb devices
Step 5: Enter the following command to locate the device’s WiFi configuration file:
$ adb shell
$ su
# cat /data/misc/wifi/wpa_supplicant.conf
Step 6: Copy this configuration file onto your PC by entering the command below:
# cp /data/misc/wifi/wpa_supplicant.conf /sdcard/
# exit
$ exit
$ adb pull /sdcard/wpa_supplicant.conf ~/Downloads/
Step 7: Navigate to the Downloads folder on your PC and open the wpa_supplicant.conf file.
Step 8: Find the Network block (a line with a code “network={“).
Step 9: Under this block, find a line starting with “psk=”.
The password for the WiFi network will be mentioned after the equal “=” mark.
RELATED:
- How to turn on Wi-Fi automatically when you reach Home, Office or any other regular place
- How to solve Wi-Fi not working problem on Samsung Galaxy S10 even when WiFi is connected
- How to fix Wi-Fi calling pop-up on Android 9 Pie update on Samsung Galaxy devices
- How to share your Wi-Fi internet without giving away the password
- How to enable VoLTE and VoWiFi on OnePlus 7 Pro




on android 8.1 and up its not exist there