

Use a Custom preset with Effects at Medium, Geometry at Low, Global Illumination at High, Lighting at High, Textures at Medium on 8GB GPUs, Reflections at Medium, Atmospheric Quality at Low, Post-Processing at Low, and test Async Compute on your own system.
Halo: Campaign Evolved is a visually heavy Unreal Engine 5 remake, but its PC settings menu has a few clear sweet spots. The goal is to keep the game’s Lumen lighting and modern indoor presentation intact while cutting Ultra settings that cost more performance than they give back.
Optimized PC settings table
| Setting | Recommended value | Note |
|---|---|---|
| Quality Preset | Custom | Use this as the baseline instead of Ultra. |
| Effects Quality | Medium | May be broken or scene-dependent right now. |
| Geometric Quality | Low or Medium | Use Medium if you want denser small object scatter. |
| Global Illumination Quality | High | Keeps Lumen indirect lighting without Ultra’s heavier cost. |
| Lighting Quality | High | The best balance for shadows, projected lighting, and VRAM. |
| Texture Quality | Medium or High | High is fine on many 8GB GPUs at 1440p with DLSS; Medium is safer. |
| Reflections | Medium or High | Use Medium in heavier cave scenes; High if you have GPU headroom. |
| Atmospheric Quality | Low | Use Ultra only if you can spare the GPU cost for clouds and refraction. |
| Post-Processing Quality | Low | Low saves performance, but it does not remove forced grain or chromatic aberration. |
| Async Compute | Test on and off | Usually helps when GPU-bound, but can hurt when CPU-bound. |
KEY!Start from Custom, apply the table, then test the same outdoor combat route and one indoor fight. The conditional settings matter because Halo: Campaign Evolved does not scale evenly across every scene.
Performance gain over Ultra
At 1440p with DLSS, this optimized preset can run roughly 22-25% faster than the Ultra preset across tested outdoor combat, action-heavy, and indoor scenes. For the Ultra comparison, Low Texture Quality was used to avoid turning the result into a VRAM test.
That gain does not make every section a locked 60 FPS experience on an RTX 3060 Ti. Warthog-driving sections are much more demanding, and even the Low preset can miss a steady 60 FPS there, so treat vehicle-heavy routes as your real stress test.

Graphics setting behavior
| Setting | What it changes | Best value |
|---|---|---|
| Effects Quality | Targets special effects such as fire and smoke, but no clear visual or performance change shows up in the tested scenes. | Medium |
| Geometric Quality | Changes density for scattered objects such as small rocks, grass, distant trees, and decorative meshes; going from Low to High or Ultra costs around 5%. | Low or Medium |
| Global Illumination Quality | Controls Lumen indirect diffuse lighting; Ultra improves coverage, light bounces, and temporal noise, but costs around 7% in the tested scene. | High |
| Lighting Quality | Controls direct lighting, Virtual Shadow Maps, distant and local shadows, projected lighting, emissive noise, and volumetric lighting; Medium costs around 4%, High around 6%, and Ultra around 9%. | High |
| Texture Quality | Mainly changes the VRAM budget for texture streaming; Low takes longer to fully stream textures when loading a level, while loaded textures look similar across settings. | Medium or High |
| Reflections | Controls Lumen reflections on rough and semi-glossy surfaces; Ultra costs around 8% in one scene, while a cave scene shows about 6% at High and 17% at Ultra. | Medium or High |
| Atmospheric Quality | Controls cloud quality and water refraction; Medium already renders clouds at high quality, while moving above Low costs around 10%. | Low |
| Post-Processing Quality | Has little effect on bloom and lens flare; Ultra is about 3% slower than Low. | Low |
| Async Compute | Lets the GPU process graphics and compute work at the same time; it can improve GPU-bound scenes but reduce performance when the CPU is the limit. | Test per system |
The biggest wins come from avoiding Ultra where it mostly sharpens noise, reflection coverage, or atmospheric detail. The settings that preserve the remake’s look best are Global Illumination Quality and Lighting Quality, while Atmospheric Quality, Post-Processing Quality, and heavy Reflections are easier places to save FPS.
Lighting Quality deserves the High setting because the remake uses local dynamic lighting heavily, including energy projectiles from Covenant weapons illuminating nearby surfaces indoors. Ultra softens shadows further and can clean up noise, but it also increases VRAM pressure, which makes High the stronger everyday choice.
Film grain and chromatic aberration cleanup
Post-Processing Quality does not disable film grain or chromatic aberration. Both remain active even when Post-Processing is set to Low, and they can make fine detail look softer than it should.
PC config tweaks through Engine.ini can disable those forced effects. For this tweak, the relevant config folder path is Meteorite\Saved\Config\WindowsNoEditor; treat it as a cautious PC tweak outside the official in-game settings menu, not a normal graphics toggle.
After applying the Custom preset, test Async Compute both ways in the same demanding route before locking it in.
GPU memory and system RAM
| Hardware concern | Practical setting choice |
|---|---|
| 8GB graphics cards | Use Medium or High Texture Quality; High can work at 1440p with DLSS, while Medium gives more safety margin. |
| Ultra Texture Quality | Possible on some 8GB setups, but the visible gain over High is small once textures finish streaming. |
| Ultra Lighting Quality | Avoid it as a baseline because it adds VRAM pressure alongside the roughly 9% performance cost. |
| Heavy reflection scenes | Use Medium if caves or rough reflective surfaces are dragging performance down. |
| High system RAM use | Expect unusually high RAM usage; it can exceed 22GB even in the main menu and does not appear tied to a texture streaming failure. |
Texture Quality is more about streaming allocation than a huge visible texture jump. On an 8GB GPU, Medium is the sensible choice, especially if you are playing at 1440p with DLSS and the optimized settings above.
The high system RAM footprint shows up immediately after launching, so changing Texture Quality is not the cure for it. If performance feels normal, focus your tuning on the GPU-heavy settings rather than chasing RAM behavior in the menu.
Display, upscaling, and latency
| Option | Recommended setup |
|---|---|
| Display Mode | Use Borderless Fullscreen. |
| Resolution and Resolution Scale | Use native monitor resolution and keep Resolution Scale at 100%. |
| Upscaling Technique | Use your GPU’s best option: DLSS, FSR, or XeSS. |
| Upscaling Quality | Start with a quality-leaning mode, then lower it only if you are clearly GPU-bound. |
| Frame Rate Limit | Cap to 60 FPS for stability or to your monitor’s maximum refresh rate for high-refresh play. |
| VSync | Turn it off when using G-Sync or FreeSync. |
| Motion Blur | Turn it off for baseline testing. |
| Frame Generation | Turn it off for baseline testing because it can add latency and artifacts. |
| Screen Calibration | Leave it at default unless you are tuning a specific HDR profile. |
Set your display and latency options before judging graphics presets. Otherwise, uncapped rendering, mismatched sync settings, or a blurry resolution scale can make a good graphics setup feel worse than it is.
Frame Generation is better treated as a later comfort option, not part of the first tuning pass. Get native frame pacing stable first, then decide whether you want the extra smoothness tradeoff.
Settings that are easy to overvalue

Effects Quality should not be chased for FPS until it changes more clearly; it may be broken right now or may only affect scenes outside the tested areas. Geometric Quality also does not fix foliage pop-in, because it changes scattered object density rather than that streaming behavior.
Reflections are not mainly a water setting here; their visible impact is on rough and semi-glossy surfaces. Ultra Atmospheric Quality is only worth considering when you have spare GPU headroom, since Medium already gives high-quality clouds and the main recommendation stays Low for performance.
Frequently Asked Questions
What are the best settings for Halo: Campaign Evolved on PC?
Use the Custom preset with Medium Effects, Low or Medium Geometry, High Global Illumination, High Lighting, Medium or High Textures, Medium or High Reflections, Low Atmospheric Quality, Low Post-Processing, and an Async Compute setting chosen after testing your own system.
Should Async Compute be on or off?
Turn Async Compute on if your GPU is the limit and performance improves in a repeated test route. Turn it off if GPU usage drops or the game behaves like it is CPU-bound.
Can Halo: Campaign Evolved run on GPUs without hardware ray tracing?
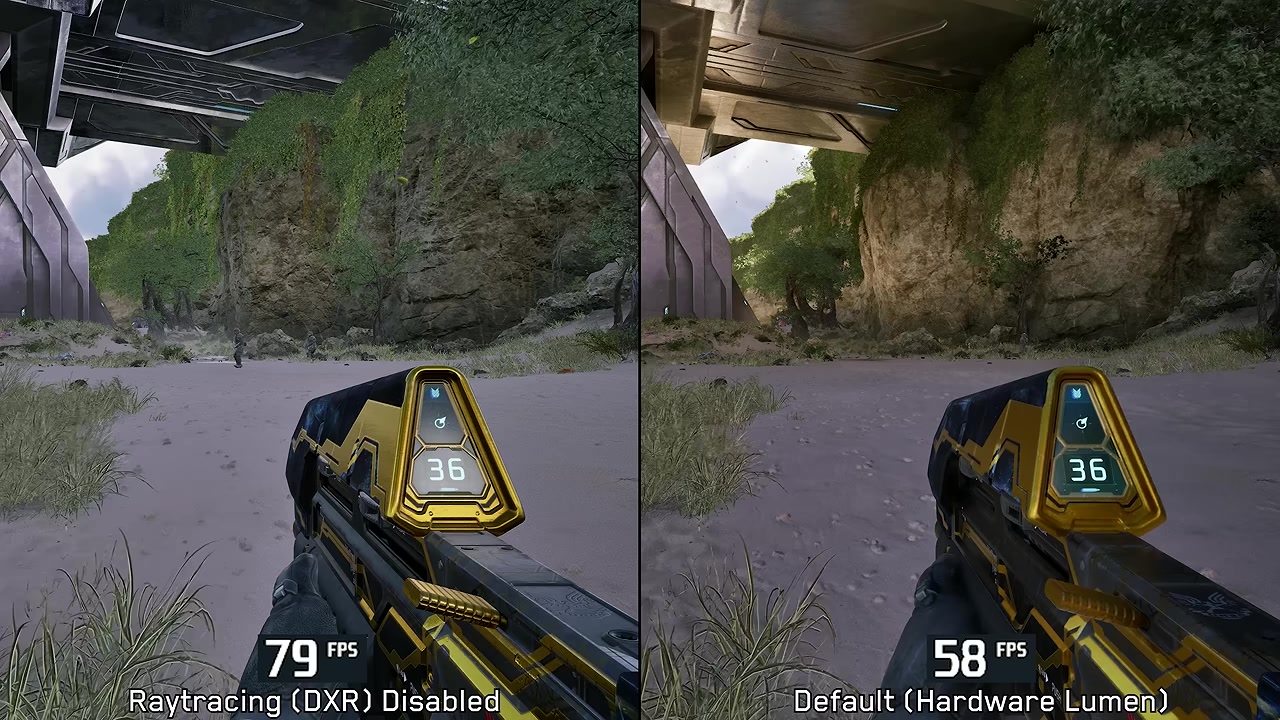
Yes, but with a major visual downgrade. Disabling the GPU ray tracing path removes Lumen, which boosts performance but strips out the game’s hardware Lumen global illumination and reflections.
Does Post-Processing Quality disable film grain and chromatic aberration?
No. Low Post-Processing still leaves film grain and chromatic aberration enabled, so removing those effects requires an Engine.ini tweak rather than a normal menu change.
Is Ultra worth using for Lighting, Reflections, or Global Illumination?
Usually not for a balanced preset. Ultra Lighting adds VRAM pressure, Ultra Reflections can get very expensive in caves, and Ultra Global Illumination is cleaner but not enough better than High to be the default pick.
More questions⤵
Why does the game use so much system RAM?
The high RAM use appears right from the main menu, so it is not simply caused by running out of VRAM during gameplay. Since it does not appear to hurt performance in the tested build, prioritize GPU settings first.
Video help






Leave a Reply