
Microsoft Edge has come a long way since its introduction. New and improved features have been added and the browser is now Chromium-based. Microsoft has started relying on Edge heavily to display web content within Windows which is why the company wants everyone to adopt it as soon as possible. While not mandatory earlier, a recent Windows update seems to have added Microsoft Edge permanently to many devices with no option to uninstall it. But there’s a workaround around that, at least for a few people. Let’s take a look at some tricks and methods that can still help you get rid of the new Microsoft Edge from your system.
1. Change your default browser
The first thing that you should do is change your default Windows browser to something else. This will help maintain functionality while removing Microsoft Edge’s permission from Windows as an essential app. Let’s take a look at how you can change your default browser on Windows.
Related: Why is Internet Explorer Dead? Best IE Alternatives you can trust!
Note: Ensure that you have a replacement browser that you wish to use instead of Edge already installed on your device before proceeding ahead.
Open Settings on your Windows device and click on ‘Apps’.

Now click on ‘Default Apps’ in your left sidebar.

Under the ‘Web Browser’ section and select the new browser that you wish to use as your default browser. (Yes, you need to install another browser like Google Chrome already before doing this, as mentioned above.)

The default browser for your Windows device should now be changed.
Related: Best Android browsers with URL bar at the bottom
2. Use the Uninstall option to remove Edge browser
Now most users are facing difficulty with the latest version of Windows 10, namely 1909 and 2004. Our in-house machines also have Microsoft Edge built into them but surprisingly the option to uninstall is available on a few select models, one of which is our Asus ROG laptop. We suspect that OEM software has a part to play in this but it would be a good idea to check the normal uninstall option before you try other methods on this list.
Note: While the option to uninstall Chromium-based Microsoft Edge is available, you can not uninstall the legacy Microsoft Edge through this procedure. If you are looking to remove the latter, then you should skip this method and try the Powershell commands instead.
Method #1: Uninstall from ‘Apps & features’ menu
Open Settings and click on ‘Apps’ on your Windows device.

Now scroll and click on ‘Microsoft Edge’

Click on ‘Uninstall’.

Windows will now automatically uninstall the browser from your device.
Related: How to inspect element on Android
Method #2: Uninstall from the ‘Programs’ menu
If the normal Settings app did not work for you, then you should give the Control Panel a try before using other methods on this list as they pose the risk of breaking the functionality of some Windows functions. Let’s take a look at how you can uninstall Chromium Edge using Control Panel on your device.
Open Control Panel on your Windows device and tap on ‘Uninstall a program’ under Programs.

Note: You can either launch the Control Panel from the Start menu or simply search for it using the Windows Search.
Now Scroll and find Microsoft Edge.

Right Click on the program and see if ‘Uninstall is available to you’. If available, click on it to uninstall ‘Edge’ from your Windows device.

Note: You can also click on ‘Uninstall’ at the top to uninstall ‘Edge’ from your device.

If available, this should easily help you ‘Uninstall’ edge from your Windows device.
Related: How to enable Live Captions on Chrome
3. Use Powershell to uninstall Edge browser
If the option to uninstall is not available to you then you can use PowerShell commands to completely remove Microsoft Edge from your system. There are two methods listed below to remove Edge, if one does not work for you, you can try the next one to remove it from your device. Let’s get started.
Method #1: Uninstall from Installer directory
Open the Windows file explorer on your device and then copy and paste the command below in your address bar. Once pasted, hit ‘Enter’.
C:\Program Files (x86)\Microsoft\Edge\Application

You will now be taken to the Edge installation folder on your system. Click and open the folder with numerical values as its name as shown below.

Now double click and open the folder titled ‘Installer’.

This is the folder where your PowerShell command will be executed. Click on ‘File’ in the top left corner of your screen.

Click on ‘Open Windows PowerShell’ and finally click on ‘Open Windows PowerShell as administrator’.

Windows will now ask your permission to run the program as an administrator. Confirm your choice by clicking on ‘Yes’.
Execute the command below by copy-pasting it in your PowerShell window.
.\setup.exe -uninstall -system-level -verbose-logging -force-uninstall

Press ‘Enter’ to execute the PowerShell command.
Wait for the process to finish. This could take anywhere from a few seconds to a few minutes depending on your PC’s performance level. Once the process is completed, Microsoft Edge should be completely removed from your Windows system.
Method #2: Uninstall the package of Edge Browser
If the above method results in errors for you or is unable to uninstall Microsoft Edge on your system, then you can give the procedure listed below a try. This should help you remove Microsoft Edge from your system.
Click on the ‘Start’ icon in the bottom left corner of your screen. Now type ‘PowerShell’ and Windows will automatically search and display you the results.

Right-click on ‘Windows PowerShell’ from the search results and select ‘Run as an administrator’.

You will now be asked for permission to run the program as an administrator. Click on ‘Yes’ to grant permission.
Now type in the following command in your PowerShell window and press ‘Enter’.
get-appxpackage *edge*

You will now be shown all the information for the current version of Edge installed on your Windows system. Find the value named ‘PackageFullName’ and copy the entire value beside it as shown below.

Now type the following command in your PowerShell window.
remove-appxpackage

Paste the text you copied beside this command. Press ‘Enter’ once pasted to execute the command.

PowerShell will now carry out the process and remove Microsoft Edge from your system.
How to reinstall Microsoft Edge?
While uninstalling may have been tough, reinstalling Microsoft Edge on your system is a super easy process. All you need to do is download the installer executable from Microsoft’s official site and run it to install it on your Windows system. Follow the link below to go to the download page and install Microsoft Edge again on your PC.
► Download Microsoft Edge browser
Note: The installer requires a network connection to download the latest version of Microsoft Edge to your system.
Can’t uninstall Microsoft Edge? Try these workarounds to completely disable it
If nothing works for you, then you can simply choose to ignore Microsoft Edge for now. There are a couple of ways you can hide it from your system and disable its access to the internet. This will prevent it from ever launching on your system and prevent it from collecting data and updating itself in the background. You can opt for this workaround until a better way to remove Microsoft Edge from Windows systems is discovered in the future.
Step #1 Change your default browser
The first thing you should do is change your default browser. This will prevent Microsoft Edge from launching on your system as the default browsing application on your system when you click on support links, support pages, email links, and more. Use the guide above to change the default browser app on your Windows system. If you are confused between your choice of browsers, then the most popular ones have been listed below along with their download links from official websites.
Look for the guide on how to change the default browser at the top of this page. After that, do the below to completely block Edge’s access to the Internet, thus disabling it completely.
Step #2: Block the Edge browser in Firewall
This is a bit tricky so make sure you follow along with each step.
Blocking all Inbound connections to Microsoft Edge
Click on the Start button and search for ‘Firewall & Network Protection’.

Launch ‘Firewall & Network Protection’ from the search results.
Click and launch ‘Advanced Settings’.

Click on ‘Yes’ when prompted to grant administrator privileges to the Firewall advanced settings.
Now select ‘Inbound Rules‘ from the left sidebar.

Click on ‘New Rule’ in your right sidebar.

Select ‘Program’ as your option.

Click on ‘Next’ in the bottom right corner of your screen.

Select ‘This Program Path’.

Now click and select ‘Browse’.

Copy and paste the command below in your address bar to go to the Microsoft Edge folder location. Hit ‘Enter’ once pasted.
C:\Program Files (x86)\Microsoft\Edge\Application

You will now see the contents of your Microsoft Edge installation directory. Click and select ‘msedge.exe’.

Now click on ‘Open’ in the bottom right corner of your screen.

Click on ‘Next’.

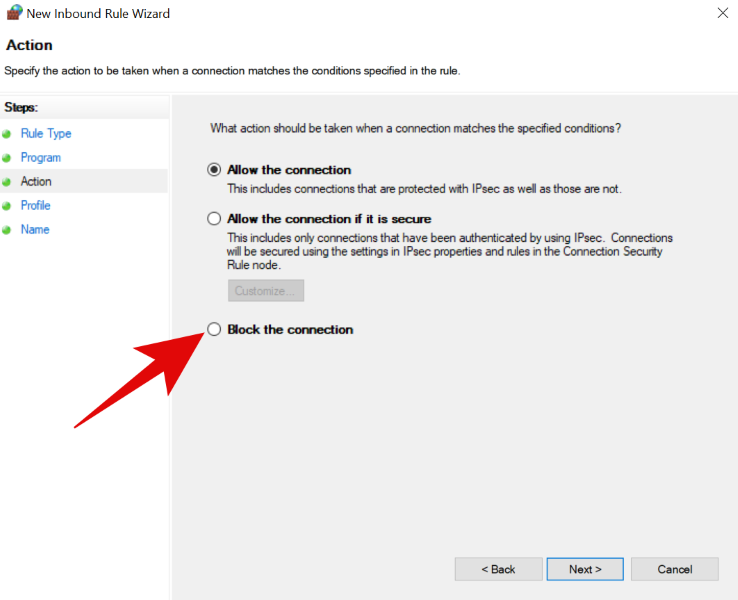
Select ‘Block connection’.
Click on ‘Next’ in the bottom right corner to proceed to the next step.

Ensure that all the checkboxes have been selected for ‘Private’, ‘Domain’, and ‘Public’.

Click on ‘Next’ once you are done.

Enter a custom name for the rule that you just created in the ‘Name’ text field. You can also enter a description of the rule in case you wish to know its context in the future.

Once you are done, click on ‘Finish’ in the bottom right corner of your screen.

Repeat the process to create a new inbound rule for ‘new_msedge.exe’ from the same folder.
Note: If you do not have this application in the folder then you do not need to create another inbound rule.
You will have now blocked all inbound connections to Microsoft Edge on your Windows system.
Blocking all outbound connections to Microsoft Edge
Search Windows for ‘Firewall & Network connections’.
Once found, click and launch the app from your search results.
Scroll down in the ‘Firewall’ section and click on ‘Advanced Settings’.
Click on ‘Yes’ to grant administrative privileges to the program.
You will now be shown the advanced settings for your Windows Firewall. Click on ‘Outbound rules‘ in the left sidebar.

Now click on ‘New Rule’ in the right sidebar.

Select ‘Program’.

Click on ‘Next’ in the bottom right corner.

Select ‘This program path’.

Click on ‘Browse’.

Now copy-paste the following address in your explorer address bar.
C:\Program Files (x86)\Microsoft\Edge\Application

Click and select ‘msedge.exe’.
Click on ‘Open’.

Select ‘Next’ in the bottom right corner of your screen.

Now select ‘Block Connection’.
Click on ‘Next’ again.

Ensure that all the checkboxes are checked for ‘Domain’, ‘Private’, and ‘Public’. Click on ‘Next’ once you are done.

Now enter a name for your custom rule in the ‘Name’ text field. You can also enter a description so that you can easily identify the rule in the future.

Once you are done, click on ‘Finish’.

Now repeat the steps above and block connection for ‘new_msedge.exe’ in the same folder.
Microsoft Edge should be now blocked entirely on your Windows system.
We hope this guide helped you easily get rid of Microsoft Edge on your system. If you have any more questions, feel free to reach out to us using the comments section below.


One response to “3 Ways to Force Remove or Disable Microsoft Edge on Windows 10 [It works!]”
Nice, this actually worked! Insane that Microsoft makes us jump through all these hoops and stuffs their OS with bloatware but at least this method sorts it out.