Adjusting a monitor’s brightness is an essential part of any setup. However, certain bugs can prevent the same and the most common one on Windows 11 is the greyed-out brightness slider. When facing this bug, you won’t be able to change your display’s brightness using hotkeys and the brightness slider in the Action Center will be greyed out. This can be quite annoying and can cause issues with your workflow. So if you’re facing this bug, then here’s all you need to know about it and how you can fix it on your PC.
- Why is my brightness slider greyed out?
-
How to fix the greyed-out brightness slider on Windows 11
- Fix 1: Use DDU to remove your display driver and perform a fresh install
- Fix 2: Install relevant software if you’re using a third-party monitor
- Fix 3: Check GPO and Registry Editor restrictions
- Fix 4: Re-install your monitor in Device Manager
- Fix 5: Select the Generic PnP driver for your monitor instead
- Fix 7: Uninstall TeamViewer
- Fix 8: Install graphics drivers provided by your laptop manufacturer
- Fix 9: Restart the Display Enhancement Service
- Fix 10: Contact Support
Why is my brightness slider greyed out?
There can be a couple of reasons why the brightness slider is greyed out or missing on your PC. The most common ones are listed below.
Bug with dGPU driver
The most common bug that causes this issue is a bug with the driver for your dedicated GPU. This is most commonly caused when you update your PC to the latest Windows build without updating the dGPU to driver to the latest available version. To fix this issue, you can reinstall your driver or update to the latest available version. Either seems to help fix the greyed-out brightness slider.
Third-party monitor
If you’re using an external third-party monitor then it’s likely that its brightness is adjusted using its OSD and dedicated keys. You might also have a remote for the same to easily access the OSD on your monitor.
This is a good reason why the brightness slider is not showing up in Windows. We recommend you try adjusting your brightness using the dedicated keys on your monitor. Your OEM might also have a dedicated Windows utility that allows you to manage the OSD settings within Windows.
GPO restrictions
Some PCs can have Group Policy restrictions in place that prevent them from adjusting the monitor brightness from within Windows. This is usually applicable to PCs issued or managed by an organization.
Some organizations tend to block brightness adjustments on older PCs as a way to prevent exploits from being used on their systems. If you have administrator access on the PC, you can use the next section to disable this restriction accordingly.
Registry Editor restrictions
The brightness adjustment can also be restricted using the Registry Editor. Ideally, this shouldn’t happen on your PC but if it was or is managed by an organization then this could likely be the case for you.
Additionally, if you installed third-party programs or OEM utilities that can edit your registry settings then it could also be a reason why the brightness slider is unavailable to you. You can fix the same using the dedicated section below.
How to fix the greyed-out brightness slider on Windows 11
Here’s how you can fix the greyed-out brightness slider on your Windows 11 PC. Start with the fixes below and go through them one by one until you manage to fix the issue. Let’s get started!
Fix 1: Use DDU to remove your display driver and perform a fresh install
We recommend you try a fresh install of your graphics driver to fix your issue. This will help restore the greyed-out brightness slider in most cases. Here’s how you can use DDU to completely remove graphics drivers from your PC and perform a fresh install. Let’s get started!
- Open the link below and download DDU on your PC.
DDU | Download Link - Once downloaded, launch Run by pressing
Windows + R. - Now type the following and press Enter on your keyboard.
msconfig - Click and switch to the Boot tab and then check the box for Safe Boot.
- Now click Apply and then click OK.
- You will now be prompted to restart your PC, click on Restart to restart your PC. Ensure you close any programs and save your data before proceeding with a restart.
- Once your PC restarts, you will be booted into safe mode. Log into your user account and then extract DDU using the .exe file we downloaded earlier.
- When extracted, double-click and launch Display Driver Uninstaller.exe.
- Click the drop-down menu for Select device type on the right and select GPU.
- Click the next drop-down menu and select your GPU manufacturer. If you have an iGPU and dGPU, then select your dGPU. You can then use these steps again to re-install your iGPU drivers if re-installing the dGPU drivers doesn’t work for you.
- Once you’ve selected the relevant options, click on Clean and do NOT restart.

- Your drivers will now be removed. Once the process completes, close DDU and launch Run again by pressing
Windows + R. - Type the following command and press Enter.
msconfig - Now click and select Normal startup.
- Next, click Apply and then OK.
- You will now be prompted to restart your PC. Click on Restart.
And that’s it! You will now have uninstalled your GPU drivers and your PC should boot normally. Your PC will use generic drivers once it boots, this is normal. You can now download and update your GPU drivers to the latest version. This should help fix the greyed-out slider on your PC.
Fix 2: Install relevant software if you’re using a third-party monitor
Third-party monitors can sometimes be incompatible with Windows or might require dedicated software to help manage their settings. This includes refresh rate, color settings, and of course brightness. So if you’re using a third-party monitor we recommend you check and see if you can change the brightness of your display using the onboard buttons and OSD. If this doesn’t work, then you might be required to download and install a dedicated utility to help manage your monitor’s settings. Additionally, it could also be that you require a dedicated driver for your monitor to manage its features and settings. In all these cases, you should be able to find the relevant programs and drivers on your manufacturer’s website. Use either of the links below to visit your manufacturer’s website. You can search for your monitor and download the relevant available drivers and programs on your PC. This should help you adjust your monitor’s brightness without any issues.
- LG | Link
- Samsung | Link
- Asus | Link
- Acer | Link
- AOC | Link
- Gigabyte | Link
- BenQ | Link
- Alienware | Link
- MSI | Link
- ViewSonic | Link
- Dell | Link
- Lenovo | Link
Fix 3: Check GPO and Registry Editor restrictions
Group Policy Editor (GPO) or Registry Editor restrictions can also cause the brightness slider to be greyed out. This usually happens if your PC is managed by someone else or an organization. If you have administrator access, you can check and change these settings using the relevant guides below. This should help you restore the brightness slider on your Windows 11 PC.
STEP BY STEP GUIDE to check GPO restrictions
Here’s a step-by-step guide to check for GPO restrictions. Keep in mind GPO is only accessible on Windows 11 Pro. If you have the Home edition, you can use the Registry Editor section below instead.
- Press
Windows + Ron your keyboard to launch Run. - Now type in the following and press Enter. You can also click OK if needed.
gpedit.msc - Navigate to the following location using the left sidebar.
User Configuration > Administrative Templates > Control Panel > Display - Double-click on Disable the Display Control Panel.
- Select Disabled.

- Now click OK.
Restart your PC for good measure. If GPO restrictions were preventing you from adjusting the brightness on your PC then the issue should now have been fixed.
STEP BY STEP GUIDE to check Registry Editor restrictions
You can also check your registry settings to see if the display brightness adjustment has been disabled using the same. Use the steps below to help you along with the process.
- Press
Windows + Rto launch Run. - Type in the following and press Enter. You can also click OK if needed.
regedit - Now navigate to the following path using the left sidebar. You can also copy-paste the same in the address bar at the top.
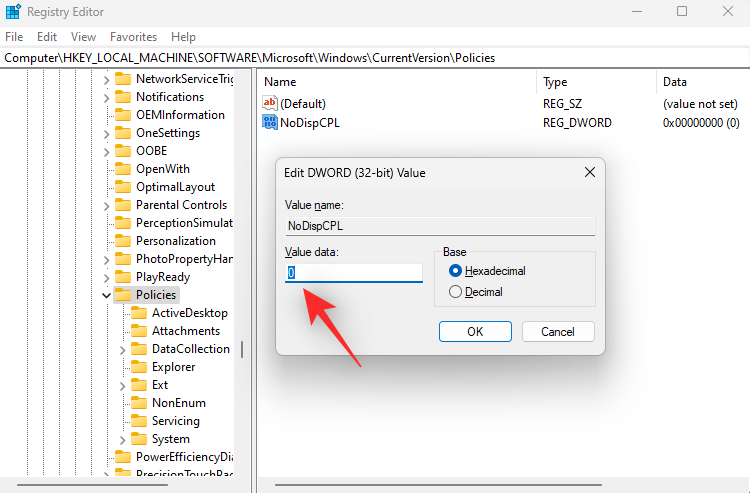
Computer\HKEY_LOCAL_MACHINE\SOFTWARE\Microsoft\Windows\CurrentVersion\Policies - Double-click the DWORD value named NoDispCPL on your right.
- Enter 0 as its Value data: to disable brightness restrictions.

- Click OK.
Close the registry editor and restart your PC for good measure. If restrictions in the registry values were preventing you from adjusting the brightness, then the issue should now have been fixed on your system.
Fix 4: Re-install your monitor in Device Manager
You can also re-install your monitor to fix background conflicts and bugs with the driver used by your monitor. Follow the guide below to help you along with the process.
- Press
Windows + Xand click on Device Manager. - Now double click on Monitors.
- Right-click your monitor under the same.
- Select Uninstall device.
- Click Uninstall to confirm your choice.

- The monitor will now be uninstalled from your PC. Fear not, you will still have a display signal. Once done, click the Scan for hardware changes icon at the top.
- And that’s it! Windows will now reinstall your monitor.
If background driver conflicts were preventing you from accessing the brightness slider on your PC, then this issue should now have been fixed.
Fix 5: Select the Generic PnP driver for your monitor instead
We now recommend you try using the generic PnP driver for your monitor instead. It could be that Windows 11 is facing a bug with the dedicated driver for your monitor and using the generic driver can help fix this issue and restore the greyed-out brightness slider. Follow the steps below to help you do the same on your PC.
- Press
Windows + Xon your keyboard and click on Device Manager. - Now double click on Monitors.
- Right-click on your monitor under the same and then select Update driver.
- Click on Browse my computer for drivers.
- Next, click on Let me pick from a list of available drivers on my computer.
- Click and select Generic PnP Monitor.

- Click Next and the selected driver will now be installed on your PC. Click on Close once done.
And that’s it! The brightness slider should now be available on your PC if the issue was caused by your current monitor driver.
Fix 7: Uninstall TeamViewer
If you’re a TeamViewer user then it is a known utility that causes issues with brightness adjustment on multiple systems. Uninstalling the same will help you fix this issue and here’s how you can do the same on your PC.
- Launch the Start menu, search for Control Panel, and launch the same from your search results.
- Click the drop-down menu in the top right corner and select Large icons.
- Click on Programs and Features.
- You will now be shown a list of programs and utilities installed on your PC. Click and select TeamViewer from the list.
- Click Uninstall at the top.

Now follow the on-screen instructions to uninstall TeamViewer from your PC. Once done, restart your PC for good measure. If it was the TeamViewer bug causing issues with brightness on your PC, then it should now be fixed.
Fix 8: Install graphics drivers provided by your laptop manufacturer
If you’re a laptop user then you’re likely still facing a display driver issue because of the latest display drivers. Laptops usually have customized display drivers designed by the manufacturer to match your model’s requirements. They contain optimizations and custom enhancements required by your laptop skew. Using the generic latest driver issued by your GPU manufacturer can cause issues on your laptop and can lead to the greyed-out brightness slider. We thus now recommend you install the driver provided for your laptop on your manufacturer’s website even if it is outdated compared to the latest driver especially if your laptop has a dGPU. Installing the driver provided by your laptop manufacturer will help fix the greyed-out brightness slider in most cases.
Fix 9: Restart the Display Enhancement Service
As a last resort at this point, you can try restarting the Display enhancement service in Windows. Windows 11 is designed with background display management services and tools in mind. The service helps watch DRM content, stream HDR videos, and automatically adjust your video settings and color profile based on the content being played on your PC.
While great features, they can sometimes conflict with monitors that come with similar features built-in. Restarting the Display enhancement service can help fix the same. Use the guide below to help you along with the process.
- Press
Windows + Rto launch Run. - Type in the following and press Enter. You can also click OK.
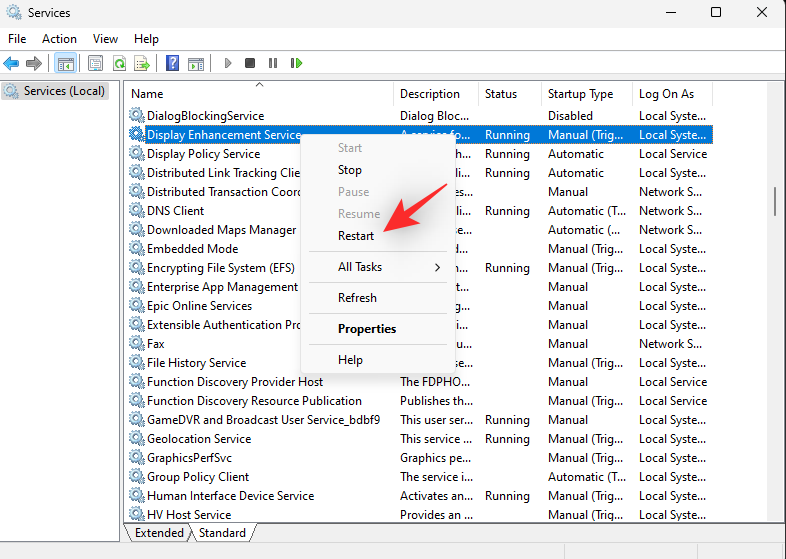
services.msc - Now find Display Enhancement Service in the list on your screen and right-click the same.
- Select Restart from the context menu.

Once the service is restarted, then try accessing the brightness slider again. If Windows 11 background conflicts were the cause of your issue, then they should now be fixed on your system.
Fix 10: Contact Support
If the brightness slider is still greyed out on your PC, then we recommend you get in touch with your monitor’s support team. If you have a laptop, you can contact your manufacturer instead. Depending on the diagnosis, the support team can then help you fix the issue or redirect you to the Microsoft support team if it is a Windows 11 issue. You can use the link below to get in touch with the Microsoft Support team if you suspect the issue to be caused due to your Windows installation.
- Microsoft Support Team
We hope this post helped you easily get familiar with the greyed-out brightness slider and how you can fix it on your Windows 11 PC. If you face any issues or have more questions, feel free to contact us using the comments below.


