
What to know
- Assistive Access is an accessibility feature that’s designed for people with cognitive disabilities to use an iPhone by stripping away unnecessary features from iOS and replacing them with a simpler interface that’s easy to interact with.
- Available on iOS 17 or newer versions, Assistive Access can be configured with limited apps, contacts, and in-app options so that the person who’s going to use the iPhone isn’t overwhelmed with excessive options, images, or animations.
- You can enable and set up Assistive Access on an iPhone by going to Settings > Accessibility > Assistive Access > Set Up Assistive Access and following the on-screen instructions to set it up as you desire.
- At any time during Assistive Access, you can return to the regular iOS interface by triple-pressing the Side button and selecting Exit Assistive Access.
What is Assistive Access on iPhone?
Apple offers the “Assistive Access” feature on iPhones to support users with cognitive disabilities. When activated, it simplifies the iOS user interface, replacing intricate gestures with user-friendly buttons and straightforward actions. This reduced interface ensures that the usual volume of images, texts, and animations doesn’t bombard users.
With Assistive Access on, users can choose a home screen with either large grid icons or rows of apps with text for clearer app identification. Apps display simpler interfaces with bigger options, omitting unnecessary content. For example, the Photos app presents large thumbnails in two columns, while the Messages app can be set only to show an emoji keyboard. The Camera app in this mode only captures photos, eliminating potentially confusing features.
How to set up and turn on Assistive Access on iPhone
Requirements:
While enabling the Assistive Access feature is pretty straightforward, there are a few things you should note or set up before you turn on the feature on an iPhone.
- Ensure that your iPhone is running iOS 17 or a newer version.
- Make sure the iPhone has been paired with all the wireless networks it’s supposed to connect to.
- Set up Face ID for the person who’s going to use this iPhone.
- Alternatively, set up a numeric device passcode with either four or six digits. Passwords can be avoided as they may get too complex for the concerned person. You can avoid adding a passcode if the person you’re setting up the iPhone for may not be comfortable with it.
- Ensure that all the apps that the person may require have already been installed before turning on Assistive Access.
- If you’re setting up the iPhone for a person with cognitive disabilities, make sure you have saved the contact numbers and email addresses of only important people. Avoid adding contact information of people whom they may not often communicate with.
Guide:
Once you’ve set up the iPhone for the person who will be using Assistive Access, you can now enable this feature on the device. For that, open the Settings app on the iPhone.
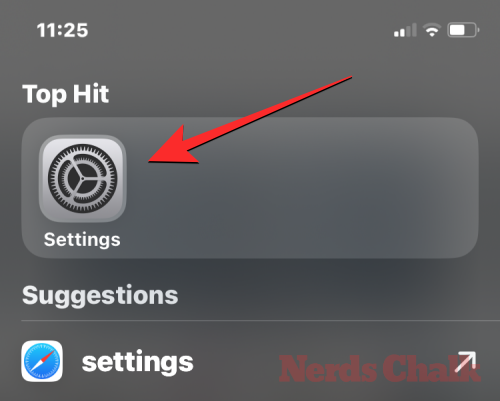
Inside Settings, scroll down and select Accessibility.
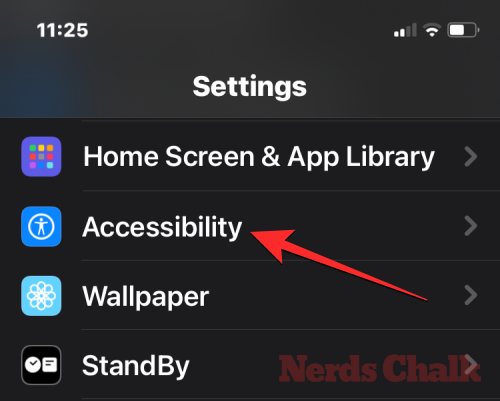
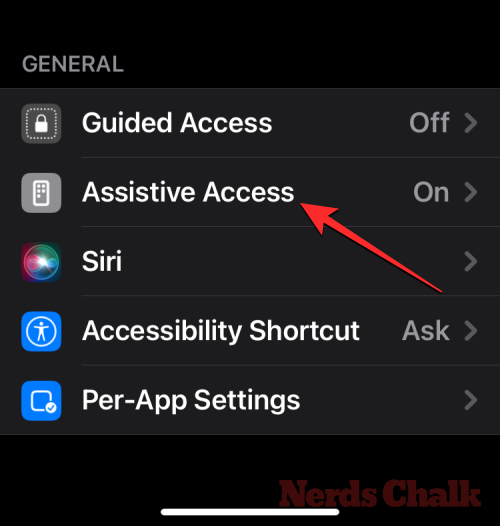
On the Accessibility screen, tap on Assistive Access under “General”.

On the next screen, tap on Set Up Assistive Access.

You’ll now see the Set Up Assistive Access screen. Here, tap on Continue to start the setup process.

On the next screen, Apple will inform whom this iPhone is associated with by showing you the name and email address that was used to set up the iPhone.

It’s recommended that Assistive Access is set up with the Apple ID of the person who’s going to use it. So, if the existing Apple ID belongs to you but you’re setting it up for someone else, you can tap on Change Apple ID at the bottom and follow the on-screen instruction to add another Apple account on the iPhone. If the Apple ID that shows up on the screen is correct, you can tap on Continue instead.

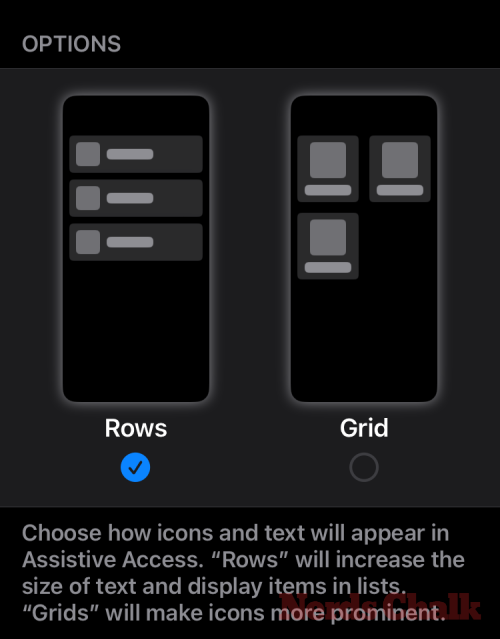
In the next step, you’ll be asked to choose an appearance style for your home screen and you can choose either Rows or Grid. Rows shows a list of available apps with increased text size while Grid will show your apps with large-sized app icons in 2 columns. Once you’ve chosen your preferred appearance style, tap on Continue at the bottom.

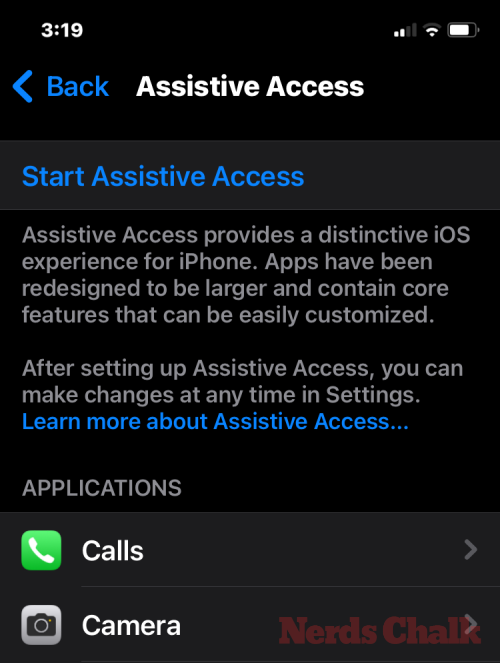
You’ll now arrive at the Select Apps screen. Here, you’ll see a select few apps listed under “Optimized for Assistive Access” and as the label says, these apps will be configured to work with Assistive Access. For now, we can also add the following apps to the Assistive Access home screen – Calls, Camera, Messages, and Photos. To add any of these apps, tap on the green Plus icon on the left-hand side of the desired app.

When you add an app from this section, a new screen will pop up prompting you to configure settings and features for the selected app. For instance, when you add the Calls app from the above list to the Assistive Access home screen, you’ll have options to choose from whom you can receive calls on this iPhone (everyone or only chosen contacts), who can you make calls to (by adding contacts to this list), and toggle dialer, keypad and speaker for your calls. Once you’re done setting up an app’s settings, you can tap on Continue at the bottom of the screen to confirm these settings.

You can repeat the above step to set up other Optimized apps from the list above. Here’s a preview of what you can configure with the Camera, Messages, and Photos apps.

When you add apps to Assistive Access, they’ll appear under the “Selected Apps” section on the Select Apps screen.

You can also browse other apps that aren’t optimized for Assistive Access by swiping downwards to the “More Apps” section on the Select Apps screen. In this section, you’ll see a list of all the apps that are installed on the iPhone. To add them to the Assistive Access home screen, tap on the green Plus icon on the left-hand side of the desired app.

Similar to how you configured the optimized apps previously, adding some of the apps from the “More Apps” list will show additional screens from where you can configure the app’s settings. Unlike the configured apps, adding any app from the “More Apps” list will only allow you to manage permissions for the selected app but won’t show you options to manage the app’s contents.
Let’s say you want to add the Gmail app to your “Selected Apps” list. When you choose an app, iOS will now prompt you with different permission prompts that you may or may not allow for the chosen app. Depending on the app you choose, you will be prompted to grant the app permissions like access to Contacts, Face ID, Motion & Fitness, Photos, Camera, and Microphone. You can either choose Allow or Don’t Allow on these prompts based on what kind of access you want to give to this app. After making your choice, you can tap on Continue to get to the next prompt until the selected app is added to your apps list.

You can add as many apps as you want to see on your Assistive Access home screen but since the goal here is to keep the interface more simple, we suggest you only add really necessary apps. Once you’re satisfied with the apps you’ve added to the “Selected Apps” section, you can tap on Continue at the bottom to proceed to the next step.

When you do that, you’ll get to the Using Assistive Access screen. Here, Apple will explain a bunch of ways about how iOS works differently with Assistive Access enabled. Once you’ve read through these details and have explained it to the person who may be using Assistive Access, you can tap on Continue at the bottom to proceed.

On the next screen, iOS will tell you whether or not Face ID and device passcode have been set up on the iPhone. If they’ve been configured properly, you can tap on Continue at the bottom to proceed or you can select Change Security Settings to change the Face ID and device passcode for the device.

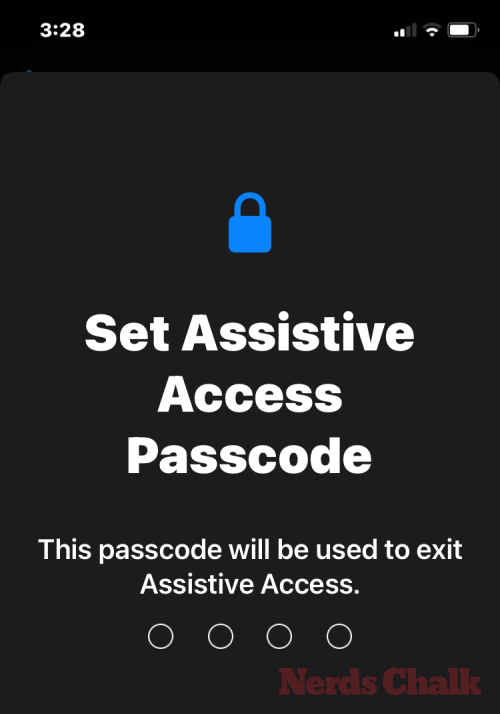
You’ll now arrive at the Set Assistive Access Passcode screen where you can enter a 4-digit passcode to enter and exit Assistive Access on the iPhone. This passcode can be different from the device passcode you may have already set on the iPhone but if the person who’s supposed to use Assistive Access may find it difficult, you can keep the same passcode for the device as well as Assistive Access.

On the next screen, you will have to re-enter the passcode you typed on the last screen.

iOS will now prompt you to set up a Recovery Apple ID for when you or this person may forget the Assistive Access passcode. If you want to add a recovery Apple ID, you can tap on Set Recovery Apple ID or you can tap on Not Now to avoid this step entirely.

iOS will now explain how you’re supposed to exit Assistive Access once it’s enabled. You can do it by triple-pressing the Side button, typing the Assistive Access passcode, and selecting Exit Assistive Access. Once you’ve understood how it works, you can tap on Continue at the bottom to proceed.

You will now see the “Assistive Access is ready to use” screen. You can either tap on Start Using Assistive Access to enable this mode straight away or tap on Enter Later if you wish to turn it on at some other time.

How to use your iPhone with Assistive Access
With Assistive Access now configured on your iPhone, you can start using it by enabling it from the Accessibility shortcuts and then using the iPhone on Assertive Access mode.
Enter Assistive Access mode
If you hadn’t used the Start Using Assistive Access option during the setup, you’ll have to manually activate Assistive Access on the iPhone. Now there are two ways to enter Assistive Mode once it has been enabled.
From Settings app
The simplest (but not the quickest) way to enter Assistive Access is by using iOS settings. To do this, open the Settings app on the iPhone.
Inside Settings, scroll down and select Accessibility.
On the Accessibility screen, scroll down to the bottom and tap on Assistive Access under “General”.
On the next screen, tap on Start Assistive Access.

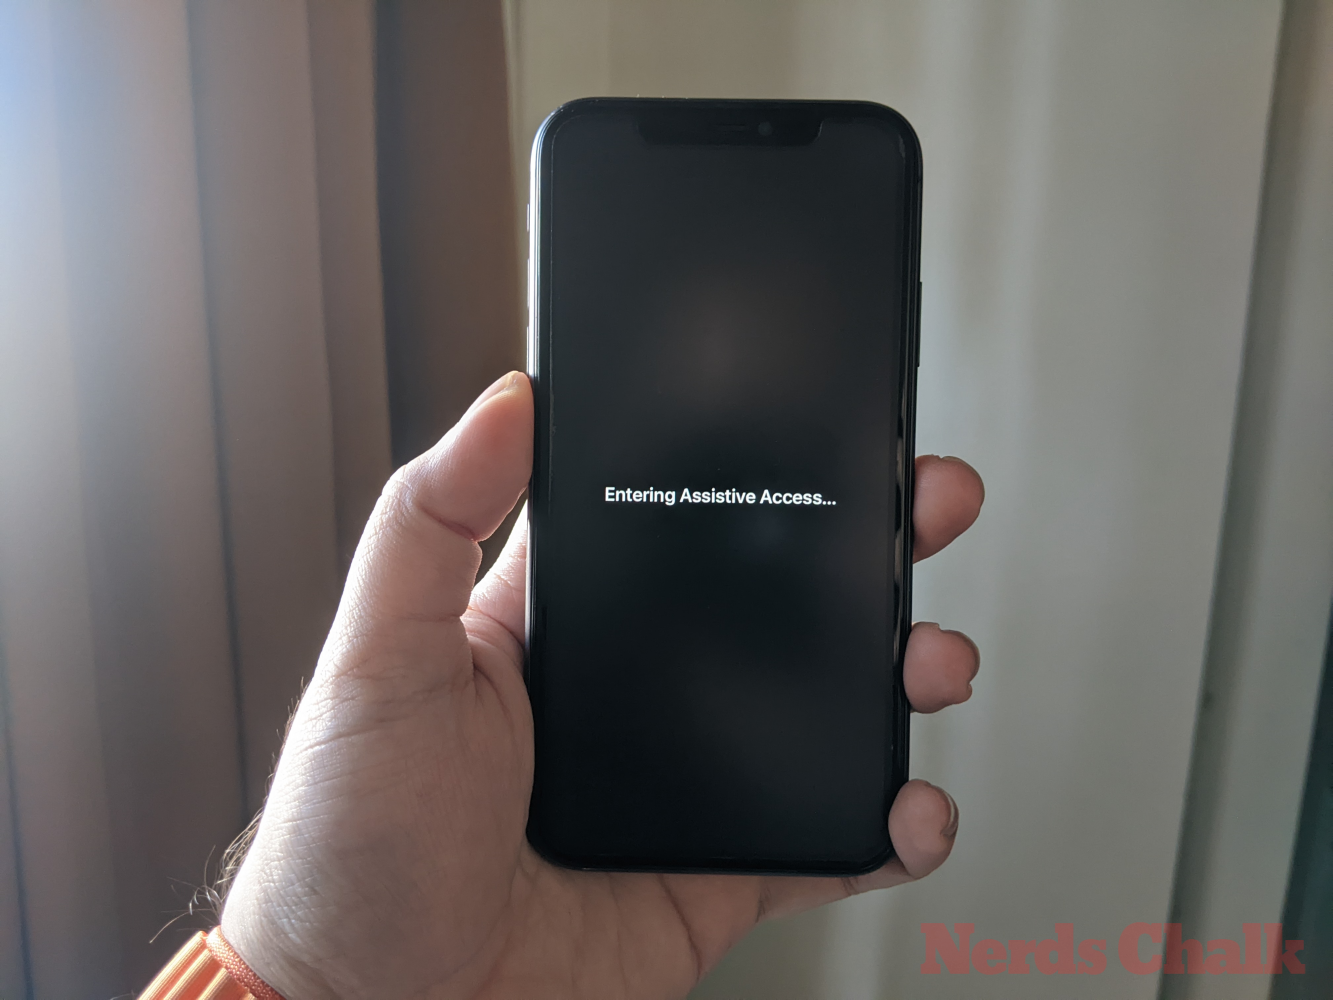
When you do that, iOS will ask you to enter the Assistive Access passcode on the screen.

As soon as you enter this passcode, the screen will go black and read the “Entering Assistive Access” message. Within seconds, you’ll see the Assistive Access home screen on the iPhone, and from there you can start using it.
From Accessibility Shortcuts
If you don’t wish to go to the Accessibility screen on the Settings app every time you want to activate Assistive Access on the iPhone, there’s an easier way to turn it on – by adding Assistive Access to your Accessibility Shortcuts. This involves a quick setup process which when done can help you enable Assistive Access with just the press of the Side button.
To add Assistive Access to an iPhone’s Accessibility Shortcuts, open the Settings app. Inside Settings, go to Accessibility.
On the Accessibility screen, scroll down to the bottom and tap on Accessibility Shortcut.

Here, tap on the Assistive Access option to see a tick mark appear on its left-hand side under the “Triple-Click the Side Button For” section. You have successfully set up Assistive Access to work with Accessibility Shortcuts.

To turn on Assistive Access, triple-press the Side Button on your iPhone. From the overflow menu that appears, tap on Assistive Access.

When you do that, iOS will ask you to enter the Assistive Access passcode on the screen.
As soon as you enter this passcode, the screen will go black and read the “Entering Assistive Access” message. Within seconds, you’ll see the Assistive Access home screen on the iPhone, and from there you can start using it.
Unlock your phone
When Assistive Access is enabled, your iPhone can still be unlocked using Face ID or your device passcode. To unlock the iPhone, tap anywhere on the screen or press the Side button once. When the screen wakes up, you’ll be greeted by the clock underneath a lock. This lock icon will switch to an unlocked icon when you bring the iPhone in front of your face.

When the iPhone detects your face, you can go to the Assistive Access home screen by tapping on the Open button at the bottom. This button can also be interacted with if your iPhone fails to unlock using Face ID.

When you tap on Open without unlocking the iPhone with Face ID, you will be asked to enter your device passcode on the screen. After entering the passcode, you will be directly taken to the Assistive Access home screen.
Interacting with apps
When you unlock your iPhone on Assistive Access, you will either see a grid of large-sized apps or rows of apps with large texts you added to this mode. You can open any app by tapping on its icon.
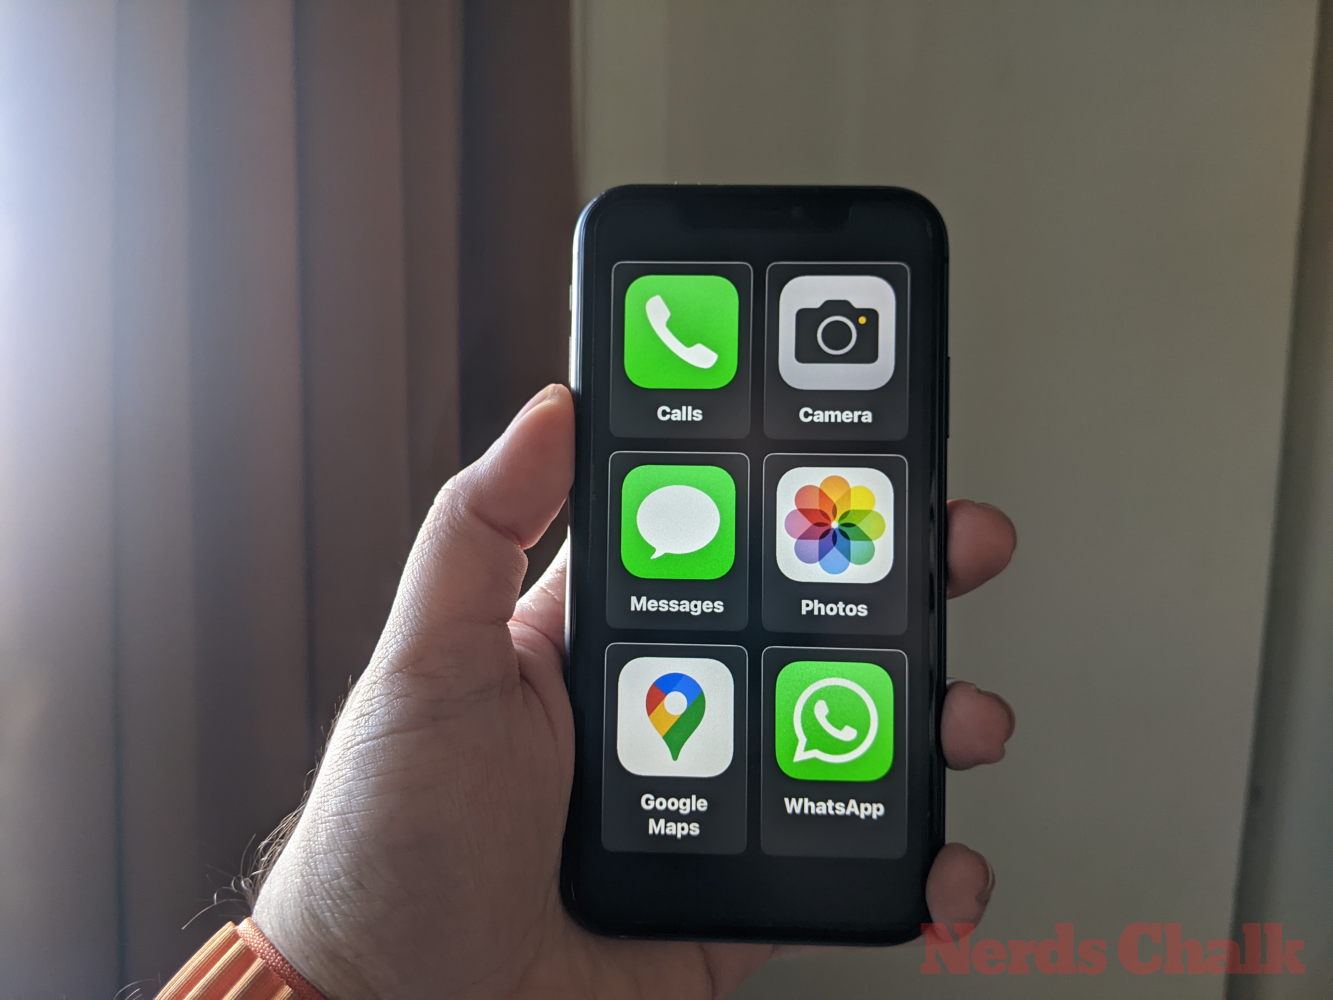
Calls
For instance, we opened the Calls app which is the Assistive Access version of the Phone app on iOS. The Calls app will then load your selected contacts with their contact images in larger thumbnails. To call a contact from this screen, simply tap on the contact you wish to call.

On the next screen, you will see a larger preview of the contact image along with a Call button at the top. To make a call to this person, tap on Call.

You can also make calls by dialing the phone numbers of contacts you didn’t add to the Calls app during setup. For this, tap on the Phone Number section at the top of the Calls screen.

The app will now show a large keypad on the screen to help you dial a phone number manually. Once you enter the phone number, tap on the Call button above the keypad to make the call.

When you receive calls inside Assistive Access, you will see a large-size button to Answer and Don’t Answer the calls on the screen.
Camera
Similarly, when you open the Camera app inside Assistive Access, you will see all the camera options you activated for Assistive Access during setup. As we can see here, only the Photo and Photo Selfie options are visible on the screen since didn’t enable the Video options for Assistive Access.

To capture photos or videos, tap on the desired option on the screen depending on which camera you want to use. For instance, Photo and Video buttons will activate the back camera while Photo Selfie and Video Selfie options will use the iPhone’s front camera.
Once you select the desired options, you will see the selected camera’s viewfinder to frame your image/video. When the shot is ready to be captured, tap on Take Photo to capture it.

Messages
Unlike the Calls app, the Messages app will only show contacts you selected during setup. To add more contacts to send messages to, you will need to exit Assistive Access and go to the Assistive Access settings on iOS to manage the contacts list. To send a message to a contact or view your conversations with them, you can tap on their contact picture from the Messages screen.

Here, you will see all of the past messages you exchanged with this person. To send a message, tap on the New Message button at the bottom.

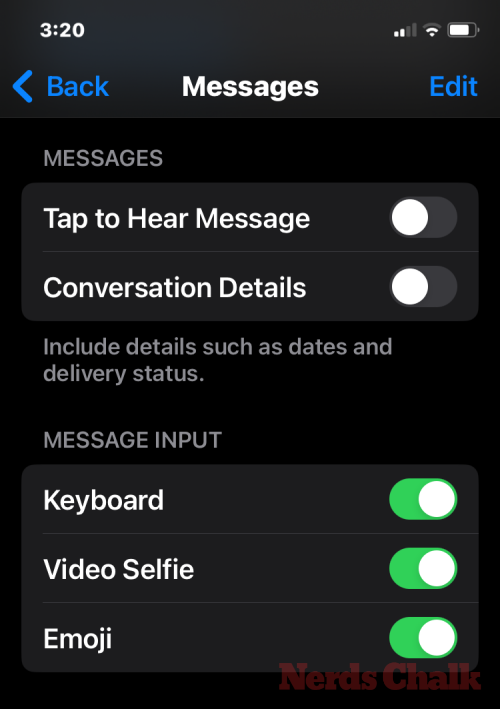
You can now choose from three options to script your message – Keyboard, Video Selfie, and Emoji.

Keyboard will open the default iOS keyboard on the screen.

Video Selfie will open the front camera viewfinder from where you can record a video message to this person.

Emoji will open an Emoji drawer at the bottom that is sent as an individual message.

Photos
The Photos app will show all the pictures from your Camera roll in rows of two. Unlike the Photos app on regular iOS, you won’t be able to access other images saved on the iPhone.

When you tap a picture from the Photos app, you will see the selected photo load up in fullscreen. You cannot, however, zoom into an image, edit it, or share it on other apps from Assistive Access.

Other Apps
When you add apps to Assistive Access that aren’t configured with this mode, they will open to show the default interface that you may have interacted with when Assistive Access isn’t active. You can interact with these apps as you normally would but you won’t be able to use the iPhone’s swipe gestures like on iOS.
Here’s what the Google Maps app looks like on Assistive Access.

Go to home screen
Unlike on iOS, Assistive Access doesn’t work with swipe gestures to switch between apps or go to the home screen. When you’re inside an app on Assistive Access, you can only go back to the home screen by tapping on the Back button at the bottom once or repeatedly depending on how deep you are inside the app’s interface.

Check time
While iOS shows you the time and other important info (Wi-Fi signal, cellular signal, or battery level) on any app you have open on the screen, it’s not the same when Assistive Access is enabled. When you’re inside Assistive Access mode, the only way you can check the current time is by locking the device using the Side button and then pressing this button again to view the lock screen. This is because you can only view the time inside the lock screen on Assistive Access.

How to manage Assistive Access settings on iPhone
You can manage the Assistive Access settings at any time even after the initial setup. Although iOS allows you to configure Assistive Access with and without this mode being active, you will get more granular options to configure when Assistive Access is inactive on the iPhone.
When Assistive Access is active
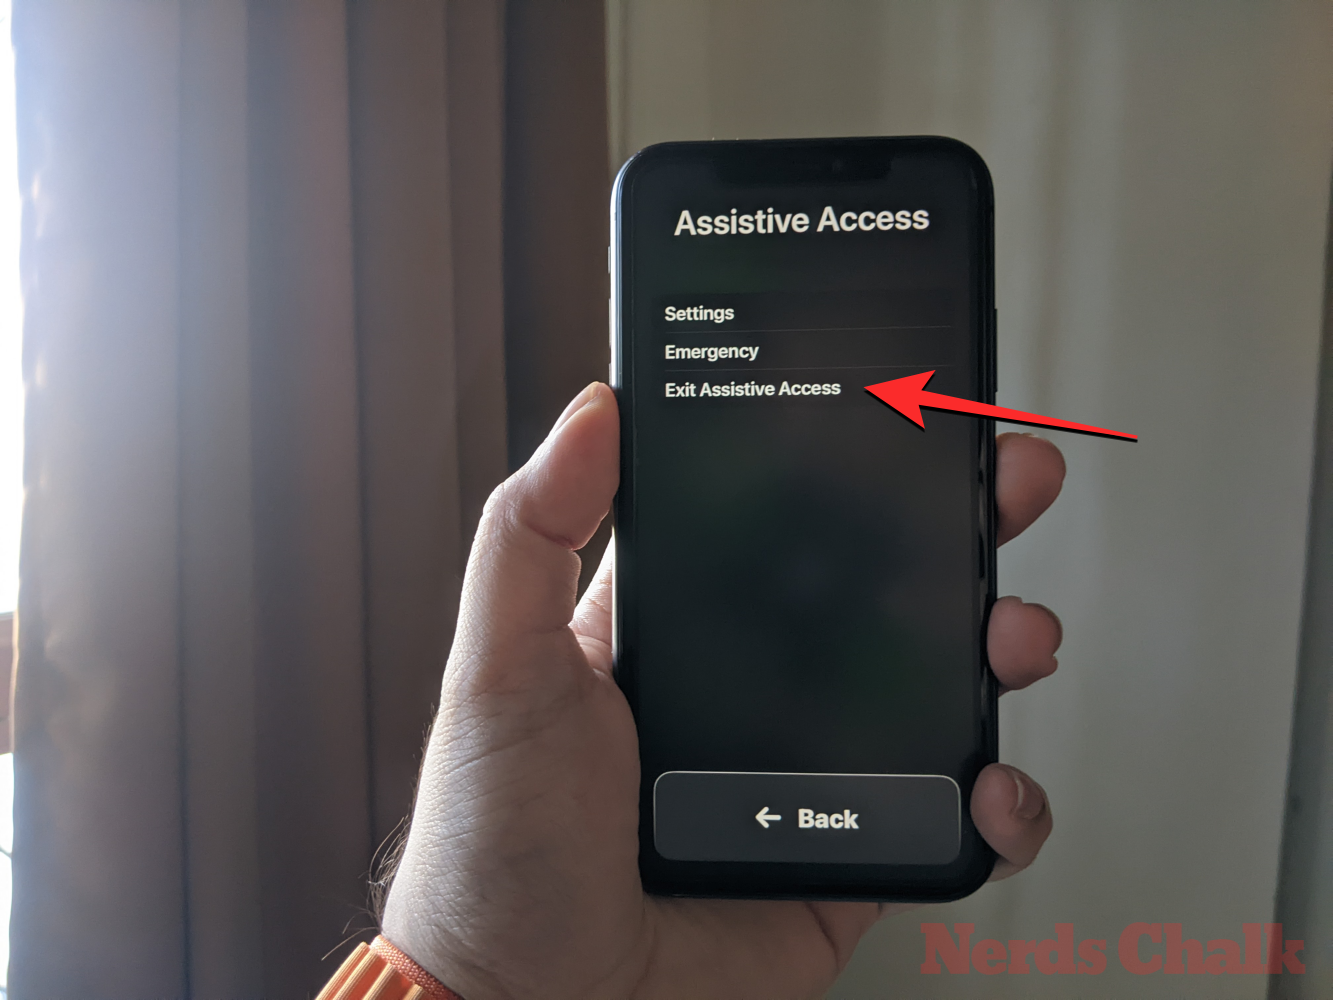
When Assistive Access is already active on the iPhone, there are a few settings you can manage within this mode. To access Assistive Access settings, triple-press the Side button on the iPhone. You’ll now see the Assistive Access screen. Here, select Settings.
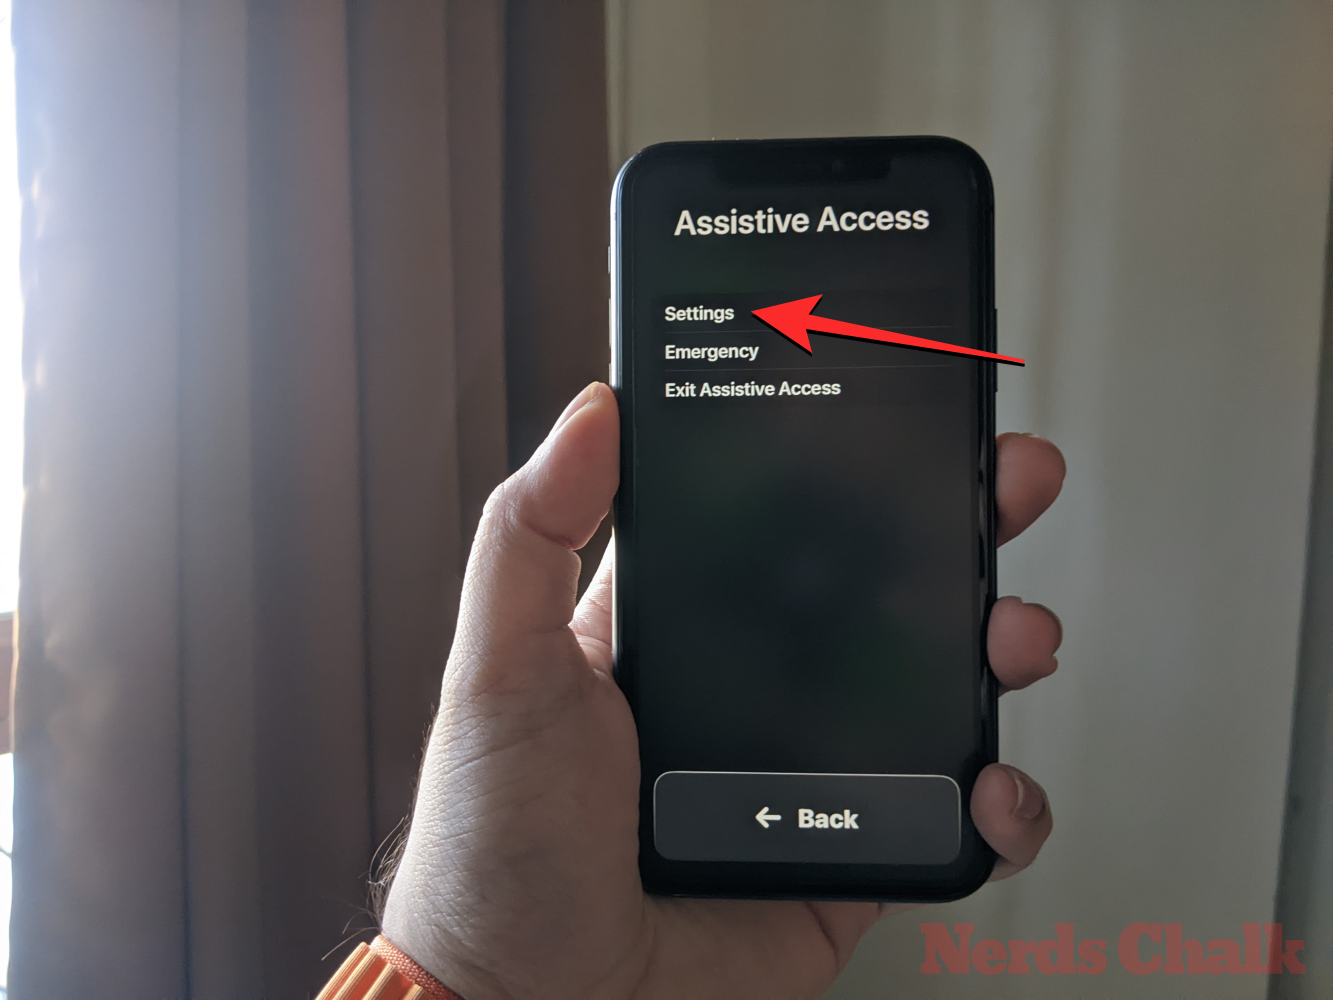
You’ll need to enter your Assistive Access passcode.

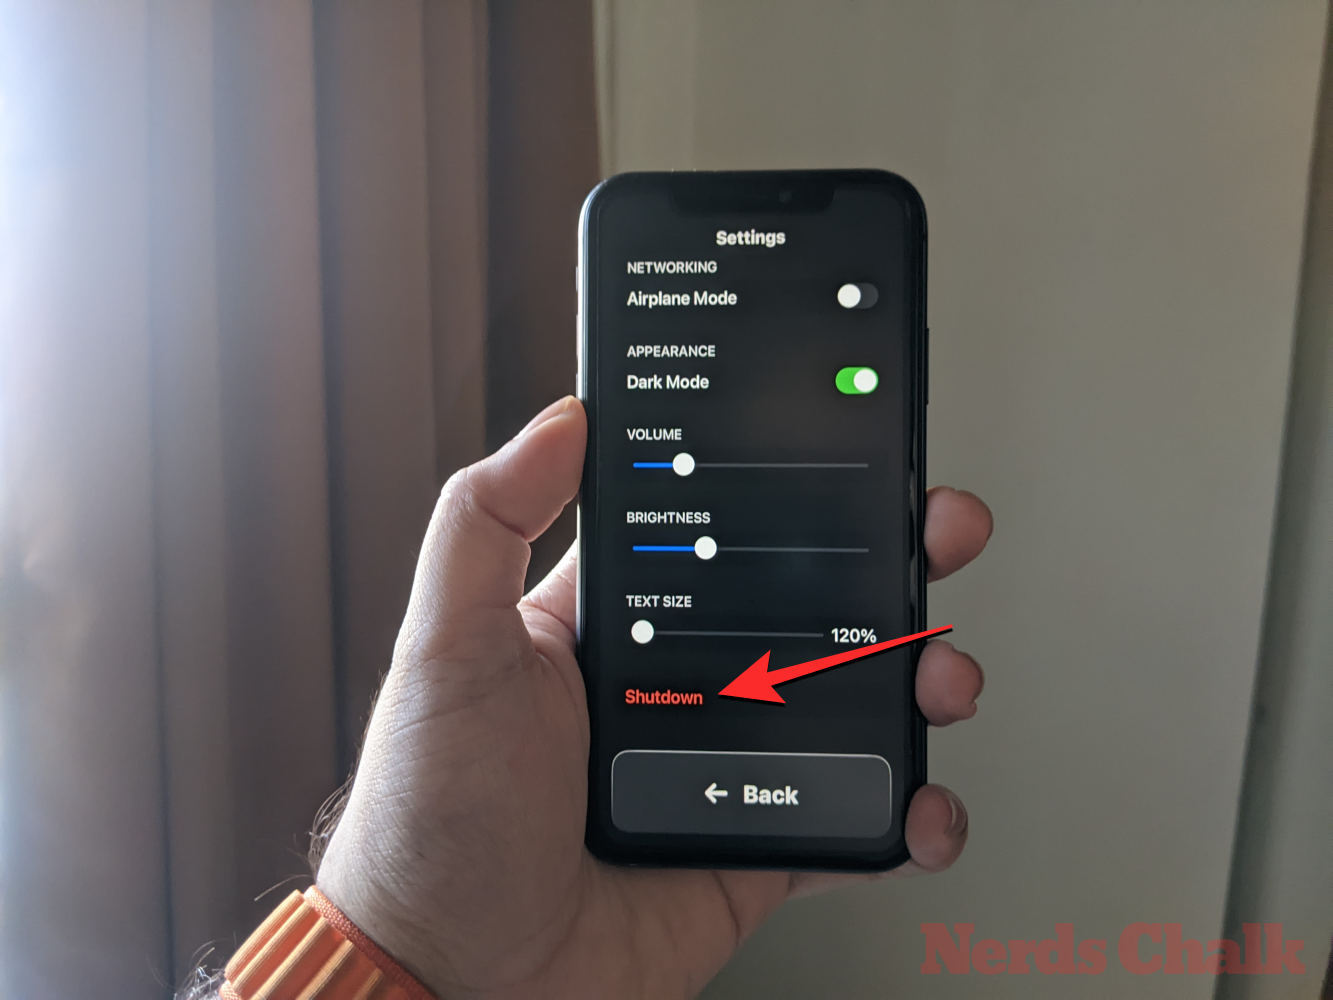
When you do that, your device will load the Settings page for Assistive Access. Here, the first thing you can toggle is switching the Airplane Mode on/off under “Networking” to prevent/allow your iPhone to connect to wireless and cellular networks.
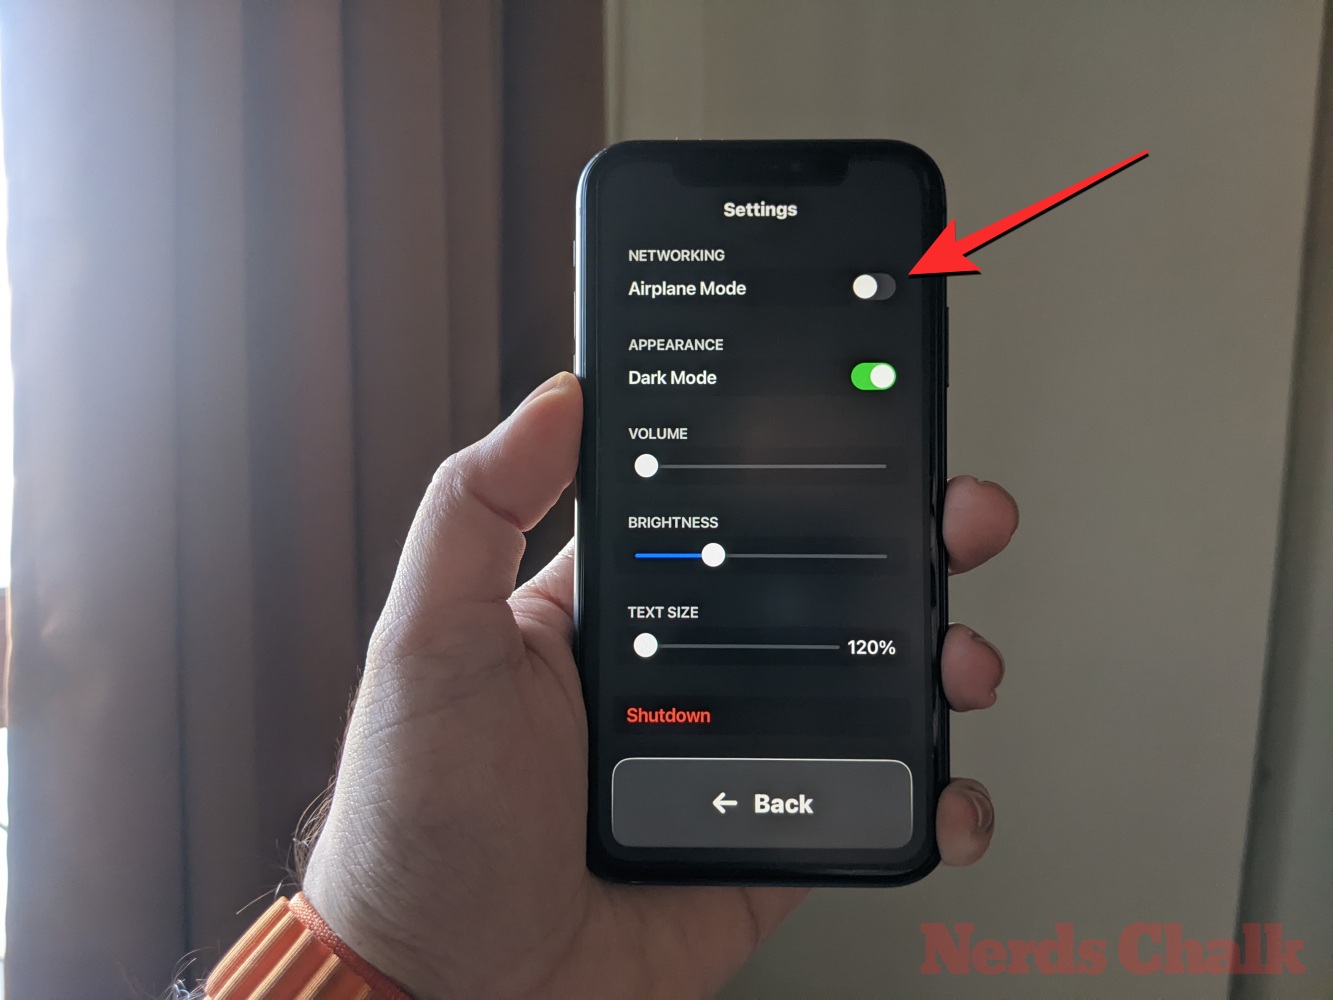
Underneath the “Networking” section, you’ll find the “Appearance” section where you can turn on/off Dark Mode for Assistive Access.
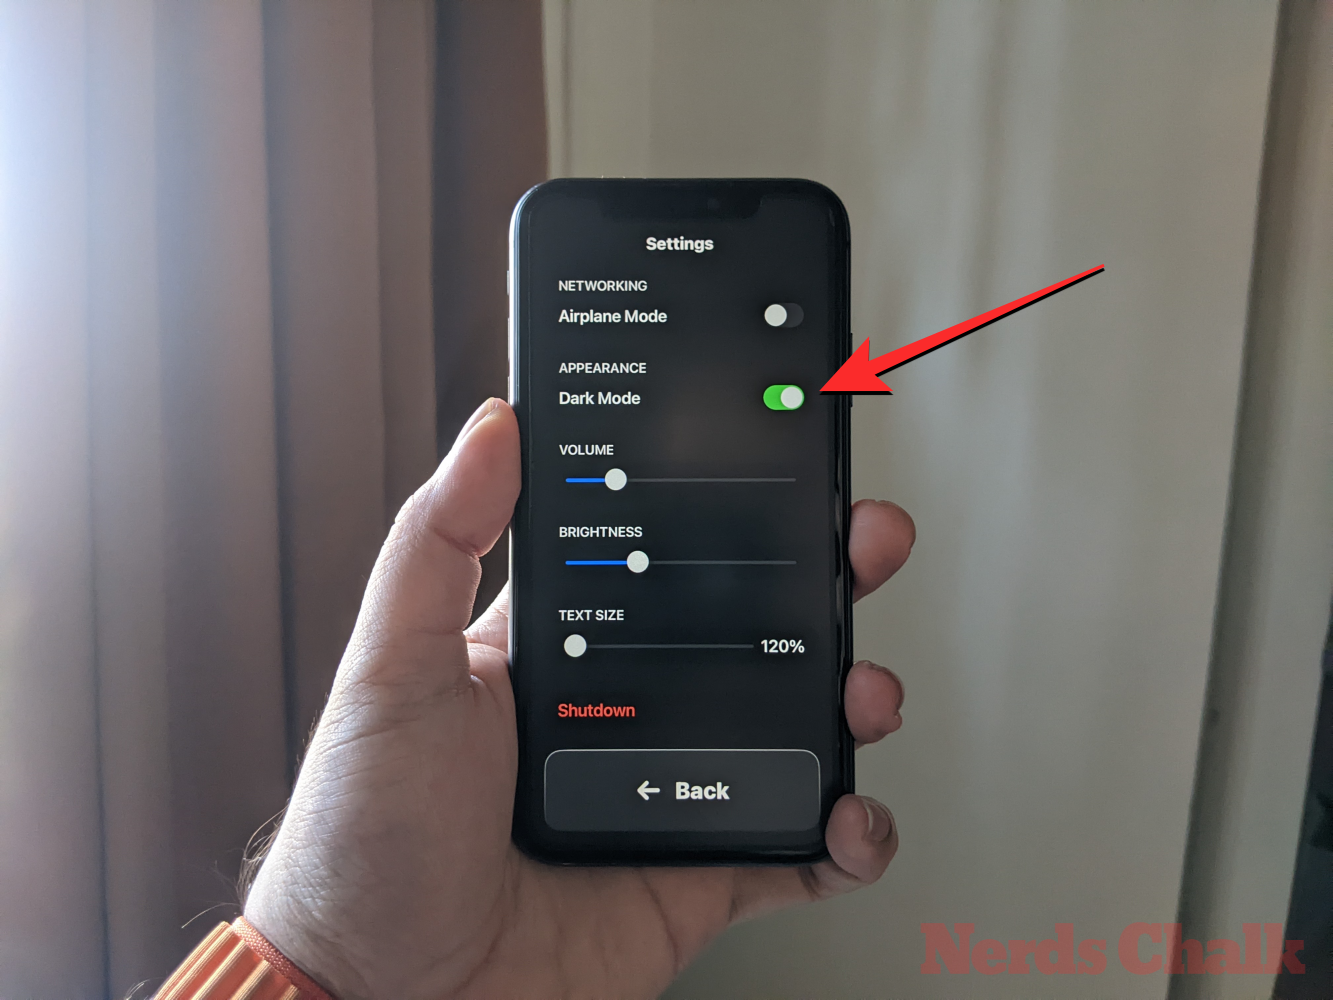
You can then move the sliders on the screen to adjust Volume, Brightness, and Text Size.
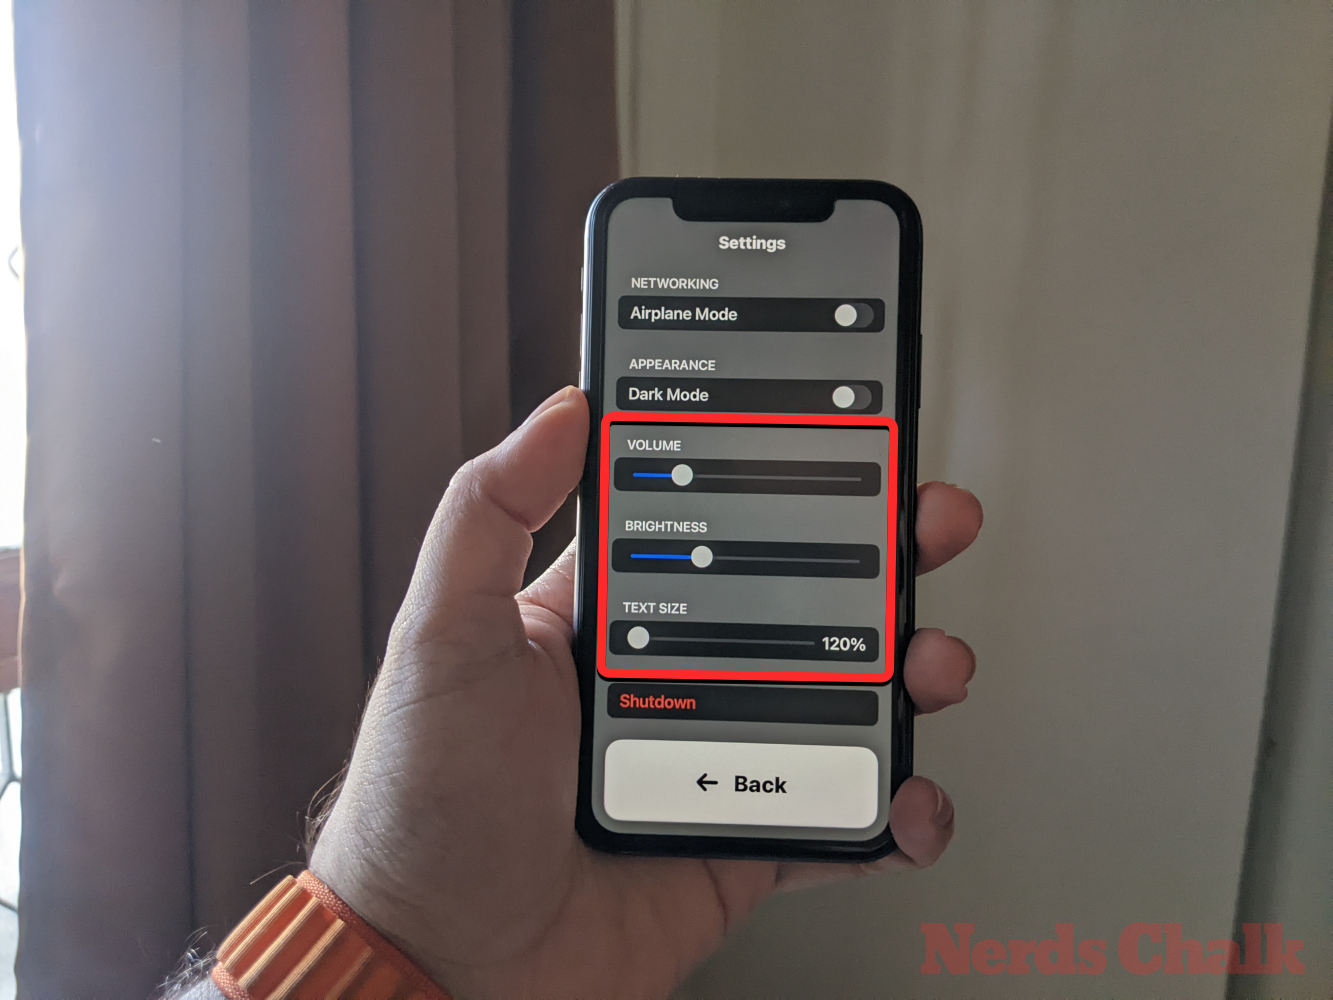
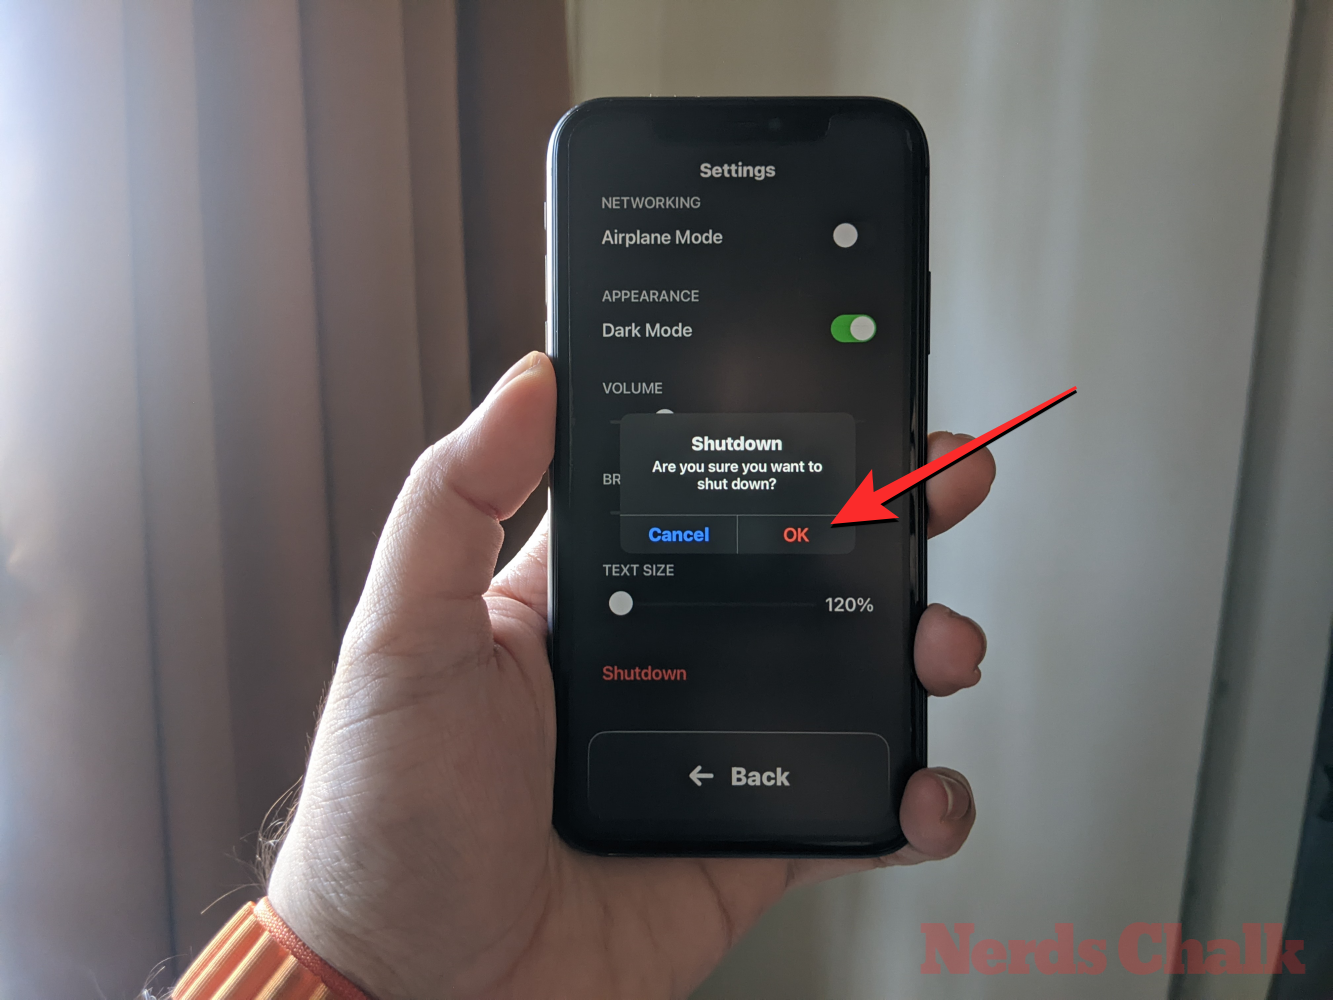
At the bottom of the Settings screen, you can tap the Shutdown button to power off the iPhone within Assistive Access.
When you do that, you’ll be prompted to confirm your action. To continue with the Shutdown action, tap on OK.
At any time, you can go back to the Assistive Access home screen by tapping on the large Back button at the bottom.
When Assistive Access is inactive
When Assistive Access is inactive, you can manage its settings by first opening the Settings app on the iPhone.
Inside Settings, scroll down and select Accessibility.
On the Accessibility screen, scroll down to the bottom and tap on Assistive Access.
You will now arrive at the Assistive Access screen from where you can manage different settings for Assistive Access on your device.
Add, remove, and manage applications
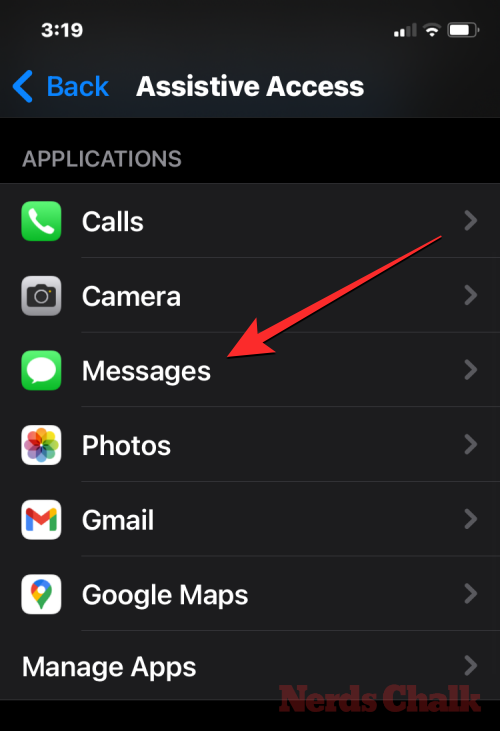
The first thing you can configure is the “Applications” section. Here, you’ll see a list of all the apps you’ve set up to be available inside Assistive Access. To change the settings and permissions for any of these apps, select an app from the “Applications” section.
On the next screen, you can toggle different options, features, and permissions for the selected app if available. Apps configured with Assistive Access will show more options to configure.
Other apps you added here will only allow you to grant or deny specific permissions for them when Assistive Access is active.
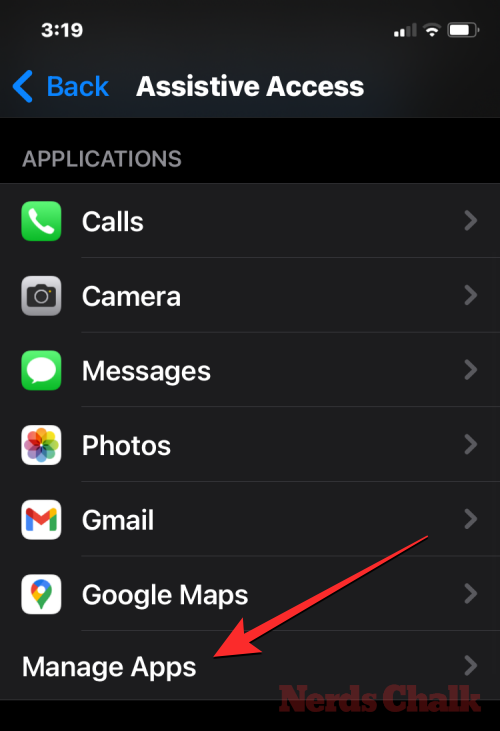
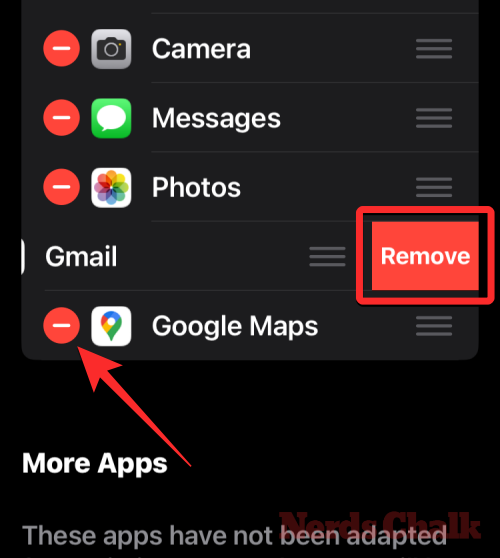
To remove or add more apps inside Assistive Access, tap on Manage Apps under “Applications”.
On the next screen, you will see existing apps under “Selected Apps” and apps that haven’t yet been added under “Optimized for Assistive Access” and “More Apps”. To add an app from these sections to Assistive Access, tap on the green-colored plus (+) button on its left-hand side and configure the selected app on the next screen.
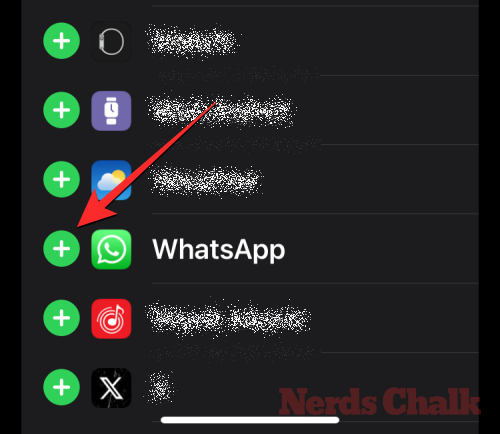
To remove an app from Assistive Access, tap on the red-colored minus (-) icon on its left-hand side and then tap on Remove on the right.
Change apps layout
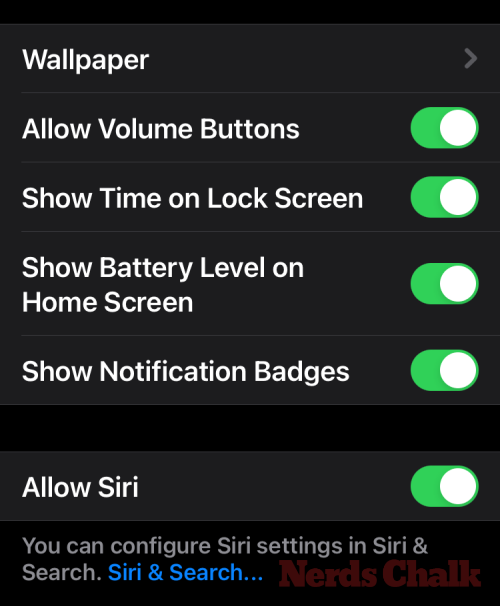
Once you’ve configured the apps to be present inside Assistive Access, you can return to the previous screen to manage this mode further. Under the “Options” section, you can switch between Rows and Grid to change the appearance of the Assistive Access home screen as described during setup.
Change default wallpaper
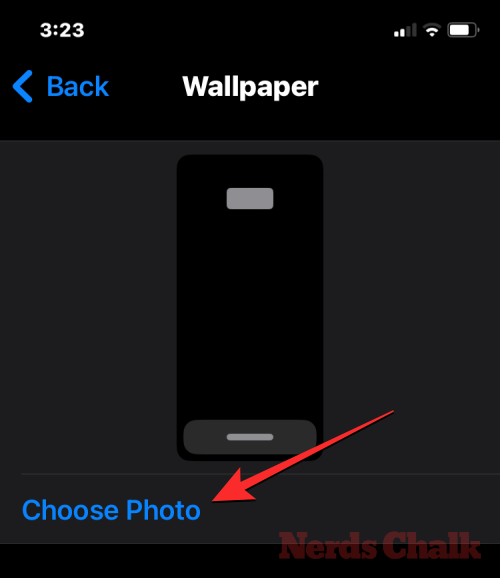
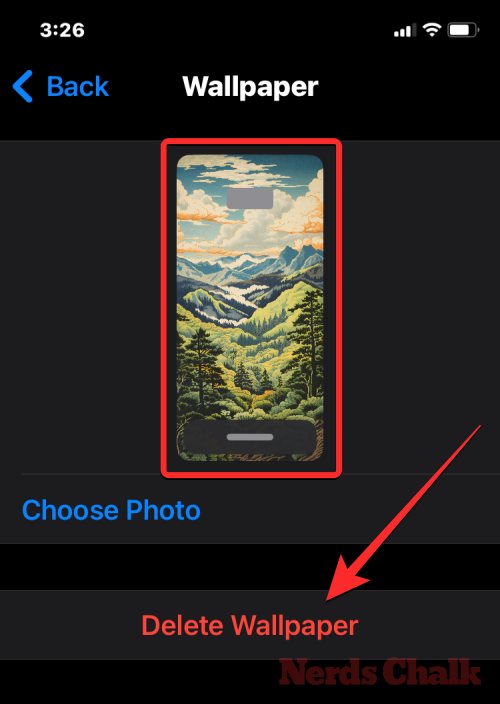
By default, when Assistive Access is set up, the lock screen shows a black wallpaper. To set a photo as your lock screen wallpaper inside Assistive Access mode, tap on Wallpaper.

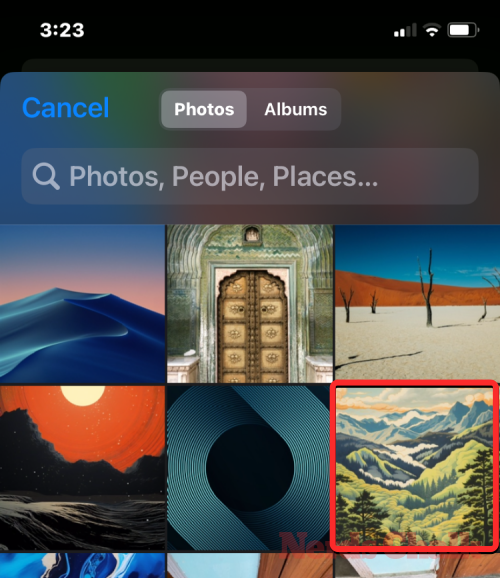
On the next screen, tap on Choose Photo to proceed.
Now, you can select a picture from your Photos library to add it as your lock screen wallpaper inside Assistive Access mode.
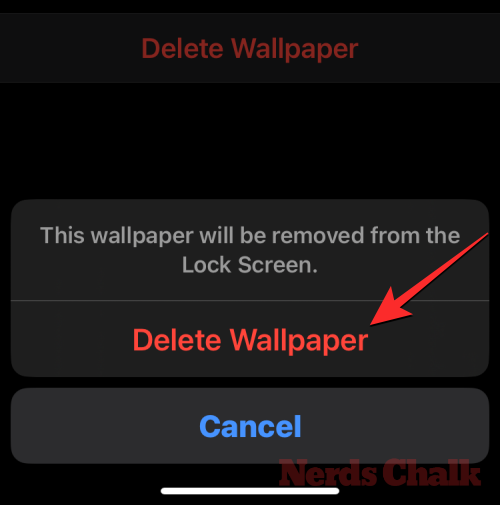
The selected wallpaper will now be added to your Assistive Access lock screen. A preview of it will appear on the Wallpaper screen. If you want to remove the applied wallpaper from the lock screen, you can do that by tapping on Delete Wallpaper.
To confirm the action, tap on Delete Wallpaper from the prompt that appears at the bottom.
Turn on additional features
Inside the Assistive Access settings, you can also toggle a bunch of different options to enable or disable when Assistive Access is active.
These include:
Allow Volume buttons: When enabled, you can turn up or down the volume levels using the volume button during Assistive Access. When disabled, pressing the Volume buttons won’t change anything on the iPhone.
Show Time on Lock Screen: By default, the only way to see the time with Assistive Access active is by checking the iPhone’s lock screen. If you disable this toggle, however, you won’t see a digital clock on the lock screen.
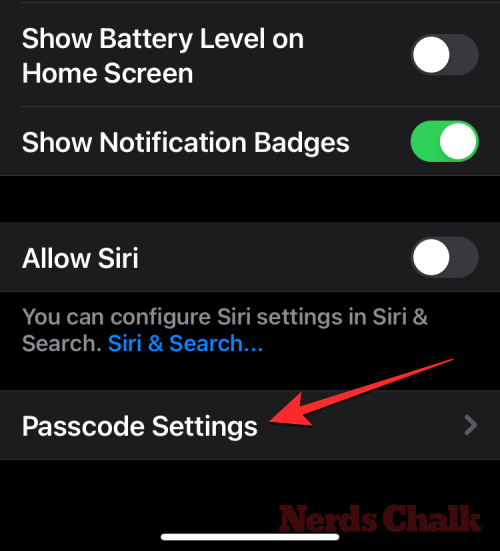
Show Battery Level on Home Screen: Assistive Access’ home screen only shows app icons and names. You can turn on this toggle to additionally see the battery levels from the home screen.
Show Notification Badges: When you receive a notification on an app with Assistive Access enabled, you’ll see a “New” labeled notification badge on the app icon. To prevent seeing this badge, you can turn off the Show Notification Badges toggle.
Allow Siri: If you configured Siri during the Assistive Access setup, this toggle will be enabled. If you didn’t, you can turn on the Allow Siri toggle to enable the digital assistant on the device when Assistive Access is active.
Change Assistive Access passcode
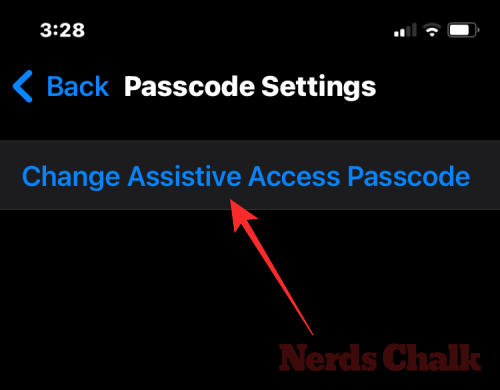
When you set up Assistive Access, iOS will ask you to create a new passcode that will be necessary to enter and exit Assistive Access in the future. You can change this passcode to something else from the Assistive Access settings by scrolling down to the bottom and tapping on Passcode Settings.
On the next screen, tap on Change Assistive Access Passcode.
You will now have to enter and re-enter your new passcode for Assistive Access in the subsequent steps.
How to turn off Assistive Access on iPhone
When you’re done using Assistive Access on an iPhone, you can switch to the regular iOS interface easily. For that, triple-press the Side button on the iPhone. This will prompt the Assistive Access screen on the iPhone. To turn off Assistive Access, tap on Exit Assistive Access from the list of options.
Your device will now ask you to enter the Assistive Access passcode.

When you do that, the screen will go black and will read the “Exiting Assistive Access” message. Within seconds, you’ll return to the regular iOS interface you may be familiar with.

That’s all you need to know about using the Assistive Access feature on the iPhone.


