[toc]
NEXUS 5 BOOTLOADER UNLOCK GUIDE
[/toc]
Hell Yeah! Nexus 5 is live on Play Store and we’re pretty sure most of you have already placed orders for this mighty beauty Google has just released. Here’s a guide for the first hack-ish thing you’d do on your Nexus 5 — unlocking the bootloader.
Rooting, custom recoveries, custom ROMs, mods and all things fun.. it all starts with unlocking the bootloader on your Nexus device. And Google has made the bootloder unlocking process as simple as possible. It’s just a one line command and takes less than a minute to unlock the bootloader.
By unlocking the bootloader on Nexus 5 you’d be able to install root and custom recoveries on your device. And most important of all ─ Custom ROMs. There’s a great community of developers making custom ROMs for various Android devices and the Nexus 5 being a Nexus device means you’ll have handful of great custom ROMs to flash, try and have fun with.
The process of unlocking the bootloader is similar between all Nexus devices so this guide is not limited to Nexus 5 only, you could use it for all Nexus devices.
WARNING!
Warranty may be void of your device if you follow the procedures given on this page!
You only are responsible for your device. We won’t be liable if any damage occurs to your device and/or its components.
BEFORE YOU BEGIN..
You must do this pre-installation stuff before attempting to unlock bootloader on your Nexus 5 in order to avoid any complications later, and have a smooth and successful process.
BACK UP YOUR DEVICE
Back up important data and stuff before you start as unlocking the bootloader on your Nexus 5 would wipe/delete every single file stored on your Nexus 5. You’ll lose all your apps and app-data (app settings, game progress, etc.), and all the files stored on the internal storage of the device.
For help on Backup and Restore, check out our exclusive page on that linked right below.
► ANDROID BACK UP AND RESTORE GUIDE: APPS AND TIPS
INSTALL NEXUS 5 DRIVER
You must have proper and working driver installed on your windows computer to be able to successfully unlock bootloader on your Nexus 5. In case you’re not sure, follow the link below for a definitive guide for installing driver for your Nexus 5 on your computer.
► NEXUS 5 ADB AND FASTBOOT DRIVER INSTALLATION GUIDE
CHARGE YOUR DEVICES
If your android device, or PC, powers off due to lack of battery while the process is underway, it could damage the device. So, make sure both of them are adequately charged and that no power interruption takes place when the process is undergoing — at least 50% battery of the device and laptop is what we would recommend.
OTHER THINGS TO TAKE CARE OF:
└ Use original USB cable to connect your Nexus 5 to PC.
Nexus 5 BOOTLOADER UNLOCK GUIDE
DOWNLOADS
Download the file given below and save it in a separate folder on your computer (just to keep things tidy, that is).
- Fastboot files: DOWNLOAD LINK
File name: Nexus 5 Bootloader Unlocking Files.zip
File size: 914 KB
STEP-BY-STEP GUIDE
You may choose to unlock the bootloader on your Nexus 5 using either our one-click automated script OR manually by yourself. Both the methods are discussed below:
UNLOCK BOOTLOADER WITH ONE-CLICK SCRIPT
- Extract/Unzip Nexus 5 Bootloader Unlocking Files.zip file on your computer (using 7-zip free software, preferably)
- Turn on USB Debugging on your Nexus 5
- Enable developer options: Go to your device’ Settings » select About device » Scroll to the bottom and tap on “Build number” seven times to enable developer options
- Enable USB Debugging: Open device’ Settings » select Developer options » Tick the “USB debugging” checkbox (under Debugging section)
- Connect your Nexus 5 to computer with a USB cable and if a pop-up screen shows up on Phone asking you to Allow USB debugging for the computer, make sure to tick the checkbox and tap Okay

- Now open the folder where you extracted the contents of Nexus 5 Bootloader Unlocking Files.zip file in Step 1
- Look for the 1-click-nexus-5-bootloader-unlock.bat script file inside the folder and execute it by double clicking on it
└ If the script hangs on < waiting for device > for a long time (say 2 minute) then that means you’ve a drivers or some other connectivity issue between your Nexus 5 and computer. To troubleshoot this, follow the drivers installation guide link provided above - After a few seconds, a screen will show up on your Nexus 5 asking you to accept the Bootloader unlocking request. Accept it by selecting Yes using the Volume button and then press the Power button to confirm
- That’s it you’re done.
MANUALLY UNLOCK BOOTLOADER
If for some reason the 1-click script doesn’t work, you can also unlock the bootloader manually by following the steps below:
- Extract/Unzip Nexus 5 Bootloader Unlocking Files.zip file on your computer (using 7-zip free software, preferably)
- Now, boot your Nexus 5 into bootloader mode:
- Power off your Nexus 5 first.
- Press and hold Volume Down and Power button together until you see Google’s logo, then release the Power button, while still holding Volume Down. You’ll enter Bootloader mode.
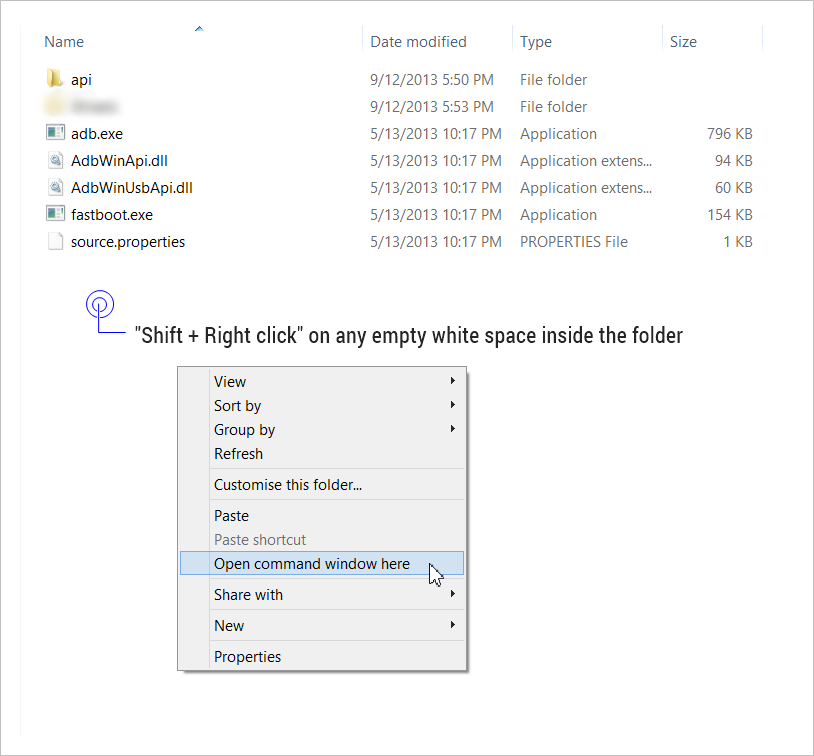
- Now open the folder where you extracted the contents of Nexus 5 Bootloader Unlocking Files.zip file
- Press Shift key + Right click on any empty space inside the folder, and select Open command window here from the context menu

- Now connect your Nexus 5 to your computer using a USB cable, and then type fastboot devices in the command prompt to make sure your device is recognized
└ In case if your device isn’t recognized and the fastboot devices command doesn’t list any device, then it means you don’t proper driver installed for your Nexus 5 on your computer. Follow the link provided above for troubleshooting driver and other connectivity issues - And now to unlock the bootloader, type this in the command prompt window:
fastboot oem unlock
- Accept the bootloader unlocking request that shows up on your Nexus 5 by selecting Yes using the Volume button and then press the Power button to confirm
That’s all.
Feedback Us!
It was easy, right? Let us know what you plan to do now, with the bootloader now unlocked on your Nexus 5.
Suggestions are most welcomed!
