
- What to know
- What is ‘Check In’ in Messages in iOS 17?
- How to set up and use ‘Check In’ on your iPhone with iOS 17
- How to cancel a ‘Check In’
- How to edit a ‘Check In’ once it has been created
- How to change data shared when using ‘Check In’
- What data is shared with my contact if I don’t arrive at the location?
What to know
- ”Check In” is a new way to notify your friends and family when you arrive at a location. This feature enhances security by keeping your loved ones updated with your location and transit times. You also get the option to create timer-based ‘Check Ins’ which notify your contacts if you don’t respond to the ‘Check In’ notification after the set period.
- ”Check In” is available in the Messages app and can be accessed by heading to Messages> conversation > plus (+) > More > ‘Check In’.
- You can choose to share your last known location or all the locations you visited since creating the ‘Check In’. When sharing all your visited locations, your last iPhone unlock location and Appel Watch removal location are also sent to your contacts. Your contacts also have access to information like your iPhone’s battery and cell service status.
iOS 17 introduces a range of privacy and security features designed to enhance the way you engage with your device and communicate with your contacts. One such addition is the new ‘Check In’ function, aimed at keeping your loved ones abreast of your location, and vice versa.
This feature shifts the focus from the traditional location-sharing method, which requires you to constantly check your device to keep up with someone’s location. Instead, ‘Check In’ gives greater weight to noticing when someone arrives at a specific location. Let’s explore this innovative feature in more detail and discover how you can leverage it on your iPhone.
What is ‘Check In’ in Messages in iOS 17?
Introduced in iOS 17, the ‘Check In’ feature enables you to automatically inform specified contacts of your arrival at a particular location. This is a safety-focused function that differs from simple location sharing. The objective of ‘Check In’ is to confirm that you have reached a specific location within a set timeframe. If you haven’t arrived as expected, a notification is automatically dispatched to the designated contact.
There’s also an alert for you if you don’t make it to the designated location. This allows you to either adjust your Expected Time of Arrival (ETA) or get in touch with emergency services. If you don’t react to this alert, both your designated contact and — in regions where this is supported — Emergency Services are automatically notified.
How to set up and use ‘Check In’ on your iPhone with iOS 17
Here’s how to use ‘Check In’ on your device running iOS 17. If you haven’t updated your device to iOS 17 yet, you can do so by heading to Settings > General > Software Update. Once you have installed the latest update on your device, you can use the steps below to use ‘Check In’ on your device.
Step 1: Enable Significant Locations
You will first need to enable Significant Locations. This will allow your device to keep track of locations you frequently visit which is a required feature to use Checkk In. Here’s how you can enable Significant Locations on your iPhone.
Open the Settings app and tap Privacy & Security.
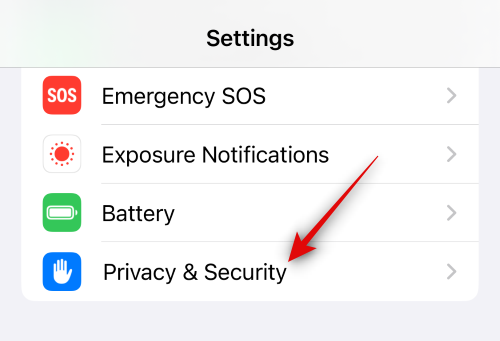
Tap Location Services at the top.
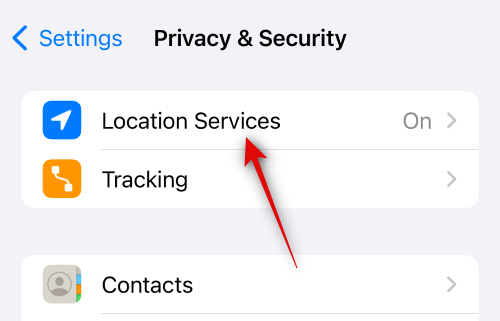
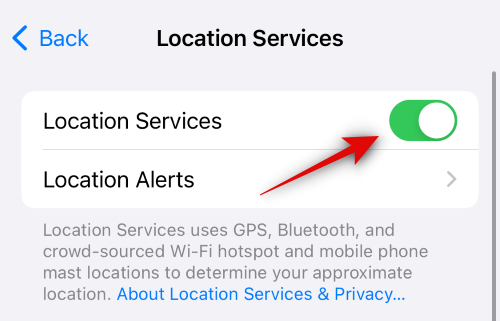
Tap and enable Location Services if the same is disabled on your device.
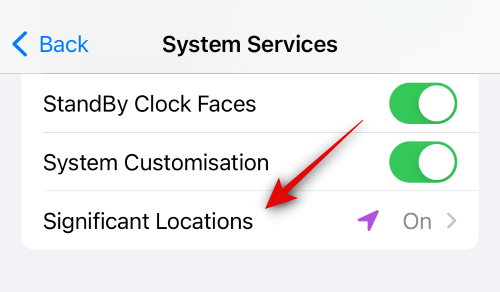
Now scroll to the bottom, and tap System Services.
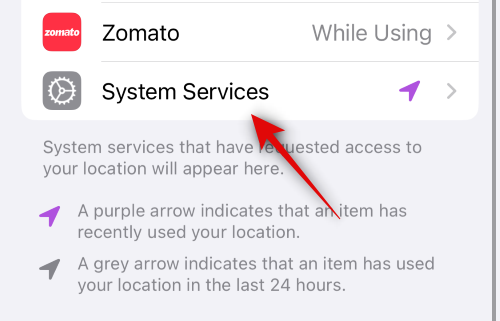
Scroll down and tap on Significant Locations.
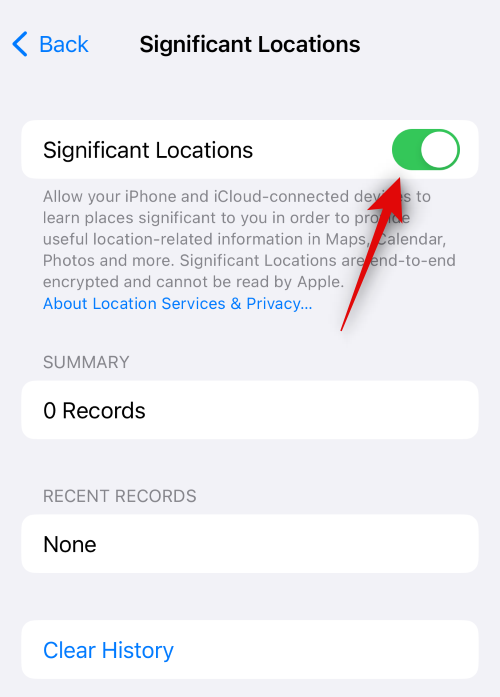
Tap and enable the toggle for Significant Locations at the top.
And that’s it! You can now use the next step to use ‘Check In’ on your device.
Step 2: Use ‘Check In’
You can use ‘Check In’ in the Messages app as long as you have iMessage enabled. Follow the steps below to help you along with the process.
Open the Messages app and tap on a conversation where you wish to use ‘Check In’.
Now tap the plus (+) icon in the bottom left corner.
Swipe up or tap More to view more options.
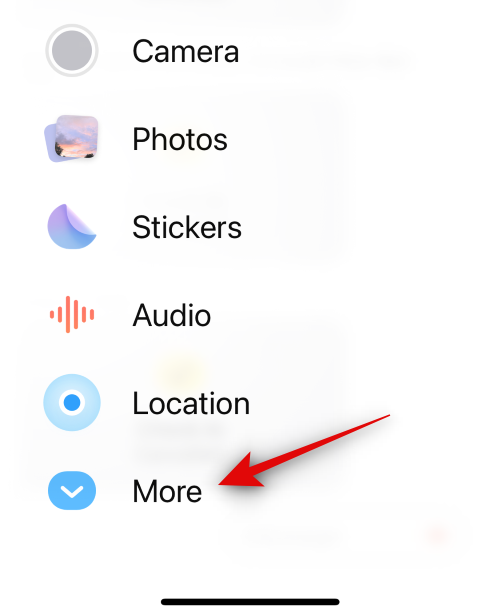
Now tap ‘Check In’.

Tap Edit in the new ‘Check In’ card added to your message.
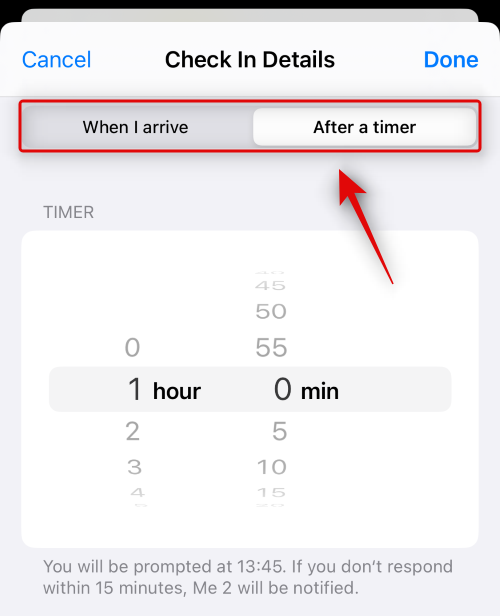
Now tap and choose one of the options mentioned below depending on the type of ‘Check In’ you wish to create.
- When I arrive: Select this option if you wish to create a location-specific ‘Check In’. This type of ‘Check In’ uses your current location to automatically mark you as arrive.
- Add a timer: This option creates a time-specific ‘Check In’. This option can be used to use ‘Check In’ when you won’t be traveling to a new location but instead wish to keep your contact updated after a specific time.
Next, follow one of the sections below depending on your choice above.
If you selected “When I arrive”
If you selected When I arrive you can use the steps below to help you customize and send your ‘Check In’.
Tap Change to select a location for which you wish to create a ‘Check In’.
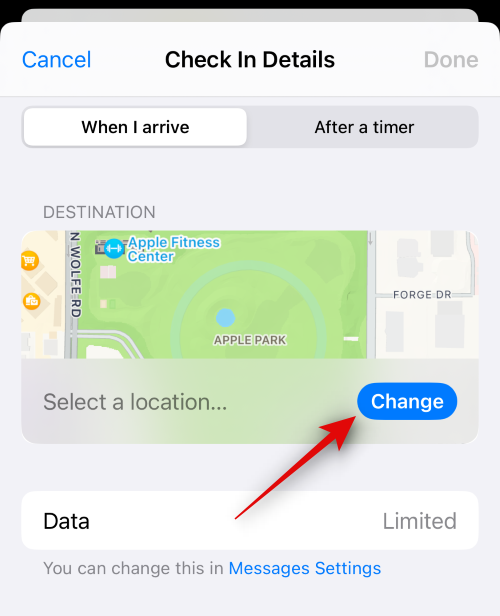
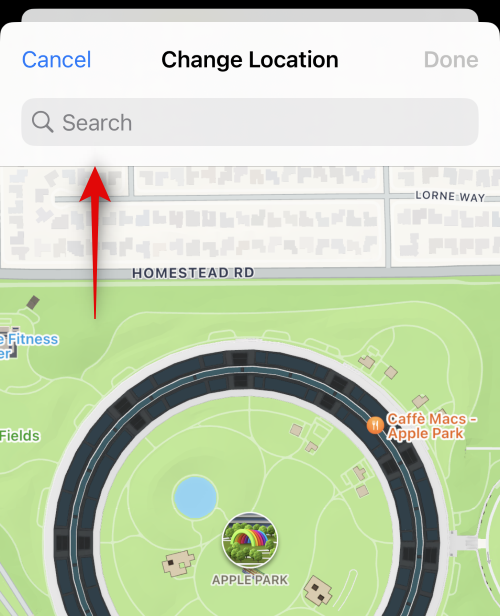
Tap the search bar at the top and search for the desired location.
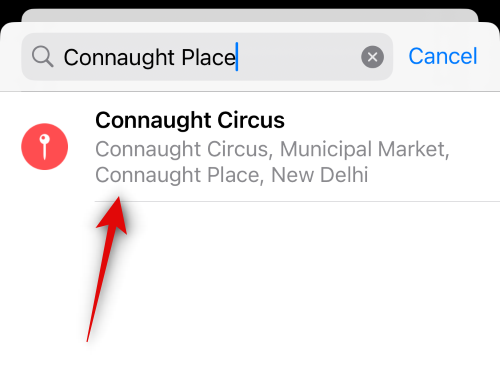
Tap and select the location from your search results.
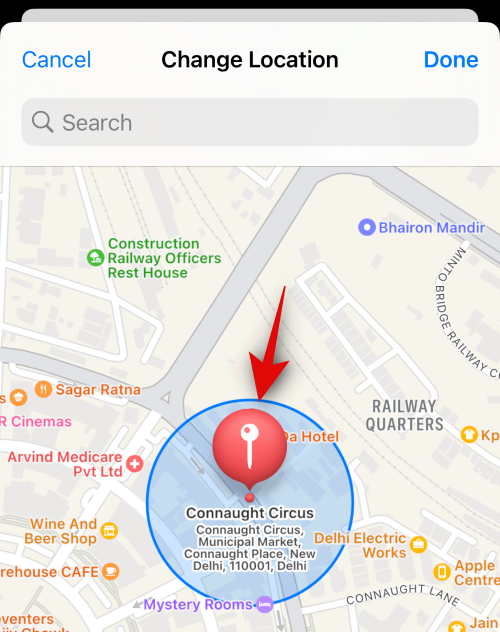
You can double-tap on the map to zoom into it.
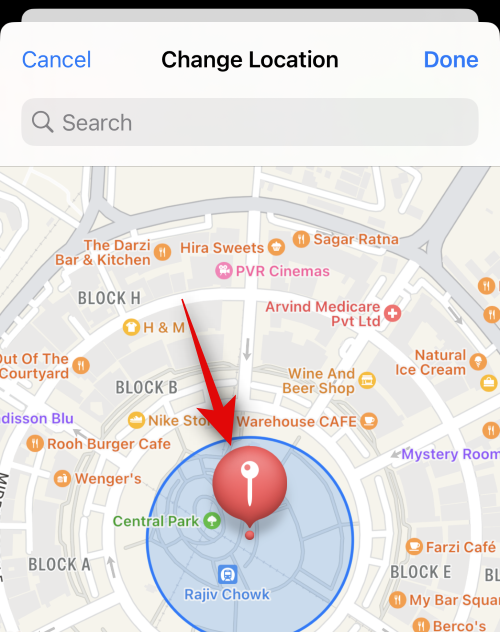
If the pin isn’t placed where you want it, you can tap and hold on the map to add a custom pin.
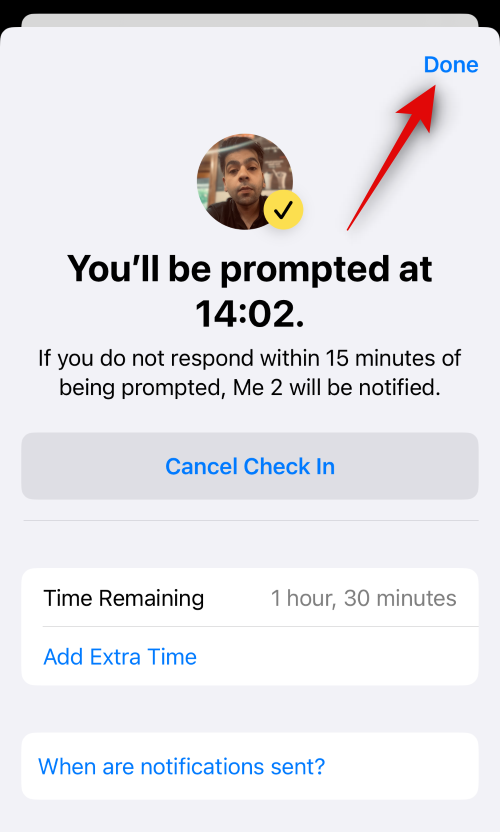
Once the pin has been added to the desired location, tap Done in the top right corner.
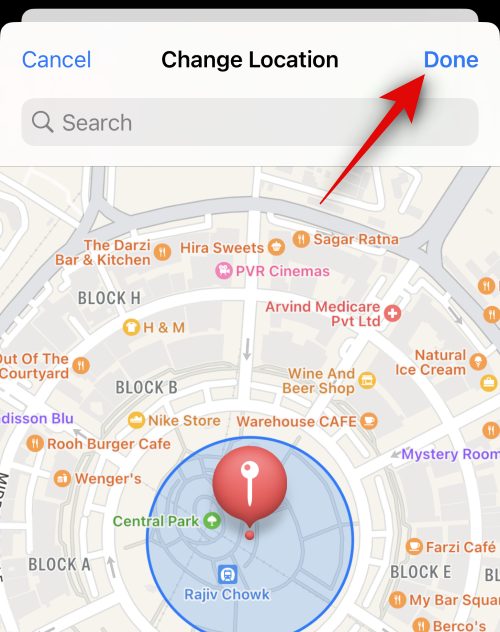
The pin will now be added as your ‘Check In’ location. Your ETA will now be shown under ESTIMATED TRAVEL TIME.
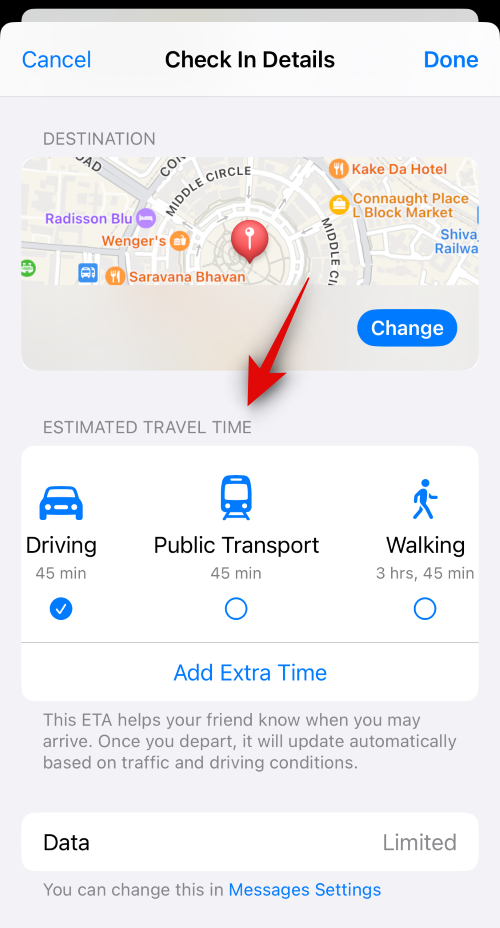
Tap and choose your preferred mode of travel from one of the choices under the same depending on your preference.

Note: Your ETA will automatically update depending on your travel conditions, transit time, and more.
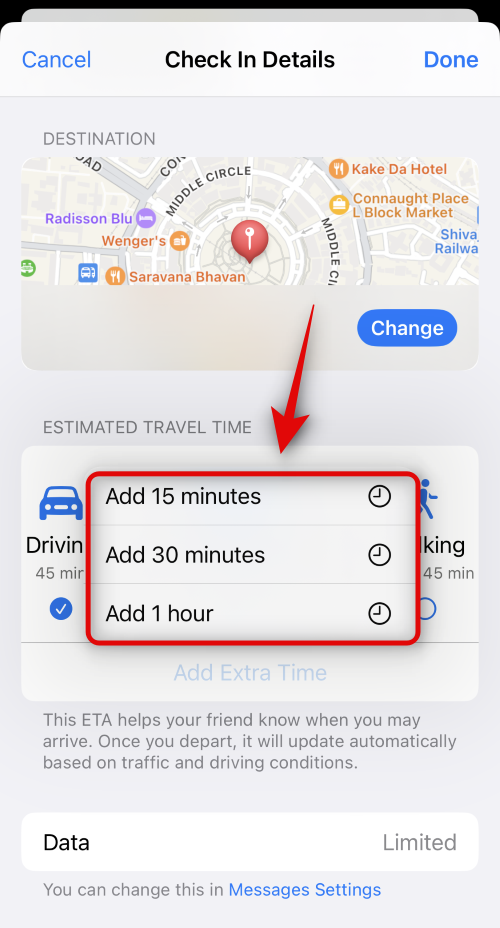
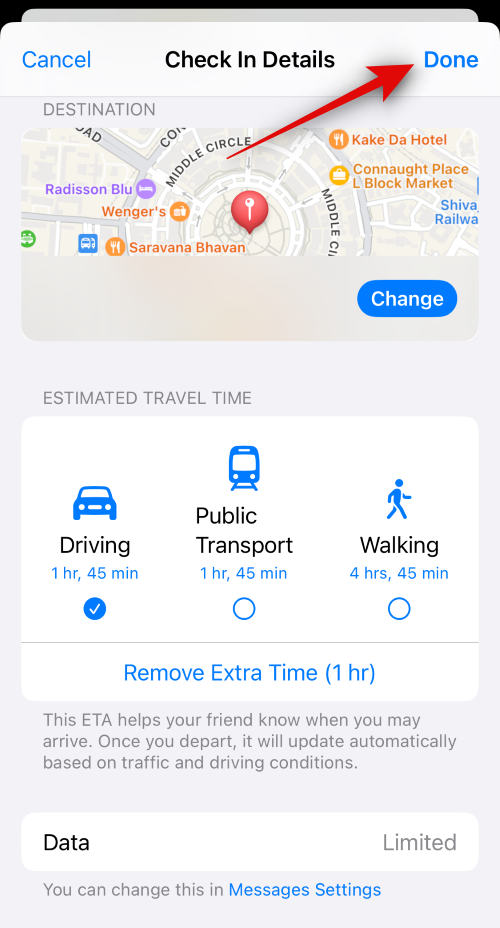
Tap Add Extra Time if you wish to add extra time to your ETA.
Tap and choose one of the options from the choices below depending on the extra time you wish to add.
- Add 15 minutes
- Add 30 minutes
- Add 1 hour
Tap Message Settings if you wish to change the data shared with your contact when using ‘Check In’.
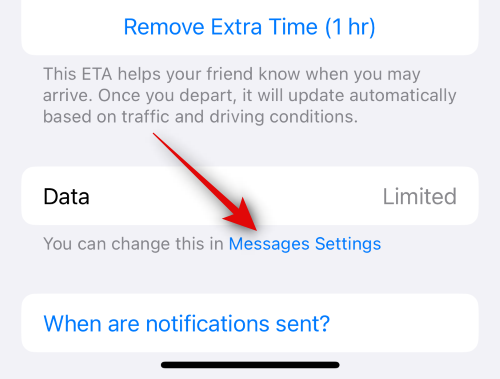
Scroll down and tap Shared Data under ‘Check In’.
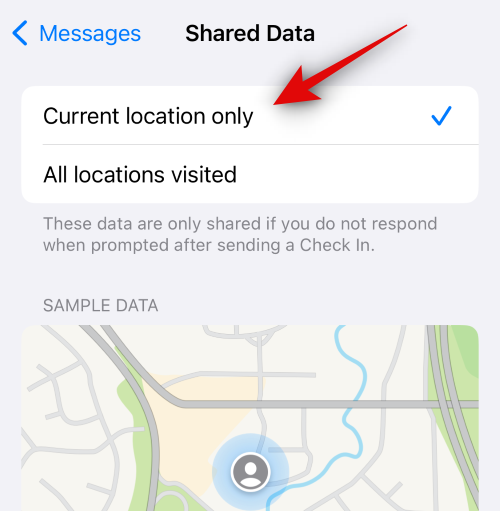
Now choose one of the following options depending on the data you wish to share.
- Current location only: This option will share your current location with the contact if you fail to respond to the ‘Check In’ notification in the required time.
- All locations visited: This option will share your current location with the contact as well as all locations you visited in the past when the ‘Check In’ was created. In addition to this, the location for your last iPhone unlock as well as Apple Watch removal will be shared with the contact if you fail to respond to the ‘Check In’ notification within the required time.
Switch back to the Messages app and tap Done in the top right corner.
The ‘Check In’ will now be created and added to your message. Add any more additional text to your message as needed.

Tap the Send icon once you’re ready.
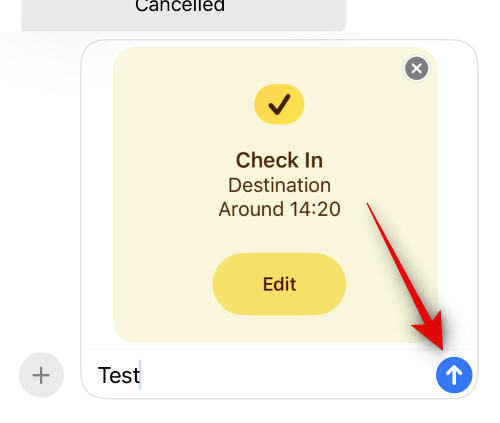
And that’s it! The ‘Check In’ will now be created and shared with the concerned contact.
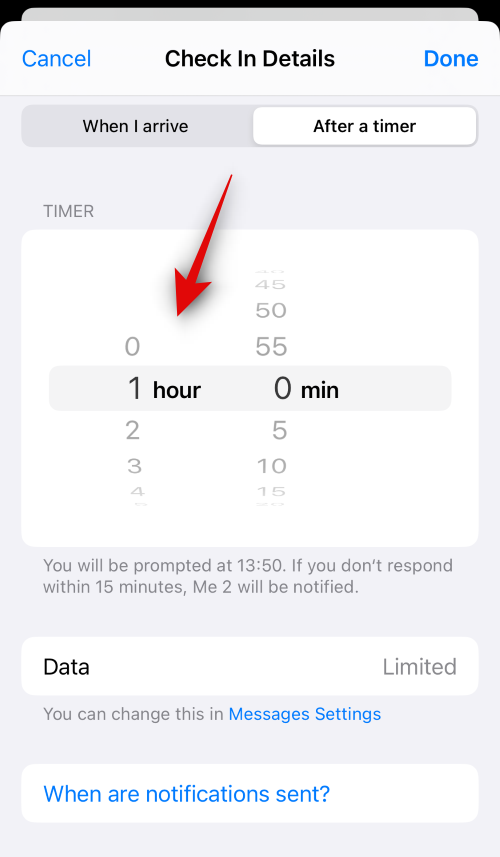
If you selected “Add a timer”
Here’s how you can customize and share a timed ‘Check In’ with your contact.
Swipe and choose the preferred amount of time for your ‘Check In’. You will be shown the ETA for your ‘Check In’ under the timer.
Tap Done in the top right corner once you’re done.
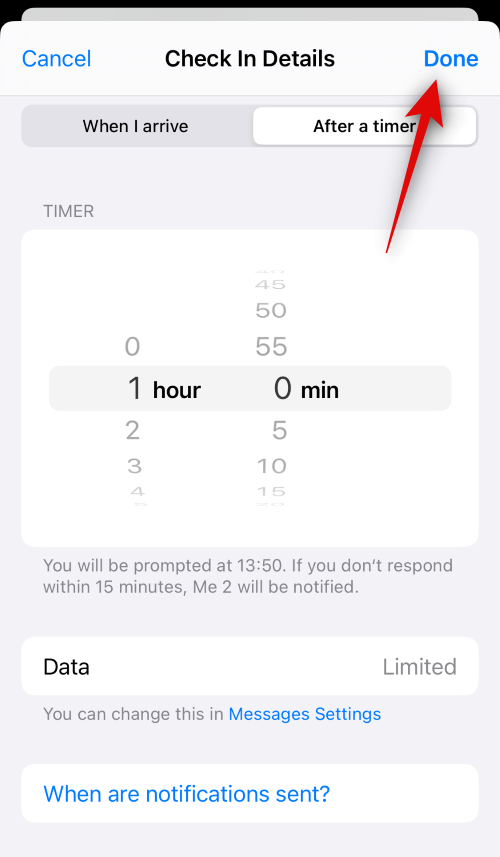
The ‘Check In’ card will now be added to your message. Add any text to your message as needed.
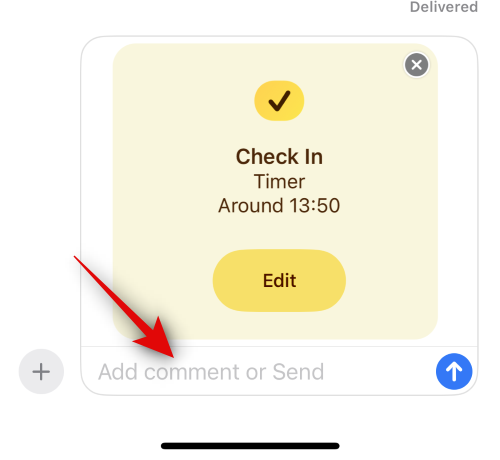
Tap the Send icon once you’re done.
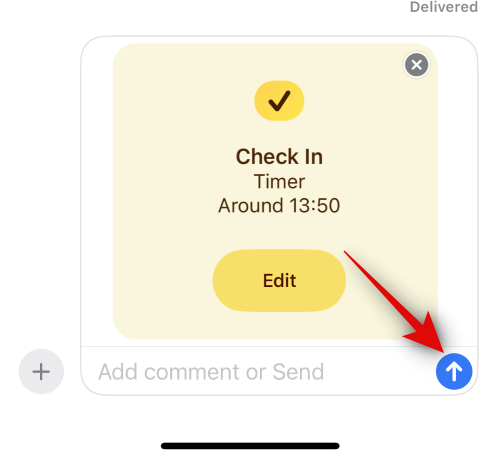
And that’s it! You will now have created and shared a timer-based Check In card with the selected contact.
Related: Fix: ‘Check in is not available to send to this recipient’ Issue
How to cancel a ‘Check In’
There might be times when you might want to cancel a ‘Check In’. This can happen due to a change in plans or unexpected circumstances. In such cases, you can use the steps below to cancel a ‘Check In’ easily on your device.
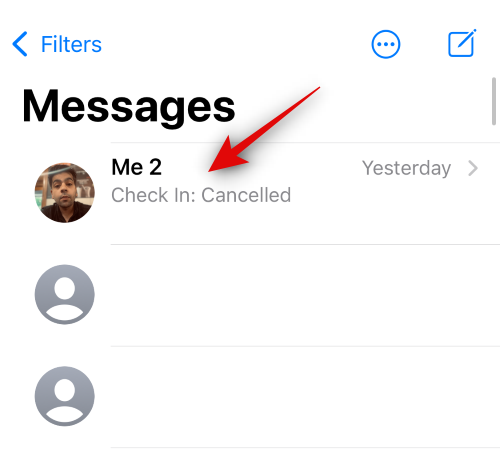
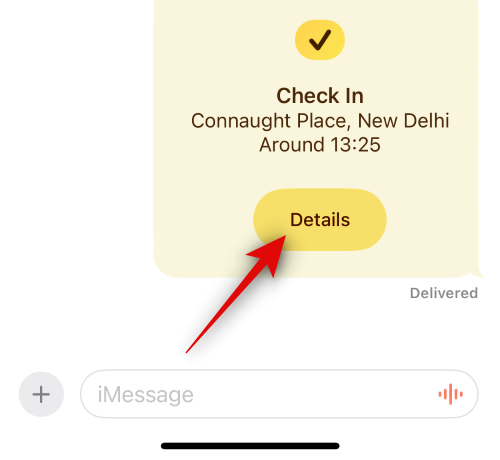
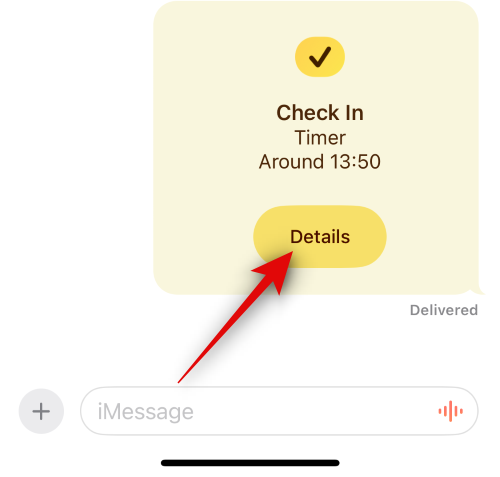
Open the Messages app and tap on the conversation where you’ve shared a ‘Check In’.
Scroll and find the ‘Check In’ in the chat and tap on Details.
Tap Cancel ‘Check In’ to initiate the cancellation.
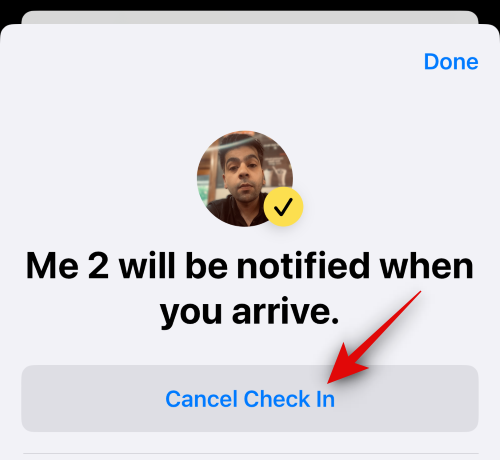
Tap Cancel ‘Check In’ again to confirm your choice.
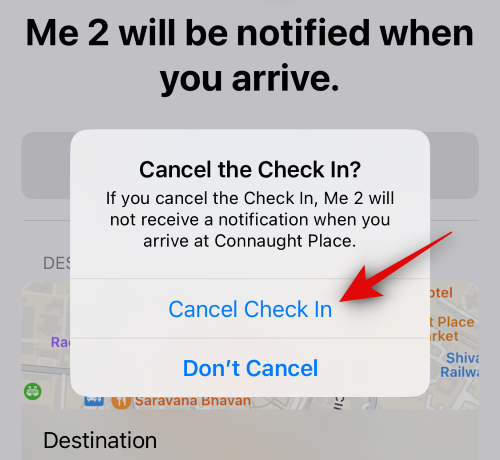
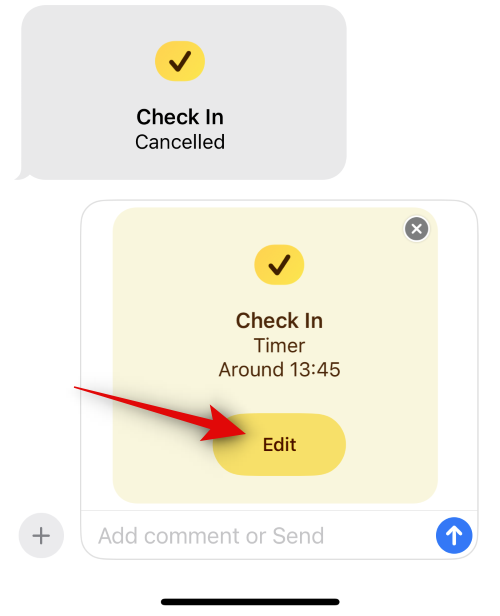
The selected ‘Check In’ will now be canceled and the same will be reflected in the chat. Your contact will also be notified once you cancel a ‘Check In’.
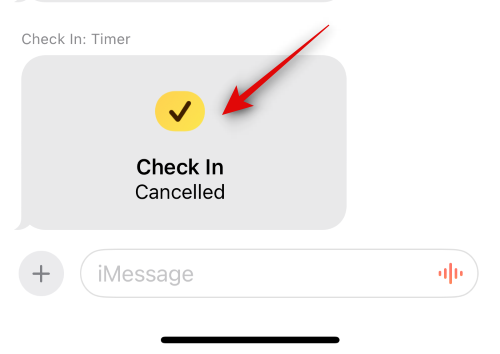
And that’s how you can cancel a ‘Check In’ on your device.
Related: How to Personalize Phone Calls on iPhone
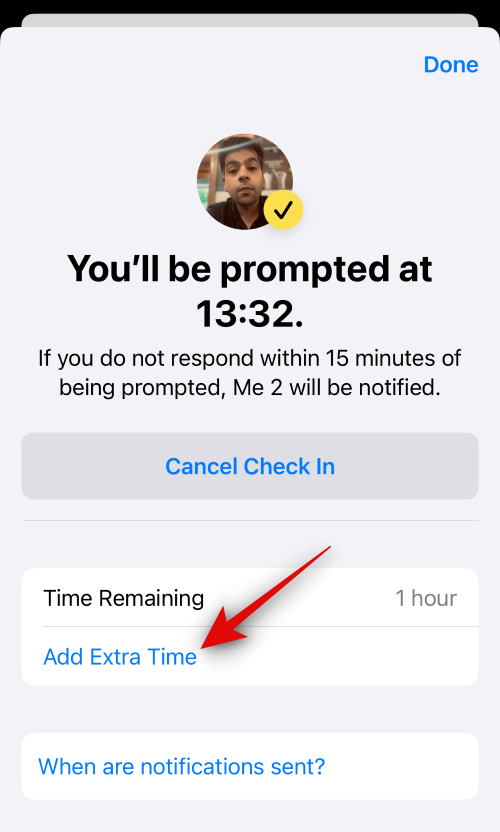
How to edit a ‘Check In’ once it has been created
There might be times when you wish to edit a ‘Check In’ once it has been created. This can help you update your ‘Check In’ by changing the location, and timer, adding extra time, and more. Follow the steps to edit a ‘Check In’ once it has been created.
Note: You can only edit timer-based ‘Check Ins’ by adding extra time to them if needed.
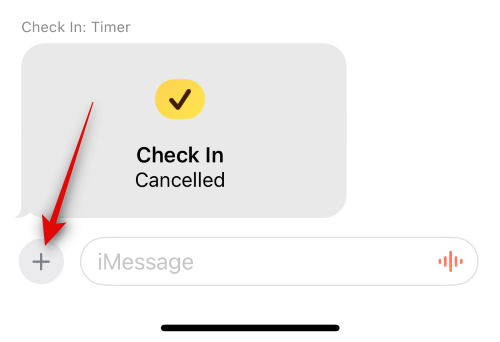
Open the Messages app and tap the conversation where you wish to edit a sent ‘Check In’.
Scroll and find the ‘Check In’ card in the conversation. Once found, tap on Details.
Tap Add Extra Time to add additional time to your ‘Check In’.
Tap and select one of the choices depending on the extra time you wish to add.
- Add 15 minutes
- Add 30 minutes
- Add 1 hour
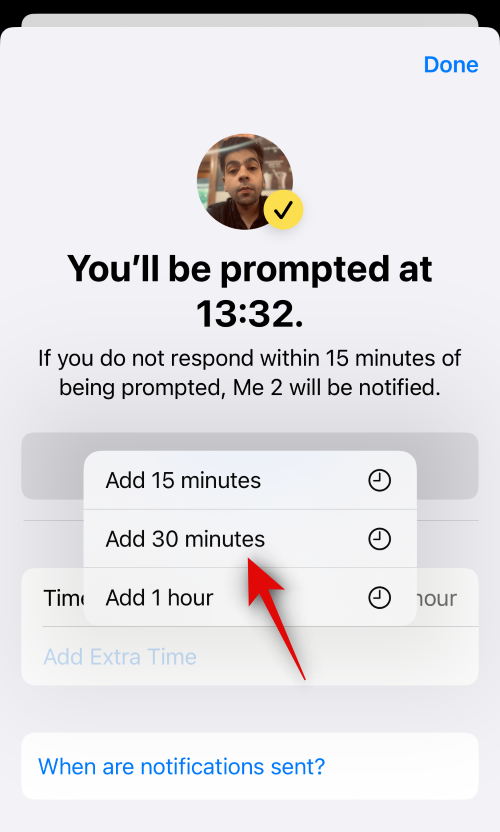
The selected duration will now be added to your timer. Tap Done in the top right corner once you’re done.
And that’s how you can edit a ‘Check In’ once it has been created and shared with a contact on your iPhone.
Related: iOS 17 Standby Mode Digital Clock: Step-By-Step Guide
You have two choices when it comes to the data that is shared with someone if you fail to respond to the ‘Check In’ notification. You can choose to share your Current location only, which will send your current location to the contact, or choose to share All locations visited, which will share all locations you visited since you shared the ‘Check In’.
This option will also share the last known location for the last iPhone unlock since missing the ‘Check In’ as well as the last known location of your Apple Watch removal if you own one. While you get to choose between these two options when first using ‘Check In’, it is unavailable the next time you use this feature. However, you can still change the data shared when using ‘Check In’ from the Settings app. Follow the steps below to help you along with the process.
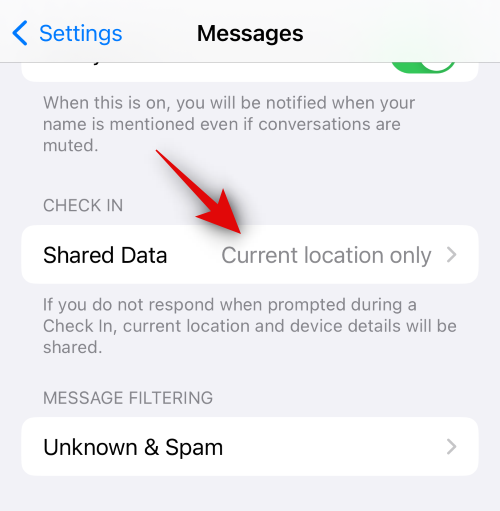
Open the Settings app and tap Messages.
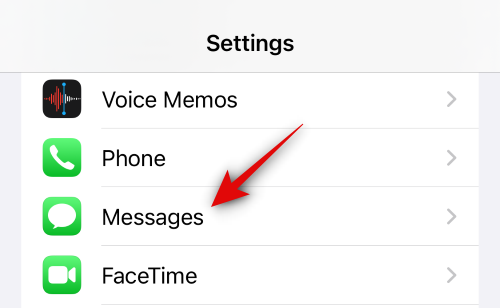
Scroll down and tap Shared Data under ‘Check In’.

Now tap and choose one of the options depending on the data you wish to share when you miss a ‘Check In’.
- Current location only
- All locations visited
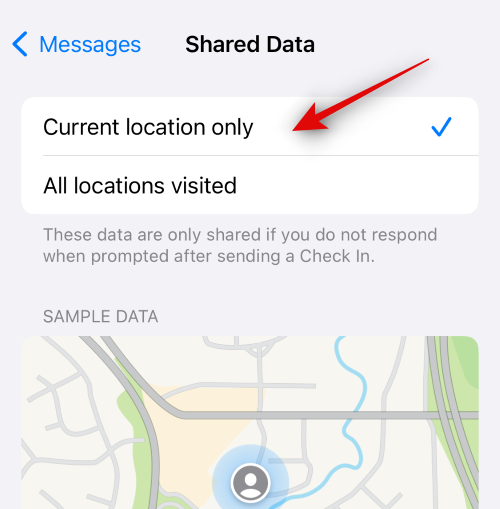
You can now close the Settings app. Your choice will now be saved for all future ‘Check Ins’ you share with your contacts.
Related: iOS 17: How to use FaceTime Reactions on iPhone
The ‘Check In’ feature shares your most recent location with the specified contact as mentioned earlier. Besides, it allows you to share more enriching data including all the places you’ve visited since your last ‘Check In’, the place where you last unlocked your iPhone, as well as the last location where your Apple Watch was taken off, provided you have one. Furthermore, the information shared includes your phone’s battery level, cellular service status among others. Rest assured, all this data is end-to-end encrypted; only you and the contact you’ve chosen to share with can access it.
RELATED


