

Root for Samsung Galaxy Tab S2 is available, but with a catch. Only Android 5.0.2 firmware could be rooted, so if you have updated to Android 5.1.1 already, you are out of luck. Though, we fully expect the Android 5.1.1 root to be available soon, like it is for Galaxy S6 and S6 Edge, Note 5 and S6 Edge Plus.
The root is an unofficial port of CD Auto Root that is the most popular root tool for Samsung device since 2010, but now has hit a bad phase ever since Android 5.1 came out. We’re hope its developer, Chainfire, is working on 5.1.1 root but in the meantime, CF Root doesn’t work 5.1.1 firmwares.
Using the CF Auto Root for Galaxy Tab S2 provided below, you can easily gain root access and the required SuperSU app that will manage the access for apps.
We will be sure to bring you a TWRP recovery for your TAB S2 as and when it becomes available.
Downloads
- Autoroot kernel for GALAXY TAB S2 on Android 5.0.2:
- Autoroot kernel for GALAXY TAB S2 on Android 5.1.1:
- Odin PC software — Link | File: Odin3_v3.10.6.zip (1.6 MB)
→ Check the official page here (for 5.0.2) and here (5.1.1) latest version of autoroot kernel available at the moment.
Supported devices
- SAMSUNG GALAXY TAB S2, 9.7-inch and 8.0-inch (as per downloads available above, per model no.)
- Don’t try on any other device whatsoever whose model no. is different than the one provided above!
Important: Check your device’s model no. on its packaging box, or in Settings > About device.
Warning: Warranty may be void of your device if you follow the procedures given on this page. You only are responsible for your device. We won’t be liable if any damage occurs to your device and/or its components. Also, this trips KNOX, meaning KNOX would stop working on your device, and thus you won’t be able to Samsung Pay, or install enterprise Apps on your device at Office.
Backup important files stored on your device before proceeding with the steps below, so that in case something goes wrong you’ll have backup of all your important files. Sometimes, Odin installation may delete everything on your device!
Step-by-step Guide
Step 1. Download Odin and autoroot kernel file from above.
Step 2. Install Galaxy Tab S2 driver (method 1 there!) first of all. Double click the .exe file of drivers to begin installation. (Not required if you have already done this.)
Step 3. Extract the Odin file. You should get this file, Odin3 v3.10.6.exe (other files could be hidden, hence not visible).
Disconnect your Galaxy Tab S2 from PC if it is connected.
- Go to Settings > About device. And then tap on build no. 7 times or until your get the message ‘You’re now a developer’.
- Go back to Settings, scroll down, and tap on ‘Developer options’.
- Look for ‘Enable OEM unlock’ and use its toggle to enable it. Accept the warning by tapping on OK button.
→ Also, be sure to disable the ‘Find My Mobile’ option in ‘Lockscreen and security settings’ for a while as that may block installation using Odin. You can re-enable it later on. Moreover, if you don’t see this option, the ignore this, it’s okay.
- Power off your Galaxy Tab S2. Wait 6-7 seconds after screen goes off.
- Press and hold the three buttons Power + Home + Volume down together until you see warning screen.
- Press Volume Up to continue to download mode.

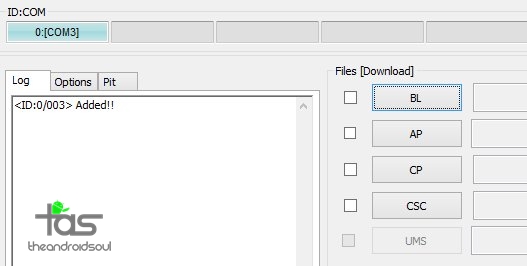
Step 8. Connect your Galaxy Tab S2 to PC now using USB cable. Odin should recognize your Galaxy Tab S2. It’s a must. When it recognizes, you will see Added!! message appearing in the Log box in bottom left, and the first box under ID:COM will also show a no. and turn its background blue. Look at the pic below.
- You cannot proceed until you get the Added!! message, which confirms that Odin has recognized your device.
- If you don’t get Added!! message, you need to install/re-install drivers again, and use the original cable that came with the device. Mostly, drivers are the problem (look at step 2 above).
- You can try different USB ports on your PC too, btw.
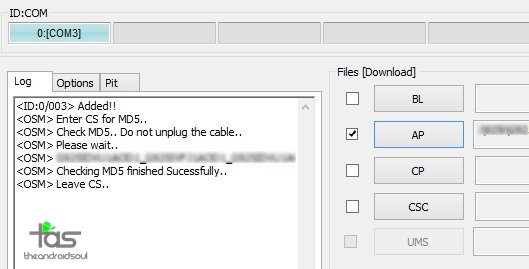
Step 9. Load the autoroot kernel file into Odin. For this, click the AP button on Odin and the select the kernel’s file you downloaded above.
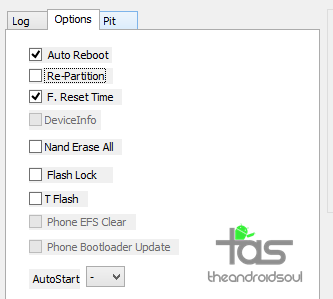
- If Odin gets stuck at setup connection, then you need to do this all again. Disconnect your device, close Odin, boot device into download mode again, open Odin, and then select the file and flash it again as said above.
- If you get FAIL in the top left box, then also you need to flash the file again as stated just above.

→ That’s it. Enjoy the root access on your Galaxy Tab S2!
If you need any help with this, let us know via comments below and we will try our best to help you out.
Via ashyx

81 responses to “Samsung Galaxy Tab S2 Root [SM-T810, SM-T710, SM-T715] Works on Android 5.1.1 and 5.0.2”
Did it not work, I do have Kernel is not something on the boot, like the first post, is there a way to revert this and go to the original settings?, thank you
Did it not work, I do have Kernel is not something on the boot, like the first post, is there a way to revert this and go to the original settings?, thank you
So easy!!! Thanks so much. Now bye-bye crappy Samsung bloatware! Thank you
So easy!!! Thanks so much. Now bye-bye crappy Samsung bloatware! Thank you
How do I unroot if used this method you root my tablet
How do I unroot if used this method you root my tablet
Dose it work on T825C?
Dose it work on T825C?
Dear Kapil,
thanks for your tutorial for the Galaxy Tab 2 ?
Would you please point me to a tutorial valid with Nougat Rom?
My final target would be having a TWRP and a custom ROM like on my Pocophone ^^
Thank you so much and have a bright Christmas time