
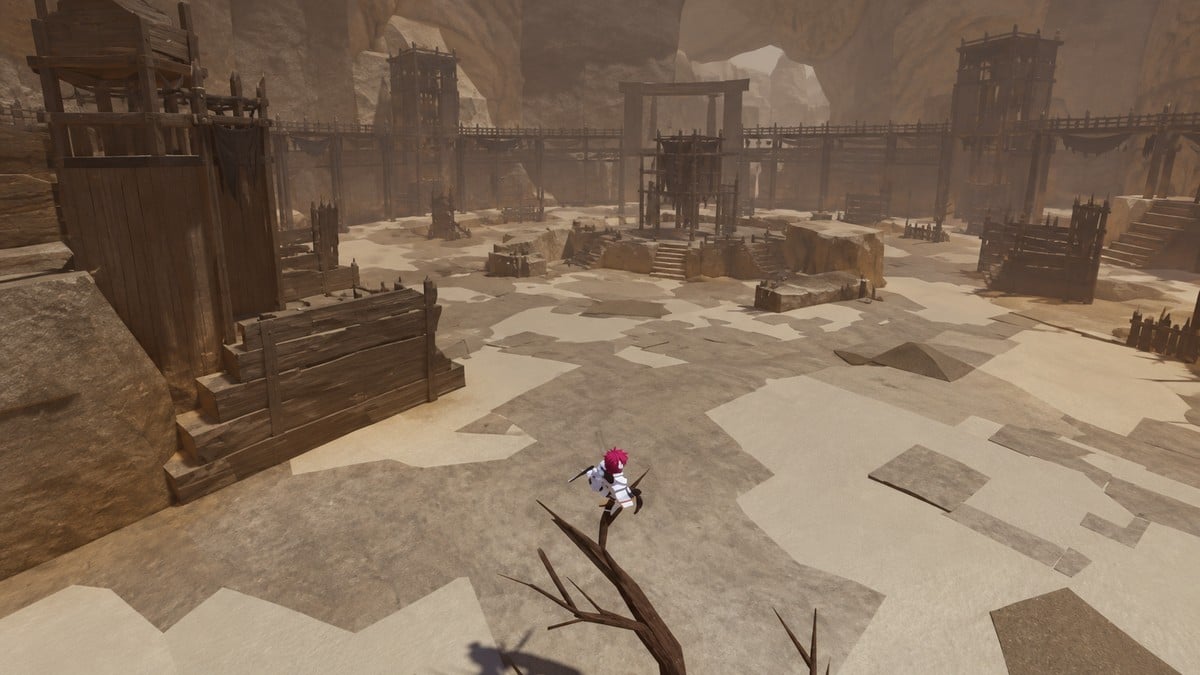
Farm Ouwigahara by grouping enemies for area attacks, building card bonuses, and surviving milestone bosses, then spend your points on mastery, equipment, and crafting materials.
Your gear affects how many dungeon points you earn, so preparation matters before the first wave starts. Ouwigahara in Project Slayers 2 also opens access to otherwise locked rewards, making the climb part of your equipment progression.
- How to unlock Ouwigahara and enter the dungeon
- Equipment for damage, survival, and area attacks
- Solo runs, parties, and point sharing
- Cards for stats, healing, draws, and scaling
- Floor modifiers and their combat restrictions
- Opening waves, later floors, and milestone bosses
- Elevated enemy grouping on all three maps
- Ending a run and spending dungeon rewards
- Damascus Sickles materials and weapon reforging
- Frequently Asked Questions
How to unlock Ouwigahara and enter the dungeon
Start in Hidden Mist Village by speaking to the NPC who offers a conversation about his second forge. Accept the resulting quest and follow its objective markers through the forge search. Bring Wall Climb; a mount is an optional travel aid.
The approach to the world entrance begins at Mistfall Harbor Shrine. Cross the bridge near Shinobu’s spawn, then continue across the wooden bridge toward the entrance near Forgotten Ruins. Look for a purple portal with a stone building behind it, and walk through to reach the Ouwigahara lobby.

After completing the forge quest, you can also select Ouwigahara through the main menu’s Hub option. This gives you another access option once the unlock is finished.
Inside the lobby, prepare your consumables at the Apothecary. Interact with Alchemist Meku to open the item-selection interface and purchase the potions you want before queuing.
Alchemist Meku’s potion prices
| Potion | Cost |
|---|---|
| Stamina Regen Potion | 140 Wen and 2 Demon Horns |
| Health Regen Potion | 600 Wen and 6 Demon Horns |
Head to the central purple queue portal, select Normal climb, and ready up. Entry begins after a 20-second countdown. Once you arrive on Floor 1, a separate 30-second countdown runs before the first wave.
Equipment for damage, survival, and area attacks
Weak equipment makes the climb difficult. A Duelist set supplies a damage-focused starting point, while a Tank set gives you another approach as dungeon cards build up your stats. Prepare a Tier 1 or Tier 2 weapon: the Serpent Katana is one suggested option, and Mythic Damascus Sickles are an upgraded choice. These are usable setups, not a requirement to copy one loadout.
Weapon mastery matters for quick clears, too. For a Blood Demon Art setup, Shockwave provides numerous area attacks, including a useful V attack for clustered enemies. Sickles complement that approach with a Z area attack.
Slayer equipment progression can begin with Duelist accessories; nearly all dungeon masks carry that class. At endgame, Technician pieces support multiplicative damage scaling. An elemental V2 weapon, such as Volcanic Katana, can serve as an interim weapon before pursuing Nightfall Katana.
Nightfall requires a schematic, with Mistfall Harbor and the dungeon’s Nichirin Forge associated with that progression. First Light Katana offers a more defensive alternative. One dungeon setup pairs Nightfall with Rengoku Breathing, but Water, Serpent, and Insect have their own weapon choices and timing windows.
Kamado supplies passive buffs and survivability that leave room for mistakes. Separately, Flame received launch-week buffs; that change alone does not establish a ranking for dungeon builds.
The Damascus Sickles values here belong to one inspected Mythic roll. They describe that copy, not guaranteed stats for every reforge.
| Displayed Damascus Sickles stat | Value |
|---|---|
| Additional Damage Factor | +6.8 |
| Blood Manipulation Additional Damage Factor | +1.8x |
| Block Points | +15.1 |
| Block Regen | +1.9x |
Solo runs, parties, and point sharing
You can enter with friends, but point earnings reflect your contribution unless a sharing effect changes the rules. A stronger teammate who deals most of the damage and claims most kills can take the bulk of the rewards. Solo play gives you control over your own earnings and provides two ordinary card selections, though you handle the fighting yourself.
Split changes the party calculation. It shares points regardless of individual damage, so another player’s kills still earn you points. The effect is party-only and adds nothing to a solo run.
Parties can also help load enemies together for area attacks. One solo example had six enemies arriving in batches of up to four, while a duo was described as potentially loading eight at once; those are run observations, not fixed spawn limits. A larger multiplayer grouping was described as roughly 30 enemies beneath a perch. More enemies together can mean quicker clears, but without Split, that does not guarantee a larger personal payout.
Cards for stats, healing, draws, and scaling
| Card or bonus | Effect |
|---|---|
| Glass Cannon | Doubles your damage. |
| Heavy Hitter | +50% damage and −20% stamina. |
| Damage | Increases damage. |
| Percentage Damage | One choice gives +6.4% Damage. |
| Max HP | Increases maximum health. |
| Cooldown Reduction | Reduces cooldowns; one choice gives +4%. |
| Damage Reduction | Reduces incoming damage. |
| Vampiric | Heals you on kills. |
| Second Wind | Immediately restores full health when selected. |
| Communal healing | A shared healing option. |
| Poison, fire, and freeze choices | Let your attacks inflict the corresponding status effect. |
| +2 Rerolls | Grants two tickets; each ticket redraws the whole hand. |
| Unnamed additional-card selection | Deals an additional card. |
| Lucky Draw | A Legendary card that improves draw quality. |
| High Roller | May grant a free reroll when you draw cards. |
| Tectonic Shift | Changes the map. |
| Streak | Adds +5% points per cleared floor. Death ends the bonus, but you can obtain it again and rebuild. |
| Unnamed damage-growth card | Appears to add a permanent +2% damage, up to +100%. |
| Ascension | A persistent point modifier. |
| Trophy | Adds points directly to your pot and scales with tier. Examples include a +75 display and an early 20-point offer. |
| Fortune | A flat point award; an early example gives 20 points. |
Build your selections around what the run needs: damage to clear enemies, recovery to keep fighting, and draws that expand your choices. Glass Cannon deserves a deliberate health check before you take it.
Medic, The Horde, and Strong D are additional named choices. Read the offered descriptions before committing a selection.
Floor modifiers and their combat restrictions
Some bonuses persist through the run, while floor modifiers apply to an upcoming floor. A larger multiplier increases that floor’s point return, but the choice still needs to fit your usable attacks and ability to survive. Read the duration and effect together before accepting it.
| Modifier | Point multiplier | Combat effect |
|---|---|---|
| Gold Rush | x2 | Allows continued weapon use, including sickles. |
| Bare Hands | — | Restricts you to fists. |
| Fair Fight | x1.2 | You cannot deal or receive critical hits on the next floor. |
| Unnamed no-blocking modifier | — | No party member can block on the next floor. |
| Grounded | — | — |
| Blood Moon | — | Lowers enemy health but makes enemy hits harder. |
| Boss-every-floor modifier | — | Adds a boss encounter to every floor. |
| Other boss-adding cards | — | Increase the number of bosses. |
A reward modifier is worth taking when your current build can handle the changed fight. Surviving keeps later scoring opportunities open; ending the run closes them.
Opening waves, later floors, and milestone bosses
The opening waves are easier, giving you room to accumulate rerolls and useful buffs. Favoring combat improvements over the early 20-point Fortune payout supports that approach. Your card selections can instead strengthen the build you will carry deeper into the dungeon.
Save rerolls toward approximately floors 50–60, where the available cards become more rewarding to pursue. This is a strategy, not a ban on early rerolls. Use one sooner if the offered hand cannot meet your immediate needs.
Build a reserve of rerolls while early waves remain manageable.
Keep developing your stats as combat changes. HP, damage, cooldown reduction, and damage reduction all have a place as later floors become harder and enemies hit more heavily. Elevated grouping can become useful around floor 30, but move to it earlier or later according to how the fights are going.
Bosses also gain access to more abilities as you climb. An early Daki encounter lacks her full move set; her ultimate can become a concern around floor 50. Treat that floor as an approximate warning point, not an exact switch for every encounter.
Milestone waves arrive every ten floors. Clear the remaining ordinary enemies, watch for the incoming-enemy notice, and finish the boss that follows. The floor-10 encounter features one boss, with four card selections available after the milestone is cleared.
Later milestones can bring more bosses: approximate examples are two at floor 30 and three at floor 50. Later boss kills can award around 3,000 points each, which gives those encounters substantial value without assigning that payout to the opening bosses.
The map normally rotates every ten waves, and a modifier can shorten that interval. Expect the terrain to change during a long climb.
Long runs can produce large totals, but they also take time. The illustrative 100,000–400,000-point range is not a guaranteed return. Plan for the climb your build can sustain, not a fixed payout.
Elevated enemy grouping on all three maps
Ouwigahara has three terrain layouts. Each offers an elevated position that can draw enemies into a cluster, although you are not tied to one exact hill or tree. Height helps set up the attack; it does not make you untouchable.
| Terrain | Grouping position |
|---|---|
| Snow and ice | A hill or raised rock formation. |
| Desert | Elevated rocks. |
| Grassland | The small central hill with a tree. |
The snow and desert approach uses the same setup: gain height, give enemies time to gather, and commit your area attack when they are clustered. The grassland hill provides another position for that approach.

STEP 1/4
25%
Climb above the approaching enemies

On snowy terrain, climb onto your chosen perch and wait for enemies to gather around it before activating Shockwave V.
STEP 2/4
50%
Wait at the tree’s edge
On the tree, move to the edge and let enemies spawn and group below. Enemies caught on obstructions can find a route around them, so allow them time to join the cluster.
STEP 3/4
75%
Drop into the grouped enemies

Once the group has gathered, jump off the branch and activate Shockwave V.
STEP 4/4
100%
Finish the remaining enemies
Use sickle attacks against survivors; the Z move provides an area attack.
Ending a run and spending dungeon rewards
Death ends the run and returns you to the Ouwigahara spending area. The end screen shows your reached floor and elapsed time.
| Reward or service | Location and cost |
|---|---|
| Mastery levels | Tower Crystal in EXP AREA: 3,000 Tower Points per level for any owned weapon or power, regardless of its normal XP curve. |
| Experience exchange | Tower Crystal in EXP AREA offers a separate points-for-XP option. |
| Accessories | Purchasable in the reward hub, with randomized stock. |
| Wen and refinement ore | Changer Zeni in WEN AREA: select the desired exchange item from the shelf. |
| Ouwigahara Chest | Reward area: 20,000 points per opening, with possible materials and Mythic items. |
Accessory stock changes.
The hub also gives you access to the Nichirin Forge for weapon upgrades. Dungeon progression includes late-game weapon schematics as another reward objective, so mastery and shop purchases are only part of what you can work toward.
Damascus Sickles materials and weapon reforging
| Damascus Sickles requirement | Quantity or cost |
|---|---|
| Base Sickles | 1 |
| Metal Scrap | 500 |
| Mythic Ore | 10 |
| Silk Thread | 300 |
| Reforge fee | 90,000 Tower Points |
Damascus Sickles provide a concrete Tier 2 crafting goal. The base Sickles item can be upgraded into the Mythic version, and Blood Sickles are another upgrade option. Damascus variants share the stated material quantities and point fee, but that recipe does not apply to every Tier 2 weapon.
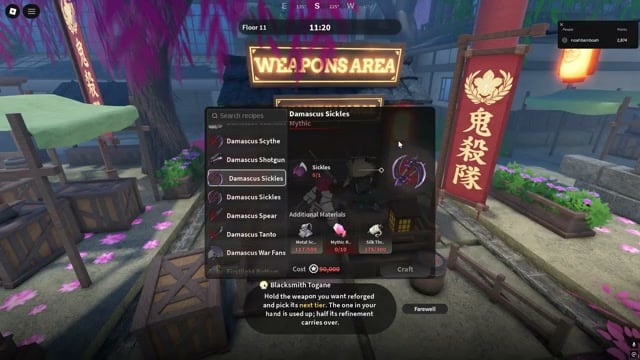
Mythic Ore costs 30,000 points each, making the ten-ore purchase a 300,000-point total. You can accumulate purchased materials across several runs instead of buying the full amount at once. Exchanging a Mythic item for one ore is another acquisition method.
Before committing to a reforge, decide which copy of the weapon you want to upgrade. Its existing refinement affects what you carry into the new tier.
At Blacksmith Togane in NICHIRIN FORGE, hold the intended weapon and select its next tier.
Build the material stock over several runs, then earn the reforge fee during the run in which you perform the upgrade. That separates the persistent collection work from the points needed at the forge.
Frequently Asked Questions
What happens if a dungeon boss ragdolls into the ground?
Bosses frequently ragdoll and can become stuck in the ground, making your fight awkward to finish. After the milestone boss is defeated, you get four card selections.



Leave a Reply