
Palworld 1.0 still has several powerful tricks worth knowing, including a Global Palbox save exploit for free Pal consumables, a condenser exploit for free 4-star Pals, Lyleen cooldown resets for instant revives, and movement setups built around Croajiro, Valentail, anti-gravity gear, and grappling.
The 1.0 World Tree Update reworked a huge amount of the game, but it didn’t scrub out every quirk. What follows is a mix of save-state exploits, normal mechanics most players walk right past, and one pure joke, all pulled together so you can grab the one you actually need.
- A quick scan of every Palworld trick
- How to duplicate Pal consumables with the Global Palbox in Palworld
- Faster Pal revives and Lyleen’s cooldown reset
- Stacking anti-gravity jumps with Valentail and belts
- Farming Technical Manuals by butchering Shadowbeak and Lyleen
- The Depresso hot spring detail
- Frequently Asked Questions
A quick scan of every Palworld trick
| Trick | Use |
|---|---|
| Global Palbox consumable save trick | Exploit — recover spent consumables and Skill Implants |
| Condenser 4-star clone | Exploit — free 4-star Pals for raids and expeditions |
| Lyleen Harvest Goddess reset | Mechanic — unlimited instant party revives |
| Croajiro tower climb | Movement — early portal and Sunreach access |
| Anti-gravity jump stacking | Movement — massive vertical jumps |
| Grapple jump gliding | Movement — long horizontal travel |
| Shadowbeak and Lyleen butchering | Farm — passive Innovative Technical Manuals |
| Viewing Cage merchants | Setup — trading without base Pal slots |
| Depresso hot spring | Cosmetic — Easter egg |
The two Global Palbox methods at the top are exploit-style tricks that lean on how the game saves, so treat them as things that could be patched at any point — everything below them is standard, intended play.
How to duplicate Pal consumables with the Global Palbox in Palworld
Set the auto-save interval to 30 minutes

Open world settings, go to custom settings, and drag the Auto save interval slider from its default all the way to 30 minutes so nothing saves mid-process.
Place a Global Palbox

Drop a Global Palbox in your base — it keeps a completely separate inventory from your regular boxes, which is the quirk the whole trick relies on.
Use your consumables on a Pal
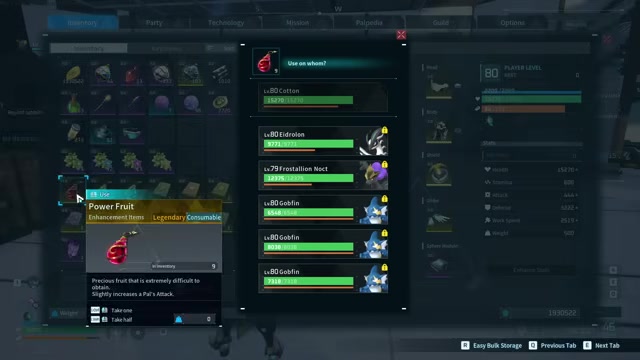
Feed Starfruit, power fruits, awakening crystals, or a Disposable implant to any Pal — here it’s a Frostallion Noct that ends up awakened.
Move the upgraded Pal into the Global Palbox

Drop the now-upgraded Pal into the Global Palbox specifically, not one of your regular boxes.
Force-close the game without saving

Use Alt+F4 or kill it from Task Manager (restart the device on console) — do NOT hit Return to Title, which would save your progress.
Reload and check the Global Palbox

Your spent consumables are back in your inventory, and the upgraded Pal is waiting in the Global Palbox — cloned, with the investment kept.
Cloning free 4-star Pals through the condenser in Palworld
The same Global Palbox quirk lets one existing 4-star Pal upgrade a 0-star copy without being consumed, so you can chain it into a full raid or expedition team.
- Set up a Global Palbox and condenser — Place a Global Palbox with a condenser next to it, and have one 4-star Pal plus a matching 0-star target ready.
- Store your 4-star Pal in the Global Palbox — Drop the original 4-star Pal into the Global Palbox before you touch the condenser.
- Condense the 0-star using the stored Pal — At the condenser, pick your 0-star Pal and pull the 4-star from the Global Palbox as fuel — it jumps from 0 to 4 stars in one go.
- Retrieve the original from the Global Palbox — The 4-star you just “spent” is still sitting in the Global Palbox, so you now have two identical 4-star Pals.
- Repeat with fresh 0-star copies — Feed each newly created 4-star into the next 0-star and repeat as often as you like, which is how you build a raid team or a 100-Pal expedition army for nothing.
Video help
Faster Pal revives and Lyleen’s cooldown reset
| Revive method | How fast |
|---|---|
| Palbox recovery | Automatic over ~10 minutes |
| Ancient bed rest | Near-instant, whole party, once per day |
| High-quality bed (place Pal on it) | Cuts the recovery timer sharply |
| Lyleen Harvest Goddess cycling | Instant and repeatable, no cooldown |
A downed Pal dropped into the Palbox heals up on its own, but ten minutes is a long time to wait mid-raid. Beds are the quick fix most people know: an Ancient bed (the top-tier one) revives your whole resting party near-instantly once a day, and laying a downed Pal directly on a high-quality bed slashes the recovery timer even after you’ve used the daily rest.
The real workhorse is Lyleen and her Harvest Goddess partner skill, which revives your downed party like you’re mounting her. On its own it sits on a five-minute cooldown — but that cooldown can be wiped instantly, turning it into an unlimited revive you can spam party by party through an entire raid wipe.
Cycle Lyleen in and out of the Palbox after every Harvest Goddess to clear its cooldown — it’s a no-cost, exploit-free way to revive your whole team wave after wave.
Climbing Faybreak Tower early with Croajiro
This is a niche speedrunning move that bounces you up the outside of a boss tower to reach its portal long before you’re meant to.
- Summon Croajiro at the tower base — Its bounce ability launches you straight up with no Alarm Bell or special gear needed — just Croajiro itself.
- Bounce up and glide to a ledge — Bounce off Croajiro, then pop a basic glider to drift onto the next safe landing spot higher up the tower.
- Resummon and repeat upward — Pull Croajiro back out, bounce again, and slowly work your way up the exterior ledge by ledge.
- Take the portal at the top — The portal at the summit of Faybreak Tower is active even without beating the level-60 boss, so you can step through for early Sunreach access.
Stacking anti-gravity jumps with Valentail and belts
| Item or Pal | Effect |
|---|---|
| Anti-Gravity Belt | Reduced-gravity, floaty jumps |
| Valentail (Big Stretch) | Same float effect, stacks with the belt |
| Double or Triple Jump Boots | Extra jumps that refresh and extend the float |
If you want absurd vertical height — or just a cheap way to get around — a few pieces of kit stack into a genuinely floaty jump. The gravity-reducing effects don’t override each other: with only Valentail‘s Big Stretch passive you clear a set height, and adding the Anti-Gravity Belt sends you noticeably above that same line. The jump boots are what let you keep climbing, since each extra jump refreshes the floaty effect before it fades.
Grapple jumping for long horizontal travel
Combining the grappling gun with your extra jumps gives you a controllable long-distance glide, handy on the high-level oil rigs where verticality and anti-air defenses make flying mounts a bad idea.
- Shoot the ground with the grappling gun — Fire the Hyper Grappling Gun at the floor ahead of you to build forward momentum.
- Jump to cancel and keep momentum — Tap Space to interrupt the grapple — the forward speed carries over instead of dumping you on the spot.
- Use extra jumps to steer or extend — Extra jumps push you further and let you change trajectory in mid-air.
- Glide to your target — Pop the glider once you’re set, riding the built-up momentum across the gap.
Farming Technical Manuals by butchering Shadowbeak and Lyleen
| Pal | Drop |
|---|---|
| Shadowbeak | Innovative Technical Manual |
| Lyleen | Innovative Technical Manual |
Both Shadowbeak and Lyleen are strong butcher targets because each has roughly a 10% chance to drop an Innovative Technical Manual — the consumable that hands you technology points, often several per manual. Keep one of them breeding in your base and you’ve got a passive, long-term supply to chip away at the full tech tree; just butcher the spare offspring whenever you swing by.
Setting up caged merchants for slot-free trading
Housing your merchants in a Viewing Cage lets you trade with all of them at once without any of them eating your limited active base Pal slots.
- Place your merchants in a Viewing Cage — Drop every merchant you want into a single Viewing Cage so they’re not scattered on sandbags and hard to reach.
- Position the cage against a wall — Set the cage close enough to a wall that you can get into a climbing stance against the glass.
- Climb the wall and jump inside — Climb the wall, press toward the glass, and hit Space to drop straight into the cage.
- Trade with the merchants — Walk up to any merchant inside and buy or sell freely, with none of them taking a base slot.
- Teleport to your base to leave — Since you’re already inside your own base, just fast-travel to the base itself and you’ll load back in outside the cage.
The Depresso hot spring detail

One last one for fun: assign a Depresso to a hot spring or hot tub and it flops face-down in the water like it has given up entirely. It fits the name perfectly, and that’s the whole thing — no hidden bonus, just a grim little sight gag.
Frequently Asked Questions
Does the Global Palbox consumable trick still work in Palworld?
Yes — it still functions after this week’s patch on the current 1.0 build. It’s clearly unintended, though, and exploits like this are exactly the kind that get closed in a later update, so use it while it’s live rather than counting on it long-term.
Can the free 4-star Pal condenser trick be patched out?
Almost certainly. It leans on the same Global Palbox save quirk as the consumable trick, so if one gets fixed the other likely goes with it. Older Early Access duplication glitches have already been closed off, so treat this as a limited window and clone what you need now.
Do Skill Implants work with the consumable save trick?
They do — anything classed as a Pal consumable qualifies, including awakening crystals and a legendary Disposable implant like Remarkable Craftsmanship. Normally Skill Implants come from high-level dungeons, late-game bosses, rare chests, and quest rewards, so the trick is really about refunding the ones you already own after using them.
How do you reset Lyleen’s Harvest Goddess cooldown?
Put Lyleen back into the Palbox right after using Harvest Goddess, then pull her out again — she redeploys with the cooldown fully cleared, so you can trigger it back-to-back. It even works on a low-level, non-condensed Lyleen, since it’s her base partner passive doing the work rather than anything star-gated.
What gear do you need for the anti-gravity jump setup?
Keep Valentail in your party, wear the Anti-Gravity Belt, and equip Double or Triple Jump Boots — the three together produce the big jump. Worth knowing: you don’t need to raise Valentail’s Big Stretch style level for it to help, because the floaty movement is active at its base passive.






Leave a Reply