The first custom ROM has been released for the LG Nexus 4, Google’s high and might Nexus smartphone, and about time too. The phone has been out in the market for a week now, and hacks that act as a precursor to custom ROMs, such as a custom recovery, root, and a bootloader unlock, have all been done in the past few days.
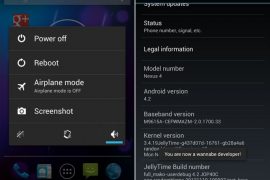
The ROM, called JellyTime, has been developed by XDA Recognized Developer randomblame. The ROM is rooted by default like all custom ROMs are, and includes other features such as an updated kernel, extended power menu with screenshot and reboot buttons, and also a Quick Settings tile (in the status bar) for toggling auto-rotate on the display.
Not too many features, but at this early stage of development, we can’t really expect any more, and will have to wait for ROMs like CyanogenMod or AOKP to get extensive customization options. With JellyTime ROM, the custom ROM action has finally begun for the Nexus 4, and hopefully we’ll see more and more ROMs come out soon.
To try out JellyTime ROM on your Nexus 4, just follow the guide below that will take you through the procedure with step-by-step instructions. Keep in mind that flashing a custom ROM requires unlocking the bootloader on the phone, which wipes all the data off the phone, so you will need to take a backup of everything before you proceed.
Let’s take a look at how the ROM can be installed.
Compatibility
The procedure described below is only for the LG Nexus 4. Do not try it on any other device.
Warning!
The methods and procedures discussed here are considered risky, so try them out at your own risk, and make sure to read each step carefully before attempting anything. We will not be held responsible if anything goes wrong.
How to Install JellyTime ROM on Nexus 4
- The procedure to install the ROM involves unlocking the bootloader on the device, which will wipe everything on the device, including everything on your internal storage. First, backup installed apps and personal data such as contacts, messages, bookmarks, etc, by referring to our Android Backup Guide for help. Then, copy everything from the SD card to your computer, which will also include the apps and data you backed up.
- The phone’s bootloader will need to be unlocked to flash the ROM. You can unlock the bootloader on your Nexus 4 by following the guide → here. Make sure you took a backup in step 1 as this will wipe all data from the phone and reset it to factory settings. Skip this if you already have the bootloader unlocked.
- You should have ClockworkMod (CWM) recovery installed on your phone to install the ROM. If not, follow this guide to install it on your Nexus 4.
- Download the latest build of the ROM from the source page.
- Also download the Google apps package using the link below. AOSP ROMs do not contain Google apps like Gmail, Talk, YouTube, Search, etc by default, so you will need to install the Google apps package as well.
Download Google Apps | Filename:4.2_gapps-jb-20121119.zip - Copy both the ROM and Google apps files (copy the files, don’t extract them) to the phone.
- Reboot the phone into CWM recovery. To do that, turn off your phone and boot into the bootloader mode using the button combination given in step 9. Then, using the volume buttons, scroll to the Recovery mode option, then select it using the power button to reboot the phone into CWM recovery.
- Now, you should make a backup of your currently installed ROM. This is a backup of the whole ROM and will restore the phone to the state it was in before you flash the new ROM, unlike the backup in step 1 which only restores apps and personal data. To take a backup, select Backup and Restore,then select Backup again. Go back to main recovery menu after backup is complete.
- Select wipe data/factory reset, then select Yes on next screen to confirm. Wait a while till the data wipe is complete (this will only wipe installed apps and settings, but will not wipe files on the SD card).
- Select install zip from sdcard, then select choose zip from sdcard. Scroll to the ROM file and select it. Confirm installation on the next screen.
- After ROM installation completes, select choose zip from sdcard again, then select the 4.2_gapps-jb-20121119.zip file to install the Google apps package.
- After the installation is complete, go back to the main recovery menu and select reboot system now to reboot the phone and boot up into JellyTime ROM. The first boot will take a few minutes, up to 5-7 minutes.
NOTE: If you want to go back to your previous ROM, boot into recovery (see step 7), select backup and restore, then restore your previous ROM by selecting it from the list.
JellyTime ROM is now installed on your Nexus 4. Have fun, and do let us know how it works!


